How to Upload Photos from Mac Photos App to Facebook [Easy Guide]
TL;DR:
Want to easily upload photos from Mac to Facebook? This guide walks you through simple methods to share your pictures quickly and effortlessly.
- Upload photos using the Mac Photos app for fast sharing.
- Use a web browser to post pictures directly to Facebook.
- Drag and drop images from Finder for quick uploads.
- Sync and download photos via iCloud before uploading.
- Transfer iPhone photos to Mac using MobiKin Assistant for iOS before sharing.
iPhoto is a legacy photo management app on Mac that helps users store and organize their pictures. Today, most Mac users rely on the built-in Photos app to manage their images more efficiently. Facebook is a popular social networking platform that allows users to share photos and life updates with friends, family, and colleagues around the world.
Many users want to upload photos from Mac to Facebook to easily share their memories online, but they may not be familiar with the exact steps. In this article, we will show you several simple and effective ways to upload photos from Mac to Facebook step by step.
- Part 1: Why Upload Photos from Mac to Facebook?
- Part 2: Upload Photos from Mac to Facebook Using Photos App
- Part 3: Upload Pictures from Mac to Facebook via Web Browser
- Part 4: Upload Photos from Mac Photos App to Facebook Using Finder
- Part 5: Upload Photos from Mac to Facebook Using iCloud Photos
- Bonus: Transfer iPhone Photos to Mac Before Uploading to Facebook
Part 1: Why Upload Photos from Mac to Facebook?
Uploading photos from Mac to Facebook has become a common way to share daily life, travel memories, and important moments with others. Compared with mobile devices, Mac computers offer a larger screen and easier file management, which makes selecting and organizing photos much more convenient.
Another reason is efficiency. When you have a large number of photos, especially from trips or events, uploading them from a Mac is usually faster and more stable than using a phone. You can quickly sort images, edit them if needed, and upload them in batches without repeated steps.
In addition, Facebook makes it easy to connect with friends, family, and colleagues. By uploading photos from Mac to Facebook, you can instantly share your experiences with people around you, no matter where they are. It is a simple way to keep your social circle updated and stay connected through visual memories. (iPhone Photos Not Showing Up on Mac?)
Part 2: Upload Photos from Mac to Facebook Using Photos App
The Photos app on Mac provides one of the simplest ways to upload and share pictures directly to Facebook. It allows you to select, organize, and post photos in just a few steps without needing to manually export files or use third-party tools. If your Mac is already synced with your photo library, this method can save you a lot of time.
Follow the steps below to upload photos from Mac to Facebook using the Photos app:
- Open the Photos app on your Mac and go to your photo library.
- Select the photos or album you want to upload. You can hold Command to choose multiple images at once.
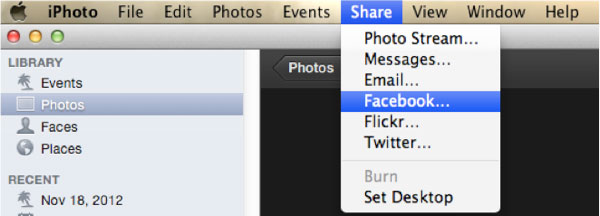
- Click the Share button (a square icon with an upward arrow) at the top of the window.
- From the sharing options, choose "Facebook".
- Log in to your Facebook account if prompted.
- Add a caption, select the destination (timeline or album), and click Post to upload your photos. (How to Transfer Photos from Mac to iPhone?)
Part 3: Upload Pictures from Mac to Facebook via Web Browser
If you prefer not to use the Photos app, another simple way to upload pictures from Mac to Facebook is through a web browser. This method works on any browser like Safari, Chrome, or Edge, and does not require any extra setup. It is especially useful if your photos are stored in folders on your Mac.
Follow the steps below to upload pictures from Mac to Facebook via a web browser:
- Open your preferred web browser on your Mac and go to Facebook.com.
- Log in to your Facebook account.
- On your homepage, click on "Photo/Video" or start a new post.
- Select "Upload Photos/Videos" and choose the images from your Mac. (How to Transfer Videos from iPhone to Mac?)
- You can also drag and drop photos directly into the post box.
- Add a caption, tag friends if needed, and adjust privacy settings.
- Click "Post" to publish your photos on Facebook.
Part 4: Upload Photos from Mac Photos App to Facebook Using Finder
Another simple way to upload photos from Mac to Facebook is by using Finder. This method is useful if your photos are already stored in folders on your Mac, instead of being managed in the Photos app. It allows you to quickly drag and drop images without opening any additional software.
Follow the steps below to upload photos from Mac to Facebook using Finder:
- Open Finder on your Mac and locate the folder where your photos are stored.
- Select the images you want to upload. You can hold Command to select multiple files at once.
- Open Facebook in your web browser and go to the post creation area.
- Drag the selected photos from Finder directly into the Facebook post box.
- Wait for the images to upload completely.
- Add a caption, adjust privacy settings if needed, and click "Post" to publish.
Part 5: Upload Photos from Mac to Facebook Using iCloud Photos
If your photos are stored in iCloud, you can easily access them on your Mac and then upload them to Facebook. This method is especially useful if you use multiple Apple devices, as iCloud keeps your photos synced automatically across your iPhone, iPad, and Mac.
Follow the steps below to upload photos from Mac to Facebook using iCloud Photos:
- Open a web browser on your Mac and go to iCloud.com, then sign in with your Apple ID.
- Click on "Photos" to view your iCloud photo library.
- Select the photos you want to upload and download them to your Mac.
- Once downloaded, open Facebook in your browser and log in to your account.
- Click "Photo/Video" in the post section or create a new post.
- Choose the downloaded images from your Mac and wait for them to upload.
- Add a caption or description, then click "Post" to share your photos.

Bonus: Transfer iPhone Photos to Mac Before Uploading to Facebook
Many users take photos on their iPhone first and later want to upload them from Mac to Facebook. In this case, the first step is to transfer photos from iPhone to Mac so you can manage and upload them more easily. A helpful tool for this process is MobiKin Assistant for iOS, which allows you to quickly move photos and other data from iPhone to computer with a simple workflow.
Key Features of Assistant for iOS:
- Transfer photos from iPhone to Mac or PC easily.
- Selectively export specific photos instead of full backup.
- Preserve original photo quality during transfer.
- Preview photos before exporting.
- Support managing multiple types of iOS data, including photos, videos, music, contacts, SMS, etc.
- Be compatible with all iPhone models, including iPhone 17/16/15/14/13/12/11/X/8/7/6.


How to Back Up iPhone Videos with MobiKin Assistant for iOS:
Step 1: Download and install the software on your computer. Once the installation is complete, launch the program. Connect your iPhone to the Mac using a USB cable. Make sure your device is unlocked, and tap "Trust This Computer" if prompted.

Step 2: After the device is successfully detected, click the "Photos" tab from the left sidebar in the software interface. You will be able to browse all photos stored on your iPhone. Select the images you want to transfer. You can choose multiple photos at once for batch export.
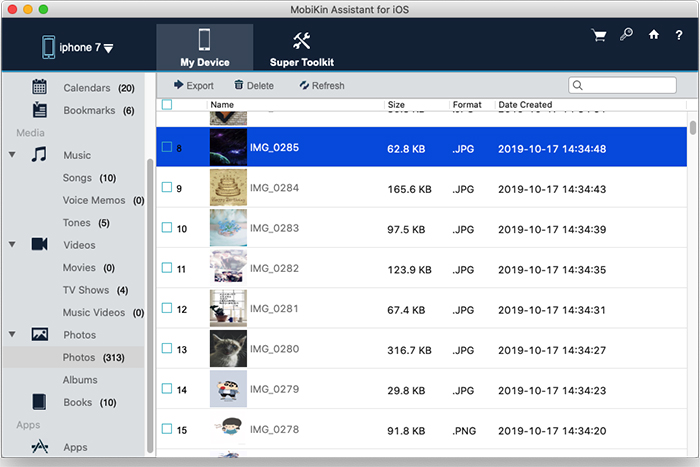
Step 3: Click the "Export" button and choose a destination folder on your Mac to save the photos. The transfer process will start immediately. Once it is finished, open the selected folder to check and confirm that all photos have been successfully transferred.
Video Guide:
Summary
In conclusion, uploading photos from Mac to Facebook is simple and can be done in several ways, including the Photos app, web browser, Finder drag-and-drop, and iCloud Photos. Each method is easy to follow and suits different user habits. If your photos are stored on iPhone, you can first transfer them to Mac using MobiKin Assistant for iOS. After that, sharing your memories on Facebook becomes quick, smooth, and hassle-free.
Related Articles:
Top 9 Photo Manager Apps for iPhone in 2026
11 Ways to Fix Photos Disappeared from iPhone after Update
