How to Delete Snapchat History on iPhone 14/13/12/11/X/8/7 Permanently?
Snapchat is one of the leading social media platform on the Internet, which allows users to share photos and videos more conveniently and novell than on Facebook or Instagram. So it has received a warm welcome from all kinds of people. However, since over 4 million Snapchat usernames and phone numbers have been leaked out due to security breach in the past years, more and more iPhone users wish to know the way to clear their iPhone Snapchat history after using it, so that they'll never worry about the data leaking out issue in the future. But obviously, lots of users can't find a proper solution by themselves.
Can't Miss: How to Erase Privacy Info from iPhone 7/6S/6/5S
Undoubtedly, privacy issue has always been a big and serious issue on the Internet, so if you're a Snapchat user, and wish to delete Snapchat conversation, including messages, photos, videos, etc., then you've been the right place. In this page, we'll show you how to permanently delete Snapchat history on iPhone 7/6S/6/5S/5, you can follow the below solutions to achieve your goal.
How to Clear Snapchat History on iPhone 14/13/12/11/X/8/7 Manually?
Generally speaking, Snapchat provide users with the history clearing feature, so you can use it to delete iPhone Snapchat history timely. But you should to note that this kinds of deletion cannot ensure the history will be restored by professional recovery software or technical team. So if there is something you don't want others know in any method, you'd better to go to the next solution to clear the iPhone Snapchat history permanently.
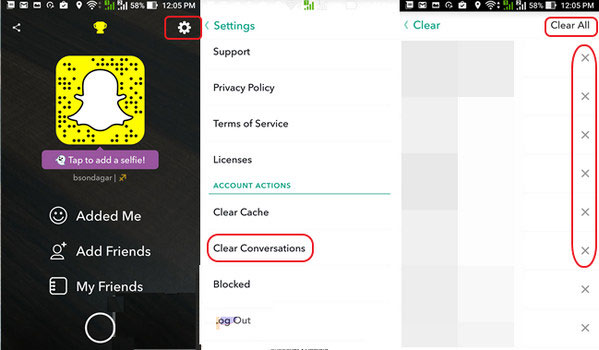
Step 1. Launch the Snapchat app on your iPhone and tap on the "Settings" icon.
Step 2. Find the "Account Action" and select "Clear Conversation". After that, you can delete the history one after one.
Step 3. If you need to delete all history on iPhone, then you don't need to delete them one by one. You can choose the function of "Clear All" to remove all Snapchat history on iPhone as you like.
How to Completely Erase Snapchat History on iPhone?
When you're going to permanently wipe something from iPhone device, then a simple deletion cannot achieve your goal. You need to find a professional data eraser for iPhone, that's why MobiKin Eraser for iOS is strongly recommended here. With it, you can choose to wipe the iPhone Snapchat history selectively or in a batch, and the deleted data will never be restored by any kinds of program on the market. Cool, right? Now, just follow the below instructions to begin your whole process.


Step 1. Connect your iPhone 7/6S/6/5S/5 to the computer with USB cable, then launch the program. This tool will detect your device and show it as below:
Step 2. Choose "Erase Private Data" in the left panel, then click "Scan" button to conduct a deeply scanning on your iPhone.
Step 3. When the scanning is finished, you can choose the data you wish to erase, and tick them one by one. After that, you can click "Erase Now" button to confirm the erasing.
Related Articles:
How to Erase iOS Notifications Permanently
3 Solutions to Restore iPhone/iPad from Backup (98% Success Rate)
iPhone Music Transfer: How to Transfer Music from iPhone to Computer Freely?
How to Transfer Contacts from iPhone to Computer?
How to Transfer SMS (Text Messages) from iPhone to Computer?
