[Simple Guide] How to Deauthorize iTunes on an Old or Dead Computer?
If you've tried transferring purchased music from an old computer to a new one, you might have run into this problem: some songs won't play because they were purchased with an iTunes account that has already reached the 5-computer authorization limit. This often happens when old computers are dead or no longer accessible. To avoid losing years of music, you need to deauthorize the iTunes account on the old device and then authorize it on your new computer.
This article will show you two effective ways to deauthorize iTunes on an old or dead computer, helping you safely transfer your music.
Part 1: What is iTunes Deauthorization?
iTunes authorization is a type of Digital Rights Management (DRM) used by Apple to protect purchased content, such as music, movies, TV shows, books, and other media files. By authorizing a computer with your Apple ID, you can access and play purchased content on that device. (How to Transfer Music from iPhone to iTunes?)
However, Apple only allows each Apple ID to authorize up to five computers at the same time. Once you reach this limit, you won't be able to authorize a new computer unless you first remove authorization from an old one. This process is called iTunes deauthorization.
Deauthorizing a computer disconnects it from your Apple ID and frees up one of your available authorization slots, allowing you to authorize another device.
You May Also Want to Know:
Part 2: When Should We Deauthorize iTunes?
Besides transferring data from an old computer to a new one, there are several situations where you may need to deauthorize your iTunes account, including:
- Before installing or reinstalling a new version of iTunes;
- Before giving away, recycling, or selling your computer;
- Before upgrading or replacing your computer hardware;
- When you no longer use the purchased iTunes content on a device;
- When your old computer is lost, broken, or no longer accessible.
Before taking these actions, it is recommended to deauthorize iTunes on the old computer first. This can help protect your personal information, avoid authorization limits, and ensure your purchased content remains accessible on your new devices.
Part 3: How to Deauthorize iTunes on an Old Computer?
In this section, we will introduce two effective ways to deauthorize an iTunes account on an old computer. You can either deauthorize a single computer or remove authorization from all computers linked to your Apple ID, depending on your situation.
1. Deauthorize iTunes on a Mac or PC
If you still have access to the old computer, you can directly deauthorize it through iTunes. The process only takes a few seconds.
- Open iTunes on your Mac or Windows PC;
- From the top menu bar, click "Account > Authorizations > Deauthorize This Computer";
- Enter your Apple ID and password in the pop-up window;
- Click "Deauthorize" to confirm the action.
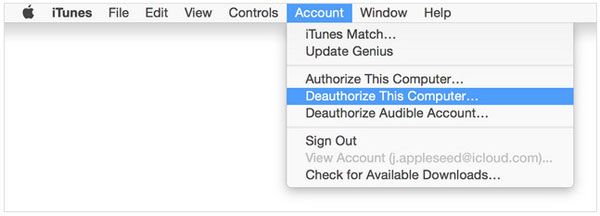
After that, the computer will no longer be linked to your iTunes account, and one authorization slot will be freed up. (Transfer Videos from PC to iPhone with iTunes)
2. Deauthorize All Computers on Your iTunes Account
If your old computer is lost, broken, or no longer accessible, you can remove authorization from all computers connected to your Apple ID at once.
Keep in mind that Apple only allows you to use the "Deauthorize All" feature once per year.
- Launch iTunes on your computer;
- Click "Account" and sign in with your Apple ID if you haven't already;
- Go to "Account > View My Account" (or "Account Info" in some versions of iTunes);
- Enter your Apple ID password when prompted;
- Scroll to the "Apple ID Summary" section and locate "Computer Authorizations";
- Click the "Deauthorize All" button;
- Confirm your choice in the pop-up window.
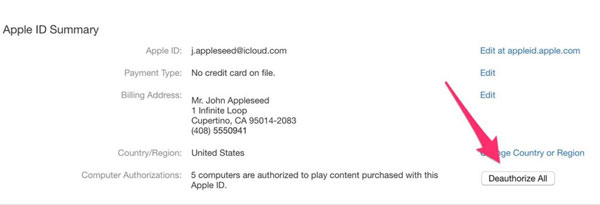
Once completed, all authorized computers will be removed from your Apple ID, and you can authorize your current devices again as needed.
Further Reading:
Part 4: Best iTunes Alternative for Managing and Backing Up iOS Data
After deauthorizing iTunes on an old computer, many users worry about losing purchased content, backups, or other important iOS data. Although iTunes can help manage Apple devices, it is often complicated and limited when it comes to transferring or organizing files. In this case, MobiKin Assistant for iOS (Win and Mac) can be a better alternative. This professional iOS management tool allows you to back up, transfer, restore, and manage iPhone, iPad, and iPod data easily on a computer without relying on iTunes.
Main Features of MobiKin Assistant for iOS:
- Back up iPhone, iPad, and iPod data to a computer with one click;
- Restore backups to iOS devices without overwriting existing data;
- Transfer contacts, messages, photos, videos, music, and more between iOS devices and computers;
- Preview and selectively export iOS files instead of restoring everything at once;
- Manage iTunes backup files directly on your computer;
- Fully compatible with most iOS devices and the latest iOS versions, including iPhone 17 and iOS 26.


How to Back Up and Manage iOS Data with MobiKin Assistant for iOS
Step 1. Download and install MobiKin Assistant for iOS on your computer. Launch the program and connect your iPhone or iPad with a USB cable. Tap "Trust" on your device if prompted.
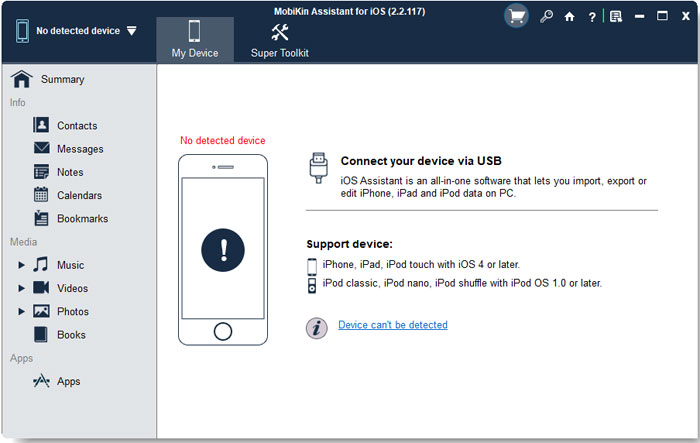
Step 2. Once the device is detected, you will see all iOS data categories displayed on the interface, including contacts, messages, music, photos, videos, books, and more.

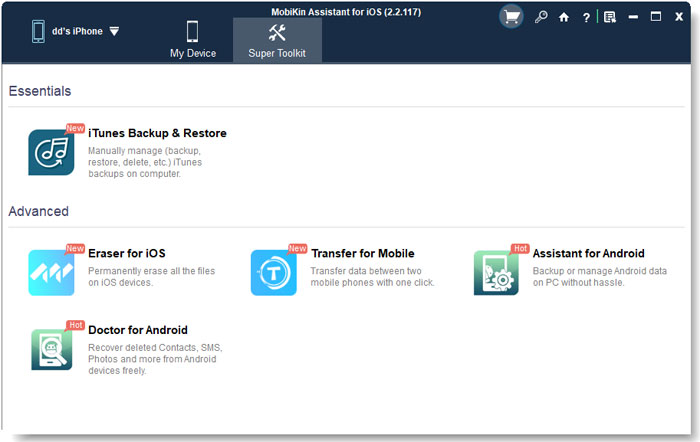
Step 3. To create a full backup, go to the "Super Toolkit" section and choose "iTunes Backup & Restore". Then select "Backup" and choose a location on your computer to save the files.
Step 4. If you only want to transfer certain files, choose a data category from the left panel, preview the files, and click "Export" to save them to your computer.

Step 5. After backing up or transferring your files, you can safely manage your iTunes library or move data to a new computer without worrying about authorization limits or data loss.
Video Guide:
Words in the End
Deauthorizing iTunes on an old computer is an important step when switching devices, selling a computer, or dealing with authorization limits. Whether you choose to remove authorization from one computer or all authorized devices, the process can help protect your account and free up available authorization slots for new computers.
To make iOS data management easier after deauthorization, you can also use MobiKin Assistant for iOS to back up, transfer, and organize your files without relying completely on iTunes.
Related Articles:
[2026] How to Sync iPhone to a New Computer without Erasing
[Solved] Recover Data from iPhone Disabled Connect to iTunes
