2 Ways to Delete Ringtone from iPhone 14/13/12/11/XS/XR
When you get an iPhone, there will be some built-in ringtones on your iPhone. If you don't like built-in ringtones, you can add a list of third-party ringtones from iTunes or other sources. But sometimes, you may purchase and download the wrong ringtones; or you may want to delete the ringtones you rarely use on your iPhone; or you want to remove duplicate ringtones to free up more storage for the iOS 16 system upgrade; or you need to delete some ringtones when managing iPhone files. Anyway, you need to delete ringtone from iPhone now.
However, iPhone does not have the option to remove the added ringtones. So how do you delete the added ringtone from the iPhone? Frankly, these issues are familiar to everyone, and we all want to find a super easy way to remove ringtones from the iPhone. In fact, users can rely on iTunes to get rid of ringtones on iPhone 14/13/12/11/XS/XR. You can also easily delete ringtones from iPhone permanently using third-party tools. This page will focus on these two ways to remove ringtones from your iPhone.
Way 1: Delete Ringtones from iPhone with iTunes (Recoverable)
iTunes is the primary tool used by Apple users to manage Apple device files. iTunes is freeware and it also allows you to remove ringtones from your iPhone 14/13/12/11/XS/XR/XS Max/XR/X/8/8 Plus/7/6S/6. Here are the steps on how to delete ringtone from iPhone using iTunes.
Step 1. Launch the latest version of iTunes on your computer and connect your iPhone to your computer. The connected iPhone will automatically connect to iTunes.
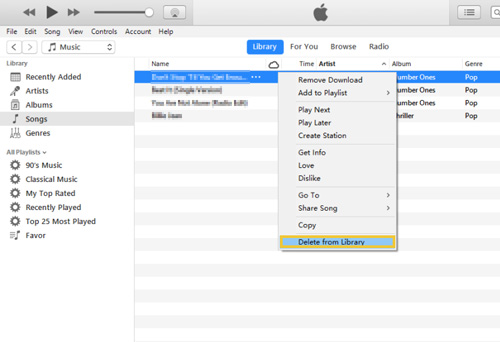
Step 2. Click on your iPhone icon and find "Tones" under "Devices" to find all ringtones. Select the ringtones you want to delete and right-click to select "Delete from Library".
Step 3. Repeat the above steps to remove all ringtones you don't need on your iPhone.
Disadvantages:
1. When you delete a ringtone from your iTunes library, you will notice that your iPhone will also be synced. That is to say, after completing the above steps, the ringtones of both iTunes and PC will be deleted. You cannot keep a copy on either party.
2. Using iTunes to delete ringtones on your iPhone doesn't really make these ringtones disappear. This means that if you use the professional iPhone data recovery tool, these "deleted" ringtones will be restored again.
If you only need to remove ringtones on your iPhone to save space and want these ringtones to be permanently deleted, try a more professional tool like below:
Way 2: Permanently Remove iPhone Ringtones with iOS Data Eraser(Unrecoverable)
If you don't want to delete iPhone ringtones through iTunes, another great utility that you can use in deleting ringtone from iPhone and iPad is MobiKin Eraser for iOS (Windows/Mac). This program is specially designed to help Apple users to erase iOS devices' files permanently in an easy way. After the erasing process, all added ringtones would be wiped out and can't be recovered any more. This software is compatible with almost all generations of iPhone, iPad and iPod, such as iPhone 14/14 Pro/14 Pro Max/14 Plus, iPhone 13/13 Pro (Max)/13 mini, iPhone Xs/Xs Max/XR, iPhone X/8/8 Plus, iPhone 7/7 Plus, iPhone 6s/6s Plus, iPhone 6/6 Plus, iPad Pro, iPad Air, iPad mini, iPad 2, etc.
Apart from ringtones, this all-in-one iOS data eraser also allows you to permanently delete other file types from your device, including contacts, messages, photos, videos and many more. Free download the program and follow the steps below to remove unwanted ringtones from iPhone in batches.


Step 1. Connect your iPhone to computer
Launch the installed Eraser for iOS on your computer and then link your iPhone or iPad to the computer via the USB cord. Once connected, you will find the basic information of your iPhone displayed on the main interface.
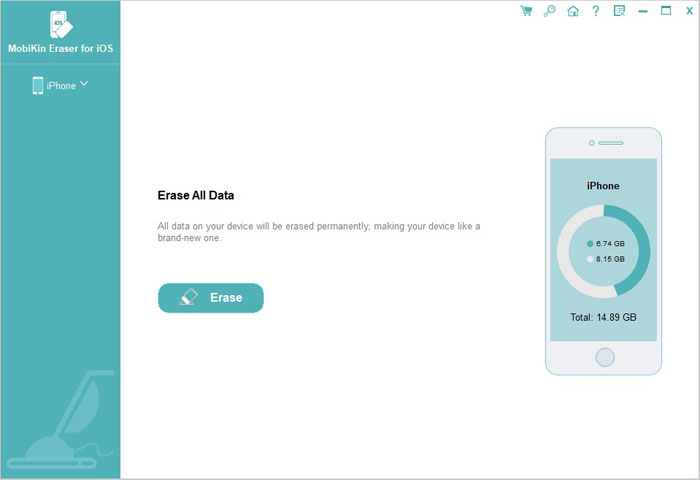
Step 2. Select security level you need
Just tap on "Erase" button on the interface to proceed to the next step. After that, you will be allowed to choose a security level you need by clicking on "Medium", which will bring out a window for you to choose a level: Low - Medium - High.

Step 3. Start to delete ringtone from iPhone
Choose the right erasing mode according to your need and type in "Delete" in the input box. Finally, tap on "Erase" button and the program will begin to erase the connected iPhone or iPad.
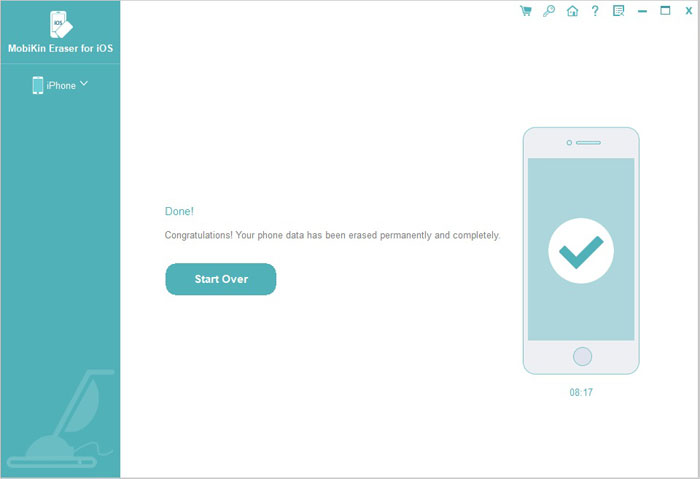
Please do not plug out your device during the erasing process and when the erasing process ends, your iPhone will be restarted.
Bonus: Back up iPhone Ringtones before Deleting
Sometimes, you may have deleted your favorite ringtones for mistakes on your iPhone. With such an accident in mind, you'd better get into the habit of frequently backing up ringtones on your iPhone. Then this MobiKin Assistant for iOS software comes to my strongest recommendation. It can do you a great favor to transfer ringtones, as well as contacts, messages, photos, videos, and many more from iPhone to computer for backup. It also works on all generations of iPhone, iPad and iPod devices.
Here is how to use Assistant for iOS to back up iPhone ringtones:
Step 1. First of all, download the right version of this software on the computer:


Step 2. Launch the installed software on the computer and get your iPhone connected to the computer via the USB cord. Follow the pop-up instructions on the program interface to make the program detect the connected iPhone. Then, you will get a program screen like this:

Step 3. This software will scan for all files saved on the device automatically. On the interface, you can see all the file types, including the Contacts, Messages, Notes, Calendars, Bookmarks and etc are displayed on the left side bar.
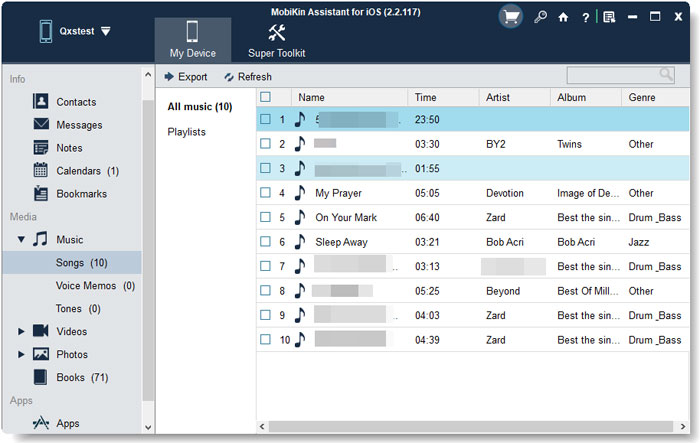
Step 4. Turn to the media section on the left side menu and click "Music" > "Tones". Then, tick off the ringtones that you want to save on your computer and click "Export" button on the top menu. After that, all your selected ringtones will be transferred from your iPhone to computer.
Bottom Line:
Above we introduced two ways to delete ringtones from iPhone. As you can see, no matter which method you choose, you can quickly and easily achieve the goal of deleting iPhone ringtones. Do you think this information is helpful to you? If so, don't forget to share this article with other friends who need help.
Related Articles:
Different Ways to Delete Music from iPod touch or classic
Quick Fix: How to Delete Gmail Account on iPhone
Can I Delete Songs from iPhone But Keep Them on iTunes? Of Course You Can!
