
iTunes File Sharing: What It Is, How to Use It and Best Alternative
TL;DR:
iTunes File Sharing offers a traditional way to move documents between supported apps and your PC or Mac, but it is not always the most convenient option for modern users. In this article, we will explain its core function and explore practical ways to use it efficiently:
- Understanding how iTunes File Sharing works and what it is used for.
- A simple guide to transferring files step by step.
- A reliable alternative that makes file sharing easier and more flexible.
The updates of iTunes often bring useful features to improve file management and user experience. One of these features is iTunes File Sharing, introduced in iTunes 9.1 and later versions. Although it has been available for many years, many users are still not familiar with how it works, which leads to underuse of this practical tool. This article provides a clear and detailed explanation of iTunes File Sharing to help users better understand and make full use of it.

Part 1: What Is iTunes File Sharing?
As its name suggests, iTunes File Sharing is a feature that allows users to transfer files between a computer and supported apps on an iPhone, iPad, or iPod touch (How to Transfer Files from iPhone to Computer). It is mainly used to move documents and app-related data without affecting the overall device content. (iPhone Not Syncing with iTunes?)
This feature offers several advantages:
- It provides a simple and fast way to transfer files between devices.
- The original file quality is preserved during transfer.
- Users can choose specific files instead of performing a full sync.
- It supports selective file management for compatible apps.
- File metadata is generally maintained during the transfer process.
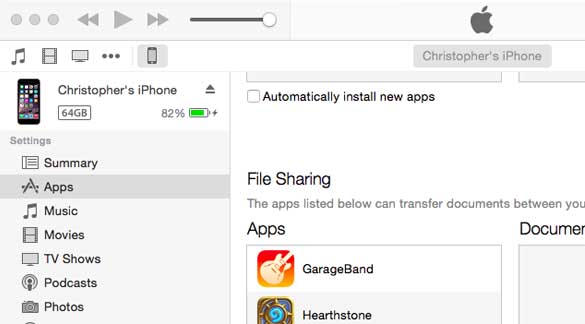
To use iTunes File Sharing, you need to connect your iOS device to a computer using a USB cable. Then open iTunes and select your device. Go to the Apps section, scroll down to the File Sharing area, and you will see a list of apps that support file transfer.
Please note that this feature is only available for apps that explicitly support File Sharing, and not all iOS apps or devices are compatible with it.
Part 2: How to Use iTunes File Sharing
Once you understand the benefits of iTunes File Sharing, you may want to try it yourself. The process is simple and allows you to transfer files between your computer and iOS device with ease.
Before you begin, make sure you are using a compatible system. You should have the latest version of iTunes installed, and your iPhone, iPad, or iPod touch should be running a supported iOS version. Your computer should also meet the basic requirements for running iTunes on either macOS or Windows.
Step 1: Connect your device
Use a USB cable to connect your iPhone, iPad, or iPod touch to your computer.
Step 2: Open iTunes and select your device
Launch iTunes. If it does not open automatically, start it manually. Click your device icon in the top menu or under the "Device" section. (iPhone Is Disabled Connect to iTunes?)
Step 3: Go to the Apps section
In the device summary page, click "Apps" in the left sidebar or top menu, then scroll down to find the File Sharing section.
Step 4: Choose an app that supports File Sharing
You will see a list of apps that support File Sharing. Select one app to view its documents and files.
Step 5: Transfer files
- To transfer files from iPhone to computer, simply drag and drop files to a folder on your computer, or click "Save To…" and choose a destination folder.
- To transfer files from computer to iPhone, drag files into the app's document area in iTunes, or click the "Add" button and select the files from your computer.
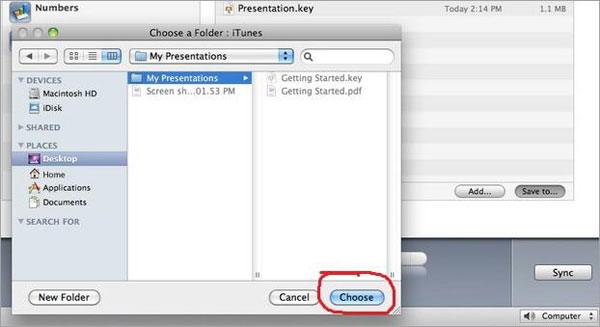
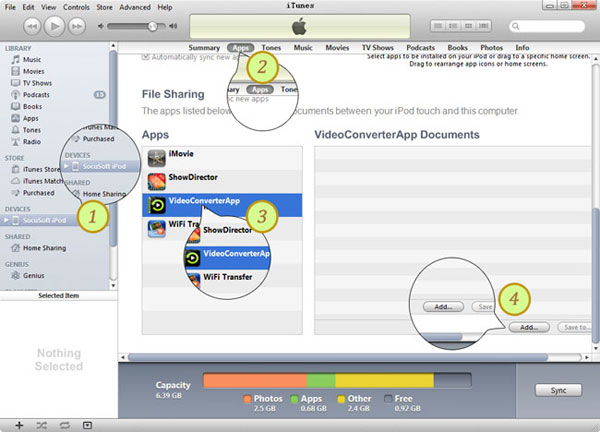
Once completed, the files will be available inside the selected app on your iOS device.
Part 3: The Best Alternative to iTunes File Sharing
When iTunes File Sharing feels limited or inconvenient, many users look for a simpler and more flexible solution. MobiKin Assistant for iOS is a powerful data management tool that provides an easier way to transfer, back up, and manage iPhone/iPad files on a computer without relying on iTunes. It is designed to make iOS data handling faster, safer, and more user-friendly.
Why Choose Assistant for iOS:
- Easily transfer files between iPhone/iPad and computer without using iTunes.
- Back up your iPhone data to computer or iTunes backup location with one click.
- Restore backups to your device whenever needed.
- Support multiple data types, including photos, videos, contacts, messages, and more.
- Allow selective file preview and export before transferring.
- Be compatible with overall iOS devices, including iPhone 17/16/15/14/13/12/11/X, etc.


How to Use MobiKin Assistant for iOS:
Step 1: Launch the software
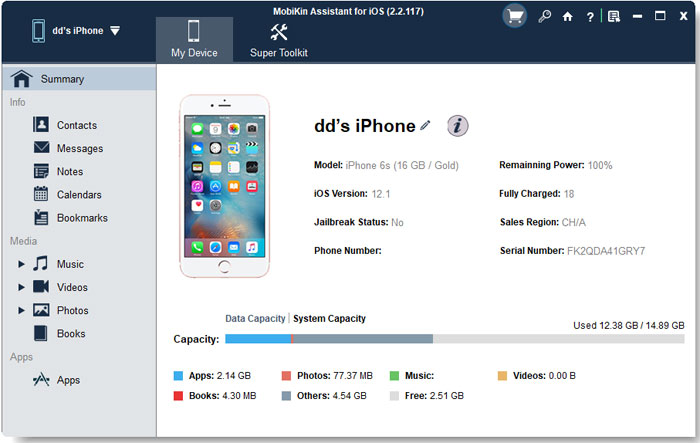
Install and run MobiKin Assistant for iOS on your computer. Use a USB cable to connect your iPhone or iPad to the computer. The software will detect your device automatically.
Step 2: Back up data to iTunes backup location
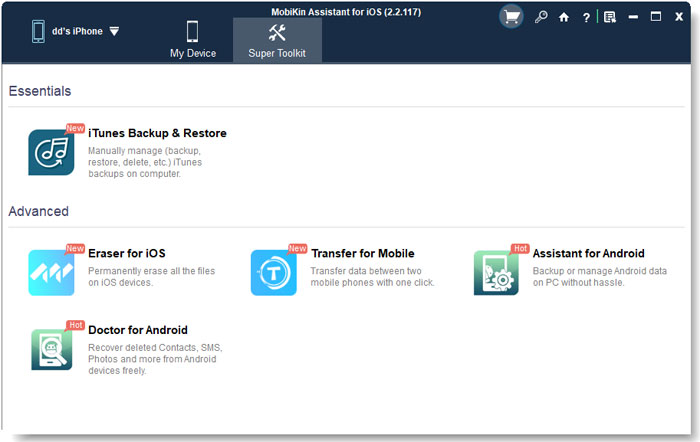
Click on Super Toolkit from the top of the main interface. Select iTunes Backup & Restore, then choose "Backup" to back up data to iTunes Backup Location or other folders on your computer to start the backup process.
Step 3: Restore data to your iPhone
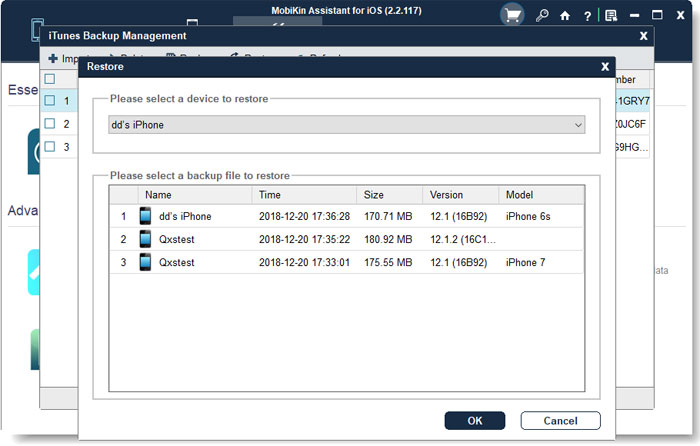
When needed, go to "Restore" to restore data back to your iPhone. Just select the backup file you want to restore.
Video Guide:
FAQs About iTunes File Sharing
Q1: Which apps support iTunes File Sharing?
Only apps that have enabled File Sharing support can be used. Common examples include document editors, media players, and productivity apps. Not all apps on iOS support this feature.
Q2: Is iTunes File Sharing still available on the latest iTunes?
Yes. iTunes File Sharing is still available on supported versions of iTunes and can be accessed through the device's Apps section when connected to a computer.
Q3: Why can't I see File Sharing in iTunes?
If File Sharing is missing, it may be due to:
- The connected app does not support File Sharing.
- iTunes is not updated.
- The device is not properly connected.
- You are using Finder on macOS Catalina or later instead of iTunes.
Q4: Why does iTunes File Sharing transfer fail?
Transfer failures may happen due to:
- USB connection issues.
- Outdated iTunes version.
- Insufficient device storage.
- File format incompatibility.
Using a different USB cable or updating iTunes usually resolves the issue.
Words in the End
In this article, we explained what iTunes File Sharing is, how it works, and how to use it step by step. We also introduced common problems and practical fixes, as well as a reliable alternative MobiKin Assistant for iOS for easier file transfer. We hope this guide helps you better understand iTunes File Sharing and manage your iOS files more efficiently.
Related Articles:
How to Sync iPhone to a New Computer without Erasing
[2 Ways] Transfer Music from iTunes to Flash Drive