Tips and Tricks for iTunes
As the most popular music software in iPhone apps, iTunes is the music player and manager which is developed by Apple and can be applied on computer. Apple funs love this application because it enable them to listen to and manage the music with powerful functions, but the more important reason for people to be attracted by it is that iTunes is also the backup tool for iOS users to backup files including settings, messages, camera roll, videos, etc. Here are some tips for iDevices users to make a better use of the iTunes.
![]()
Where Is iTunes Backup File Location on Windows/Mac?
The backup destination folder where you save the files depends on the operating systems of your computer, so please follow the steps below in order to find the target folder easily and quickly.
Note: Before that make sure that the backup folder is included in your data-backup routine.
![]() iTunes Backup File Location in Windows 8/7/Vista
iTunes Backup File Location in Windows 8/7/Vista
For Windows 8/7/Vista users: \Users\(username)\AppData\Roaming\Apple Computer\MobileSync\Backup\
You can also click the "Start" and then input "%appdata%" in the search bar and hit "Return" to get the access to the folder which stored the apps data.
![]() iTunes Backup File Location in Windows XP
iTunes Backup File Location in Windows XP
For Windows XP users: \Documents and Settings\(username)\Application Data\Apple Computer\MobileSync\Backup\
You can also find the application data folder directly by clicking the "Start" to select "Run", then typing the "%appdata%" and clicking "OK".
![]() iTunes Backup File Stored Folder on Mac
iTunes Backup File Stored Folder on Mac
For Mac users: ~/Library/Application Support/MobileSync/Backup/
PS: the "~" means your Home Folder, and just hold "Option" and click "Go" button if you do not find the Library in the Home Folder.
How to Change the iTunes Backup File Location in Windows?
The backup folder is usually in the hard disk C , so the backup files may occupy the space of the main computer hard driver. With time, the data will be more and more, which will waste the space. Of course it is easy for you to copy the files from the backup folder in system disk and paste on other space, but obviously it will be more convenient for you if you change the backup location, thus no matter how many files you backup, the hard disk C will not be influenced.
Steps to change the save path
First, stop the iTunes and make sure the iTunes does not work at the time.
Second, move the backup folder from C:\Users\(username)\AppData\Roaming\Apple Computer\MobileSync\Backup\ to the space you want to save, here take the "E:\Backup" as the example.
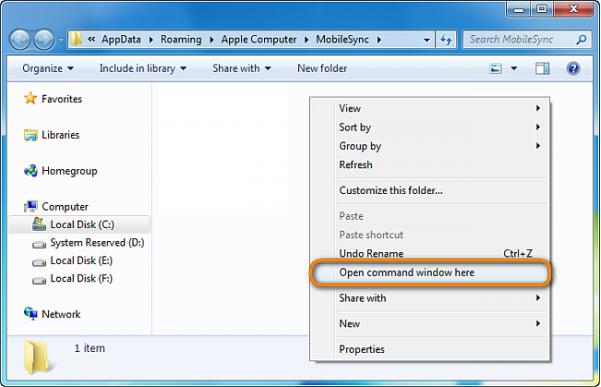
Third, open a Command Prompt window in the space that the backup folder originally saved. Just like the picture shows.
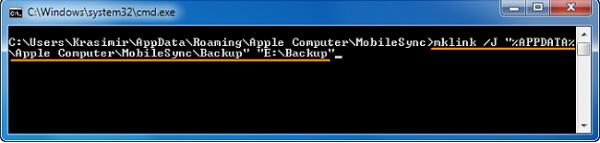
Fourth, create a junction point in the command window and change E: with your new location. And then type mklink /J "%APPDATA%\Apple Computer\MobileSync\Backup" "E:\Backup". By the way, type the command and not just copy it.
Fifth, then a new folder will appear in the original location after the command be executed. This folder functions as the shortcut to the new location.

This the "directory junction" and iTunes will not notice the backup location changed but the files will be saved in the new location.
Click here to see how to change iTunes Backup Location in Windows 10/8/7 in details >>
How to Use iTunes in the Cloud Under iTunes?
With iTunes in the Cloud, you can transfer a large quantity of files from the iTunes to the Cloud to free the space of the hard driver and you can easily re-download the files from the Cloud whenever you want. Thus it is a good backup tool for Apple users.
Enable iTunes in the Cloud
Step 1. Start the iTunes and open the "Preferences" .
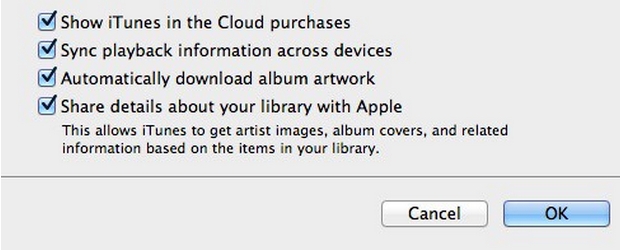
Step 2. Click "Store tab" and check the "Show iTunes in the Cloud purchases" as the picture shows
Download items from iTunes in the Cloud
Step 1. Run the iTunes in the Cloud and find the wanted items on the Cloud. Click the smallcloud icon to download them.
Step 2. Just click the "Download icon" button and now you finish the process.
Move downloaded items back to iTunes in the Cloud
Step 1. Launch the software and find the items that you downloaded from the Cloud and right click on it and select the deletion option.
Step 2. There will be a window popping up and click the "Delete Item" and uncheck the "Delete from iCloud" option just like the picture shows. Finally click the "Delete Item" button and the marked files will be back to the iTunes in the Cloud.
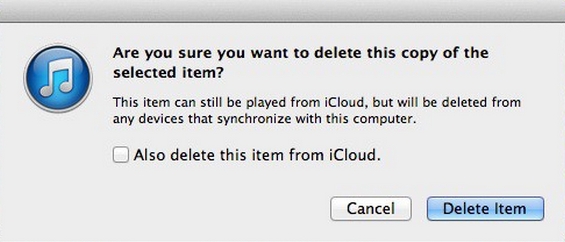
Note: If you want to delete the items completely, just click the "Delete from iCloud" button
More tips and tricks about iTunes are offered in the related articles below.
Related Articles
iTunes not Recognizing iPhone, What will You Do
How to Transfer iTunes Library to External Hard Drive
Top 3 Free Alternatives to iTunes
