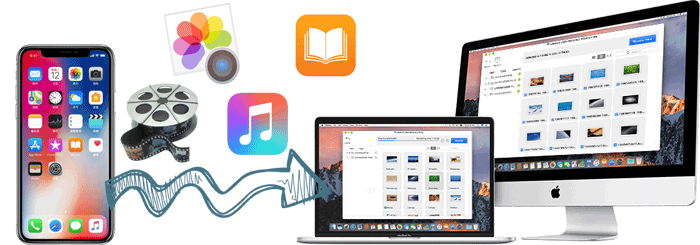
How to Transfer Files between iPhone and Mac/MacBook: 7 Easy Ways
In our increasingly interconnected digital world, copying files across different platforms has become commonplace. One regular occurrence is the need to transfer file between iPhone and Mac. Whether you want to share photos, migrate important documents, or sync media files, the ability to seamlessly move data between these devices is essential.
Well, this comprehensive guide aims to provide you with seven workable options to facilitate file transfer between your iPhone and MacBook. Just treat yourself by going through this simple tutorial now.
- Way 1: Transfer Data between iPhone and Mac via USB Cable Only
- Way 2: Transfer Files between iPhone and Mac via Assistant for iOS [Flexible]
- Way 3: Share Files between iPhone and Mac by AirDrop
- Way 4: Transfer Files between iPhone and Mac with iCloud Drive
- Way 5: Send File from iPhone to Mac or vice versa via iTunes File Sharing
- Way 6: Transfer Files between iPhone and Mac Using Dropbox
- Way 7: Send Files from Mac to iPhone and back by Email
Way 1: Transfer Data between iPhone and Mac via USB Cable Only
One of the simplest ways to transfer files between your iPhone and Mac is by connecting them directly. (What if your iPhone won't connect to your Mac?) This straightforward method only requires an available USB cable, making the process trouble-free.
How to upload files from iPhone to Mac using a USB cable?
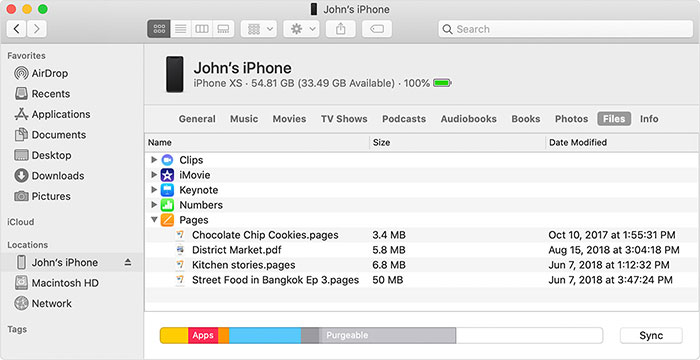
- To connect your iPhone to your Mac, plug in the charging cable and open Finder.
- In the Finder sidebar, locate and select your iPhone under "Locations".
- Within your iPhone's Finder window, click on "Files".
- Expand an app folder by clicking the arrow next to it, revealing the files and folders within.
- To transfer a file or folder to your Mac, simply drag and drop it to a desired location in the sidebar.
- To migrate files to your iPhone, drag and drop them from your Mac into an app folder on your iPhone.
Additional Recommendations:
Way 2: Transfer Files between iPhone and Mac via Assistant for iOS
Flexible, fast, and secure data transfer is always favored by more people. As one of the most recommended helpers for Apple devices, MobiKin Assistant for iOS (Mac and Windows) provides you with one-stop, hassle-free experience, not only in content copy between Apple and Mac but also in managing iOS items. Plus, it is widely compatible with all kinds of iOS devices and offers services for many types of your data.
Main Features of MobiKin Assistant for iOS:
- Transfer files between iPhone and Mac/PC/iTunes with the ability to choose specific files.
- Easily back up and restore iPhones with just one click for multiple items.
- Provide extensive support for various file types, such as contacts, text messages, photos, music, videos, notes, bookmarks, books, calendars, and more.
- Efficiently manage iOS data directly on a computer.
- Free trial, error-free, trouble-free, and convenient management.
- Compatible with a whole range of iOS devices, such as iPhone 16/15/14/13/12/11/X/8/7/6, iPod touch, iPad, etc.
- It doesn't compromise your privacy.


How to make the file transfer between Mac and iPhone with Assistant for iOS?
Step 1. After downloading and installing the product on your Mac, establish a connection between your iPhone and Mac using a USB cable. Then launch the program and click "Trust" on your iPhone to authorize this computer. Once completed, the interface below will appear on your Mac.

Step 2. On the left side menu, you will find all the different file types. Simply select the data types you're to copy, and all the specific items on your iPhone will be displayed. Preview the stuff and choose what you want to transfer to your Mac.
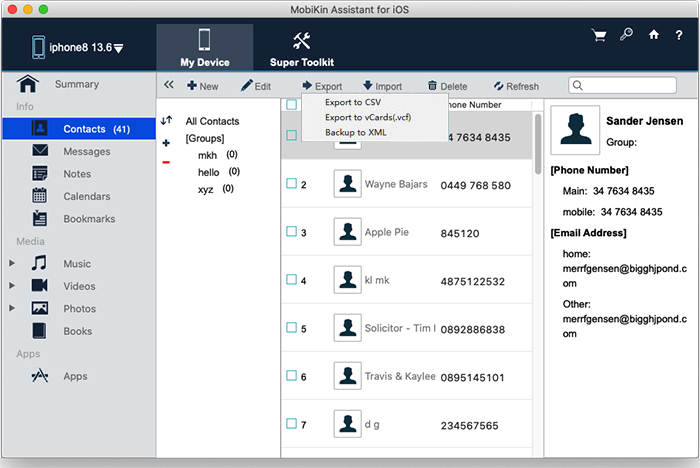
Step 3. Once selected, click the "Export" button in the top menu. This action will prompt a path selection dialog to appear. Choose a destination on your Mac where you wish the files to be transferred, and the transfer from your iPhone to your Mac will commence immediately. (Here, you can also choose "Import" and follow the prompt to transfer files from this Mac to your iPhone)
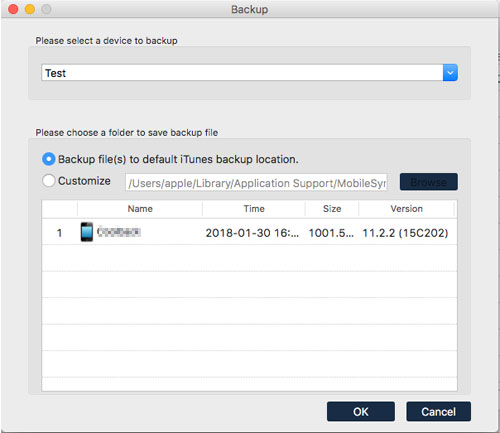
This tool also lets you make the transfer in batches. To start the backup, click "Super Toolkit" > "iTunes Backup & Restore" > "Backup" from the program interface; a pop-up window will appear where you can select the device to back up and pick an output folder; click "OK" to begin the process. For restoration, pick "Restore" instead; confirm the target device and select an iTunes backup; finally, click "OK".
The video guide shows you how to transfer photos from iPhone to Mac, by using Assistant for iOS:
Way 3: Share Files between iPhone and Mac by AirDrop
AirDrop is a fundamental feature of iOS and macOS, enabling quick and easy file transfers between nearby devices. It utilizes Bluetooth and Wi-Fi, allowing transfers in a few easy taps. To AirDrop iPhone to Mac, you can share some file types, including images, videos, webpages, locations, and more.
How to transfer files from iPhone to Mac with AirDrop?
- Open Finder and go to the menu bar.
- Click on "Go" and select "AirDrop".
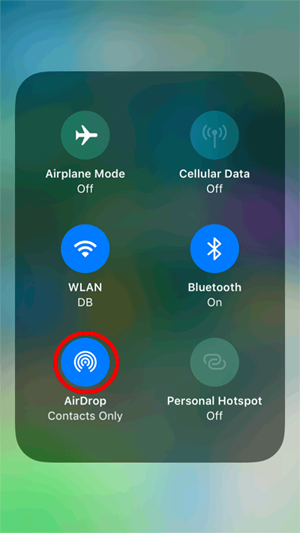
- Make sure that Bluetooth and Wi-Fi are turned on to activate AirDrop on your Mac.
- Set the AirDrop visibility to "Allow to be discovered for all" or "Contacts only".
- Open Control Center on your iPhone.
- Ensure that Wi-Fi and Bluetooth are enabled and tap the AirDrop icon.
- Set your iPhone to be discoverable by "Everyone" or "Contacts Only".
- To transfer files from your iPhone to your Mac, open the file you want to send on your iPhone.
- Tap the "Share" icon and select the "AirDrop" icon.
- Wait for the available devices to appear and choose the desired device to AirDrop the file to.
To transfer files from your Mac to your iPhone, you can:
- Right-click on the file you want to share on your Mac.
- In the menu that appears, hover over "Share" and click on "AirDrop".
- Select the recipient iPhone from the list of available devices.
- Click "Done" to initiate the file transfer.

Way 4: Transfer Files between iPhone and Mac with iCloud Drive
iCloud Drive, a handy AirDrop alternative, is Apple's cloud storage service that keeps your files in sync across devices. A strong Wi-Fi connection is essential for smooth file transfers, and it's important to have the latest OS on both your iPhone and Mac for compatibility.
How to transfer files to Mac from iPhone using iCloud Drive?
- On your iPhone, navigate to "Settings" > [your name] > "iCloud > "iCloud Drive".
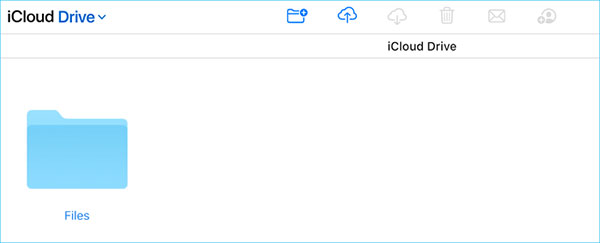
- Open the "Files" app and go to Browse > iCloud Drive.
- Locate the desired files and move them to iCloud Drive.
- To access iPhone files on your PC/Mac, visit icloud.com on your Mac.
- Log in using your Apple ID that you use on your iPhone.
- Choose "iCloud Drive" from the available options to access your iPhone files on the computer.
To copy files from Mac to iPhone, you can:
- Select the file or folder you wish to transfer from your Mac.
- Click "Share" and utilize AirDrop or generate an iCloud Link.
- On your iPhone, open the Files app and sign in to iCloud.
- Find the transferred file/folder in the AirDrop section or use the link.
- Save the file/folder to your desired location on your iPhone.
Way 5: Send File from iPhone to Mac or vice versa via iTunes File Sharing
iTunes is a popular method for file sharing, especially for syncing music, videos, and photos between iPhones and other devices. To successfully accomplish the task, ensure that you have the following requirements:
- Use an appropriate cable to establish a reliable connection between your iPhone and Mac, preferably the original cable that came with your device.
- A Mac with the latest version of iTunes.
- Verify if the apps where your files are located support file sharing.
How to copy data from iPhone to Mac with iTunes File Sharing?
- Connect your iPhone to your computer via USB.
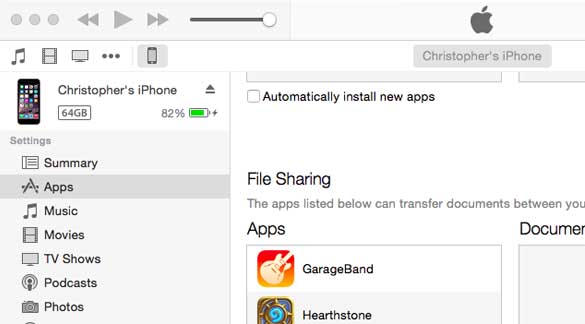
- Launch the iTunes app on your Mac.
- Click the "Device" button above the sidebar in the iTunes window.
- Select "File Sharing" from the options.
- Choose the specific app from the list on the left that you want to transfer files to or from.
- Select the file you wish to transfer from the list on the right.
- Click "Save to" and choose the destination where you want to save the file.
- Press that button again to initiate the transfer.
To transfer files from your Mac to your iPhone, you can:
- Click "Add" in iTunes.
- Select the file you want to transfer from your Mac.
- Click "Add" to initiate the file transfer.
Note: iTunes File Sharing requires navigating through app-specific folders, which can be time-consuming and cumbersome. Additionally, this feature primarily focuses on app-specific files and does not offer real-time syncing between the iPhone and Mac.
Way 6: Transfer Files between iPhone and Mac Using Dropbox
Dropbox is one more way to transfer files between iPhone and Mac. It handles a wide range of files, including photos, videos, Excel Files, Word Documents, Text Files, Zip Files, and more. To get the job done, you'll need a stable Internet connection. Before proceeding, you have to download and install Dropbox on both your Mac and iPhone, log in to the app with the same Dropbox account, and ensure the devices are under stable network connections.
How to transfer data from iPhone to MacBook via Dropbox?
- Visit the Dropbox website and create an account if you don't already have one.
- Then, authorize your account.
- Go to the App Store on your iPhone and download the Dropbox app.
- Once downloaded, open the app and sign in with your Dropbox credentials.
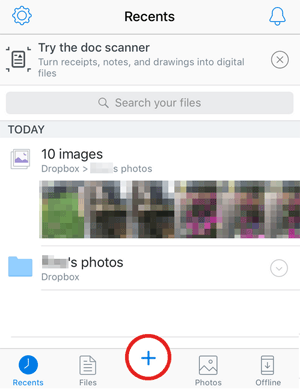
- Tap the "Create" or "+" icon in the Dropbox app and select "Create or Upload file" to back up files with Dropbox.
- Choose the files you want to upload and tap "Next".
- Select the destination in Dropbox where you want to save the files, then tap "Upload".
- Wait for the upload to complete, and then go to the Dropbox app on your Mac to access the downloaded files. (To transfer files from your Mac to your iPhone, simply upload the items to Dropbox from your Mac.)
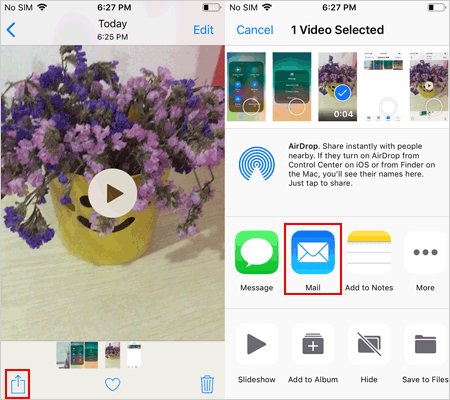
Way 7: Send Files from Mac to iPhone and back by Email
To transfer a small number of files from your iPhone to your Mac, simply attach the files to an email and send them to your own email address. This allows you to access the files on any of your devices, including your Mac.
How to transfer files between iPhone and Mac over Email?
- Access your iPhone and navigate to the file you want to transfer.
- Once selected, tap on the "share" icon and choose the "Mail" option to open the email app.
- Log in to your email account, compose the email, and wait for the attachments to finish uploading.
- Tap the "Send" button to get out the email.
- Access your email on your Mac and locate the email with the attachments.
- Download the attached files from the email on your Mac.
- To copy files from Mac to iPhone, compose an email on Mac and attach the files you want to copy; send the email to yourself; open the email app on iPhone; locate the email you just sent and get the attached data.
Concluding Thoughts
Overall, this step-by-step tutorial offered practical tips for iPhone to Mac transfer and vice versa, from utilizing cloud storage services to leveraging built-in features. However, for a streamlined and error-free experience, we put a high value on MobiKin Assistant for iOS. This powerful utility simplifies transferring files between iPhone and Mac and delivers comprehensive data management capabilities. So, give the software a download and try it out now.
Related Articles:
[Stepwise Guide] How to Back up Photos from iPhone to PC/Mac/Cloud?
Detailed Tutorial on How to Back Up iPhone to Google Drive
[Beginners Guide] How to Fix Contacts Not Syncing to Mac in 13 Hot Tips?
How to Fix iPhone/iCloud Photos Not Showing Up on Mac? [Ways Most People Don't Know]
