[Solved] Data Recovery Cannot be Completed Please Restore Your iPhone from Backup
Have you ever seen the error message on your iPhone saying, "Data Recovery Cannot be Completed, Please Restore Your iPhone from Backup"? It's a common problem that many iPhone users deal with. And it can be particularly stressful if you're trying to recover important data from your iPhone or iPad.
Don't worry though - help is here! In this guide, we'll walk you through simple steps to fix the iPhone data recovery cannot be completed error and restore your iPhone from a backup. Whether it's caused by a software issue, an iOS update, or something else, we'll help you recover your data quickly and easily.

- Part 1: Why Does My iPhone Say Data Recovery Cannot Be Completed?
- Part 2: How to Fix Data Recovery Cannot Be Completed iPhone Issue?
> Method 1: Restore iPhone/iPad from iTunes Backup
> Method 2: Restore iPhone with iTunes Recovery Mode
> Method 3: Restore iPhone through the DFU Mode
> Method 4: Fix "Data recovery cannot be completed" Error with iOS System Recovery - Part 3: Backup & Restore iPhone with Professional MobiKin Assistant for iOS [HOT!]
Part 1: Why Does My iPhone Say Data Recovery Cannot Be Completed?
If your iPhone shows the "Data Recovery Cannot Be Completed" message after an update, it's likely due to software problems. This issue is especially common when updating to a Beta version of iOS. Certain bugs or compatibility issues between apps and the iOS update may cause this. Here are some reasons why this might happen:
- Not Enough Storage: If there's not enough space on your iPhone for the recovery, the process can't finish successfully.
- Corrupted Backup: A damaged or incomplete backup can prevent data recovery from working properly.
- Software Glitches: Sometimes, updates or restores cause bugs that block recovery. A restart or update may be needed to fix it.
- Hardware Problems: A malfunction in your iPhone's hardware, like a faulty storage drive, can interfere with the recovery process.
- Outdated iOS Version: If the backup was made on a newer iOS version than what's currently installed, the recovery might fail because of version incompatibility.
Part 2: How to Fix Data Recovery Cannot Be Completed iPhone Issue?
Once you understand what's causing the problem, you can easily find the right way to fix it. In the next sections, we'll guide you through the steps to fix the data recovery cannot be completed error and recover your data successfully.
Method 1: Restore iPhone/iPad from iTunes Backup
If you see an error message asking you to restore your iPhone or iPad from a backup, that's actually a good hint for solving the issue. Restoring from a backup can often fix this problem.
To do this, you'll need to use iTunes (or Finder, if you're on macOS Catalina or later). Here's how you can do it:
- Connect your iPhone or iPad to your computer using a USB cable.
- Open iTunes or Finder on your computer.
- In iTunes or Finder, select your device. If you're using Finder, make sure you're on the "General" tab, and if you're using iTunes, head to the "Summary" tab.
- Click on the "Restore Backup" option in the right pane.
- A prompt will pop up asking you to choose a backup. Pick the one you want and hit "Restore."
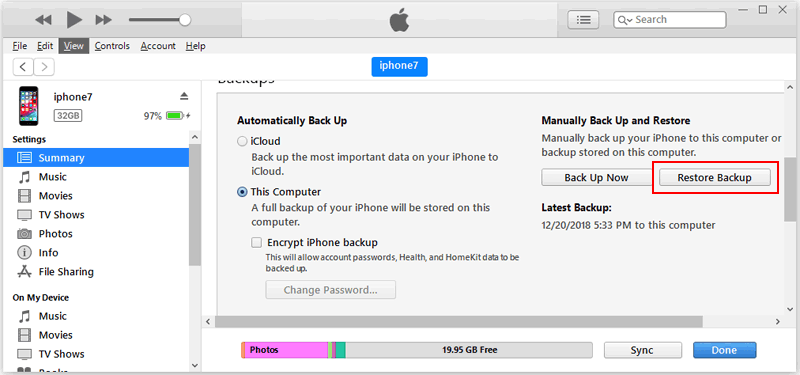
Once the process is complete, the error should be gone, and your device should be back to normal!
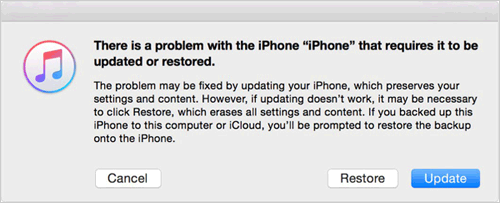
Method 2: Restore iPhone with iTunes Recovery Mode
If restoring from a backup doesn't fix your problem, you can try putting your iPhone into Recovery Mode using iTunes or Finder. This is a helpful feature if your iPhone isn't working as it should. Here's how you can do it:
Step 1: Open Finder (on macOS Catalina and later) or iTunes (on Windows or older versions of macOS).
Step 2: Connect your iPhone to your computer with a USB cable and put it into recovery mode:
- iPhone 8 or newer: Quickly press and release the volume up button, then the volume down button. After that, press and hold the side button until you see the "Connect to Computer" screen.
- iPhone 7/7 Plus: Press and hold both the volume down button and the power button. Keep holding them until the "Connect to Computer" screen shows up.
- iPhone 6S or older: Press and hold both the Home button and the power button until the "Connect to Computer" screen appears.
Step 3: Once your iPhone is in recovery mode, look for it on your computer. When you're asked whether to update or restore, choose "Restore". After the process is finished, your issue should be fixed.
Method 3: Restore iPhone Through the DFU Mode
If Recovery Mode didn't work, try using DFU (Device Firmware Update) mode. This is a deeper restore method. Here's how to do it for each iPhone model:
iPhone 6 and earlier:
- Press and hold the Power button for at least 3 seconds.
- While holding the Power button, also press and hold the Home button for 10 seconds.
- Release the Power button but keep holding the Home button for another 5 seconds.
- If the screen stays black, your iPhone is in DFU mode.
iPhone 7/7 Plus:
- Press and hold the Side button and Volume Down button together.
- After 10 seconds, release the Side button, but continue holding the Volume Down button for another 5 seconds.
- If the screen is black, your iPhone is in DFU mode.
iPhone 8 and newer:
- Press and hold the Power button for 3 seconds, then also press and hold the Volume Down button.
- After 10 seconds, release the Power button but keep holding the Volume Down button.
- After 5 seconds, if the screen stays black, your iPhone is in DFU mode.
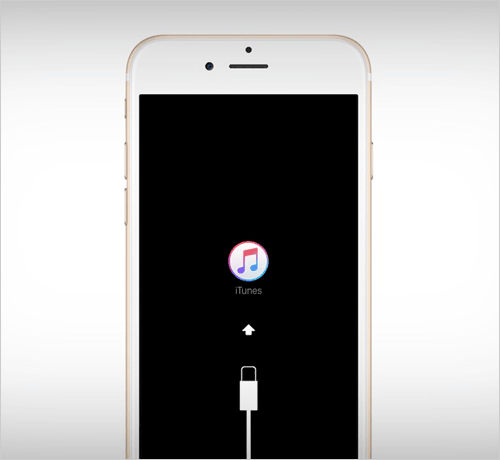
Once you're in DFU mode, you can restore your iPhone and hopefully resolve the issue.
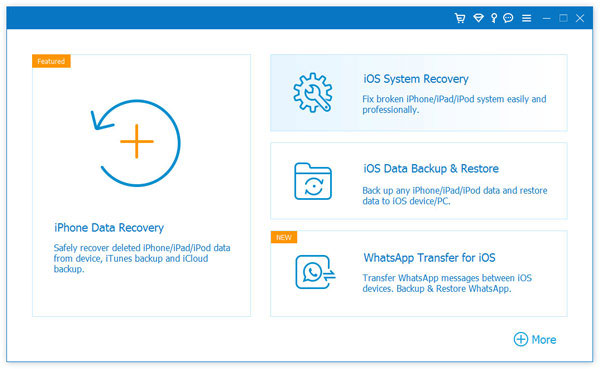
Method 4: Fix "Data recovery cannot be completed" Error with iOS System Recovery
If you're still facing the "Data recovery cannot be completed. Please restore your iPhone from backup" error, try using iOS System Recovery. This tool is built to fix over 150 different issues on your iPhone or iPad, like being stuck on the Apple logo, going into a boot loop, or not turning on at all. It works with all iOS versions and devices, including the latest iOS 18/26 and iPhone 17/16 models.


To fix the "data recovery cannot be completed" error on your iPhone or iPad using iOS System Recovery, follow these steps:
Step 1: Select the "iOS System Recovery" option
Install and launch iOS System Recovery on your computer. Connect your iPhone or iPad using a USB data cable. Open the program and navigate to "More Tools>iOS System Recovery" from the main menu.
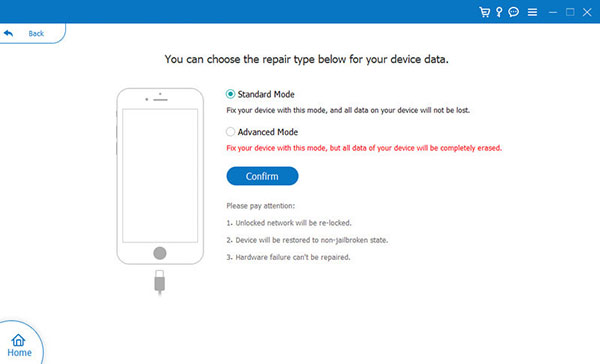
Step 2: Select "Standard Mode"
Follow the on-screen prompts and select "Standard Mode" to fix the issue without losing any data. Click "Confirm" and the software will automatically detect your device model and display the appropriate firmware options.
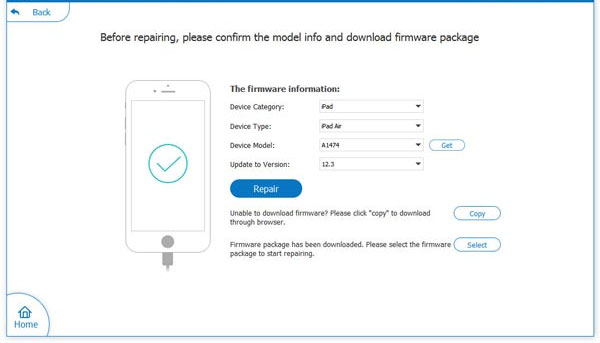
Step 3: Download firmware
Press the "Download" button to get the firmware needed to fix the data recovery cannot be completed issue.
Step 4: Fix the iPhone recovery cannot be completed issue
After the downloading process is finished, your device will no longer show the error, and it should work normally again.
You Could Potentially Like:
Part 3: Backup & Restore iPhone with Professional MobiKin Assistant for iOS
If you encounter issues with iTunes and can't complete data recovery, you can try a reliable third-party tool called MobiKin Assistant for iOS. This software provides a secure and easy way to back up and restore your iPhone data. It lets you back up your iPhone to a PC or external hard drive and restore the backup with just a single click.
Why Choose MobiKin Assistant for iOS for Backup and Restore?
- Offline Backup & Restore: You can back up and restore your device without needing an internet connection.
- Unlimited Storage: Choose to back up your data to an external SSD or your PC's local drive, without worrying about storage limitations.
- Selective Backup and Restore: Preview and select specific data from your iPhone or iPad to transfer to your PC, or vice versa.
- Easy-to-Use: The software has a simple interface, making the backup and restore process smooth for both beginners and experienced users.
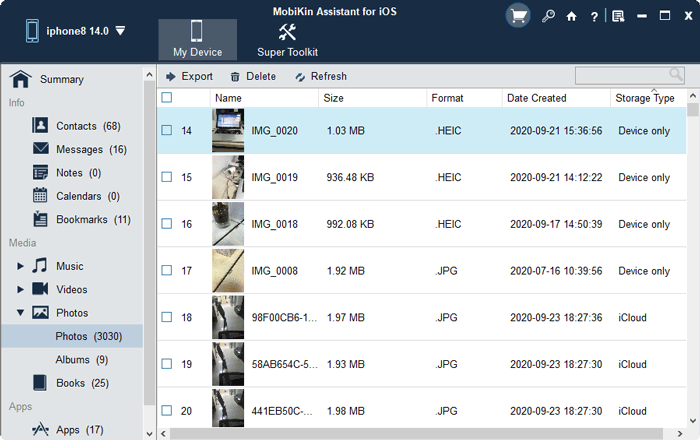
How to Back Up and Restore Your iPhone Data Using MobiKin Assistant for iOS?
How to Back Up Your iPhone to PC
Backing up your iPhone data (like photos, videos, contacts, and messages) to your PC is easy. Just follow these steps:
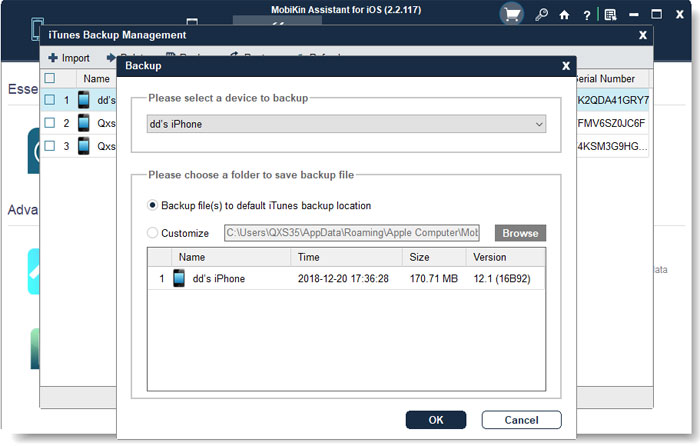
- Plug your iPhone into your PC using a USB cable and launch MobiKin Assistant for iOS.
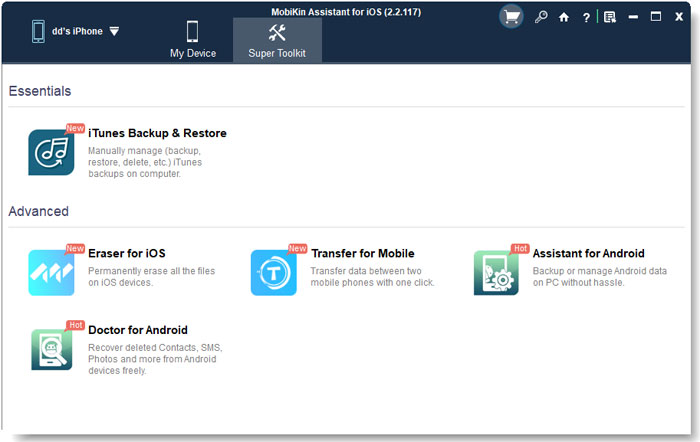
- In the program, go to "Super Toolkit" > Select "iTunes Backup & Restore" > Click "Backup" to back up all data from your device.
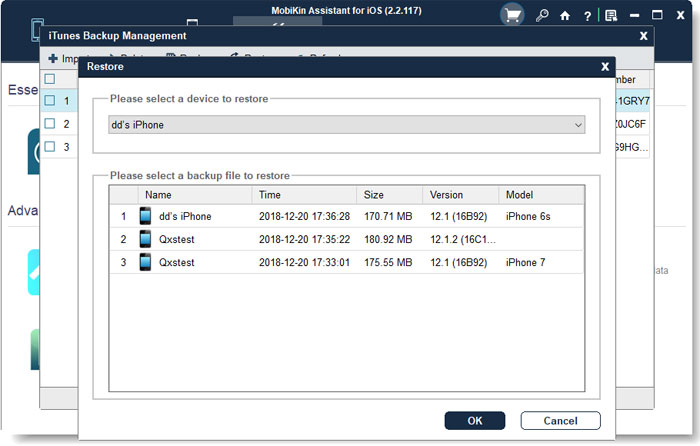
How to Restore iPhone Data from PC
To restore your iPhone data from a previous backup, here's what you need to do:
- Ensure your iPhone is connected to the computer. Then go to "Super Toolkit" > Select "iTunes Backup & Restore" > Click on "Restore".
- Find the backup you want to restore and select it. Click "Restore" to transfer the data back to your iPhone.
Selective backup and restore: If you only want to back up specific data from your iPhone, click the left panel to select the categories (like photos, contacts, etc.). You can preview the content and then click "Export" to back it up to your computer. When you want to restore this data, simply switch to the "Import" tab and restore your selected files.
Video Guide:
Ending Words
This article introduces four simple ways to fix the "data recovery cannot be completed, please restore your iPhone from backup" error. If you're dealing with the issue of iTunes getting stuck during backup due to a weak internet connection, try using MobiKin Assistant for iOS. It lets you back up your entire iPhone and restore it whenever you need, without the hassle. Give it a try!
Related Articles:
How to Fix SIM Card Stuck in iPhone? Here Are the 5 Viable Ways
iPhone Screen Black and White? 9 Effective Solutions for You
How to Fix App Disappeared from Home Screen on iPhone? 14 Solutions
4 Most Effective Ways to Fix iPhone Is Disabled Connect to iTunes
