[Top 5 Ways] How to Back up iPhone to Mac or MacBook?
Many iPhone users take backup very seriously, but choosing the right backup method on Mac can be confusing. There are a variety of backup tools on the market, and it's crucial to find one that's easy to use while saving all your important data, such as photos, videos, messages, WhatsApp chats, and contacts.
If you're looking for an easy way to back up your iPhone to Mac and view the saved information directly on your computer, this guide will introduce five of the most reliable and secure backup options to help you achieve this goal easily.
- Part 1: Back up iPhone to Mac with Finder (macOS Catalina and later)
- Part 2: Back up iPhone on Mac with iTunes (macOS Mojave and earlier)
- Part 3: Back up iPhone through Mac with iCloud
- Part 4: Back up iPhone to Mac/MacBook Using Backup Software [Recommended]
- Part 5: Back up iPhone to Mac via AirDrop
- Bonus: Where to Find iPhone Backup on Mac & How to Restore it
Part 1: How to Back up iPhone to Mac with Finder
If your Mac is running macOS Catalina and later, backing up your iPhone to Mac using Finder is a straightforward process. Follow these steps to ensure a smooth and efficient iPhone backup on Mac:
- Use a USB cable to connect your iPhone to your Mac. Unlock your iPhone and trust the computer if prompted.
- Launch Finder on your Mac. You can do this by clicking on the Finder icon in the Dock or using Spotlight search.
- In the Finder window, you should see your iPhone listed in the left sidebar under "Locations." Click on your iPhone to select it.
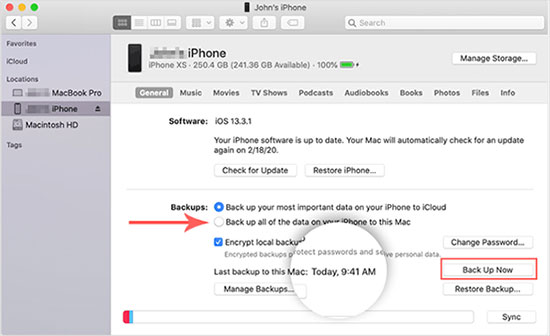
- Once your iPhone is selected, you'll see an overview screen with details about your device. Click on the "General" tab in the top menu.
- In the General tab, you'll find the option to "Back up all of the data on your iPhone to this Mac." Check this option.
- If you want to include sensitive information like passwords in your backup, check the box that says "Encrypt local backup." Set a password for the encrypted backup when prompted.
- Click the "Back Up Now" button to initiate the backup process. The time it takes to complete the backup will depend on the amount of data on your iPhone.
- You can monitor the backup progress in the Finder window. A progress bar will show you how much of the backup is completed.
- Once the backup is complete, you can verify its success by checking the backup details in the Finder window. Ensure that the "Latest Backup" information is up to date.
Check If You Need:
Part 2: How to Back up iPhone on Mac with iTunes
Finder is compatible with macOS Catalina and later versions. If your Mac is currently operating on macOS Mojave or an earlier version, utilize iTunes to back up iPhone to a Macbook. Follow these steps to see how to back up iPhone on iTunes on Mac:
- Connect your iPhone to your Mac using a USB cable.
- Launch iTunes on your computer.
- When prompted, unlock your iPhone and establish trust between your device and your Mac.
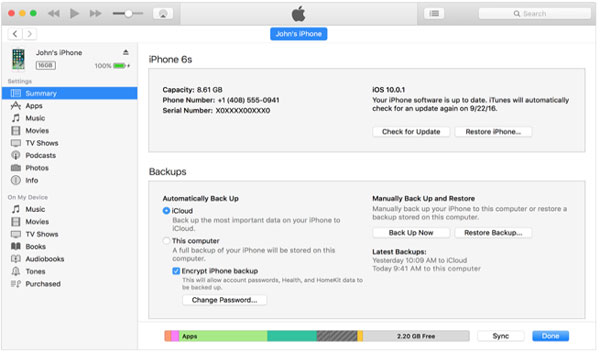
- Locate and click on the iPhone icon situated in the upper left corner of the iTunes window.
- Opt for the "Summary" option, where you can access comprehensive information about your iPhone.
- Navigate to the Backup section, choose "This Computer," and initiate the backup by clicking on the "Back Up Now" button.
- Upon the completion of the backup process, verify the success of the operation by checking the status to ensure that the backup was completed successfully.
Part 3: How to Back up iPhone through Mac with iCloud
You can also use iCloud to back up iPhone onto Macbook/MacBook Pro/MacBook Air/iMac. Just follow the steps below to get it done.
Step 1: Sync data from iPhone to iCloud
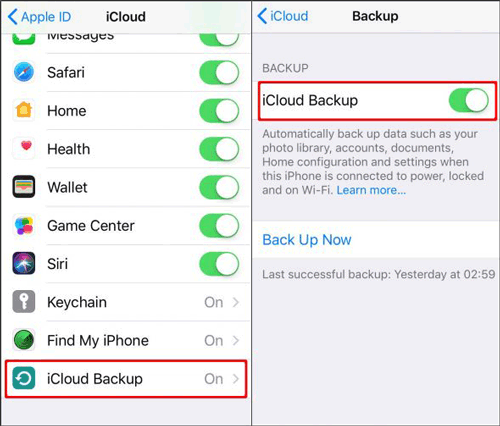
- Unlock your iPhone and go to "Settings" > [Apple ID] > "iCloud". Choose the "iCloud Backup" option to enter the iCloud Backup screen.
- Toggle on the "iCloud Backup" option from the iCloud Backup screen.
- Once your iPhone is plugged in, locked and connected to WiFi, an automatic backup will be created automatically.
- You can also click on "Back Up Now" option to archive iPhone data manually.
Step 2: Check the backed-up files on Mac
- Launch Finder on your Mac.
- Choose iCloud Drive from the sidebar of the Finder window and you can see a few sub-folders are displayed here.
- Just double-click on these folders to check the backed-up iPhone files.
Part 4: How to Back up iPhone to Mac/MacBook Using Backup Software
Mobikin Assistant for iOS (Mac Version) is a versatile and user-friendly software designed to facilitate seamless management of iOS devices. With its intuitive interface, this tool enables users to effortlessly transfer, backup, and manage data such as contacts, messages, photos, and more between iPhones, iPads, iPod touches and computers. It allows you to back up iPhone through Mac wholly or selectively for further use.
Main Features of Assistant for iOS:
- Swiftly transfer data between iOS devices and computers (Mac/PC).
- Reliable and secure backup and restore functionality to safeguard vital iOS device data.
- Easily manage contacts, messages, photos, music, movies and more with a user-friendly interface.
- Choose specific files for backing up and restoration, providing flexibility in recovering only essential data.
- Compatible with various iOS devices, including iPhone 16/15/14/13/12/11/X/8/7, etc.
- It also comes with Windows version: MobiKin Assistant for iOS.


How Do I Back up My iPhone to My Mac with Assistant for iOS?
Step 1: Connect your iPhone to Mac
Install and run Assistant for iOS on your Mac. Use a USB cable to connect your iPhone to the Mac. Once connected successfully, the software will detect the connected iPhone and the main interface of the program should be displayed as below.
Remember to tap on "Trust" on your iPhone to make your iPhone be recognized by the program.

Step 2: Select your target files
All types of your iPhone data will be shown as different category in the folder on the left side bar, including "Contacts", "Messages", "Notes", "Calendars", "Bookmarks", "Music", "Videos", "Photos", "Apps" etc. Click on the file types you want to backup and the program will scan all the data you have chosen.
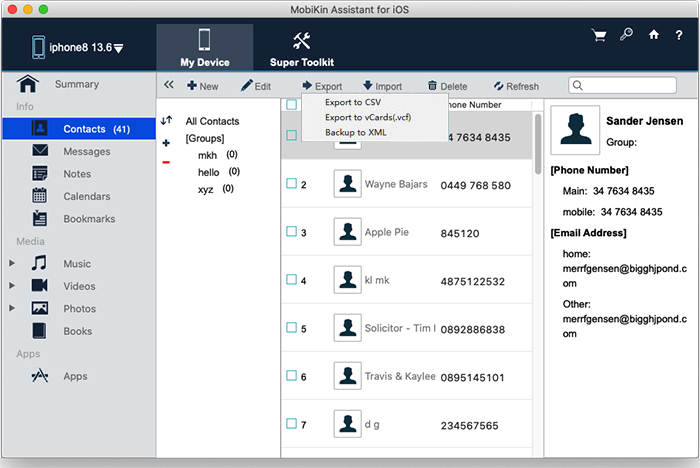
Step 3: Start to back up iPhone to a Macbook
Preview the scanned out files and tick off those you want to backup, then, click on "Export" on the top menu to transfer them to Mac. Choose a folder on your Mac where you would like to save the transferred files and then you just wait until the process is finished.
Check If You Need:
Part 5: Back up iPhone to Mac via AirDrop
AirDrop offers a quick and wireless way to transfer important files from your iPhone to your Mac. While it doesn't create a full device backup, it's perfect for manually saving things like photos, videos, documents, and other individual files you want to keep safe.
Steps to back up iPhone to Mac via AirDrop:
- Open Finder, click "AirDrop" in the sidebar, and set your AirDrop visibility to "Everyone" or "Contacts Only" depending on your preferences.
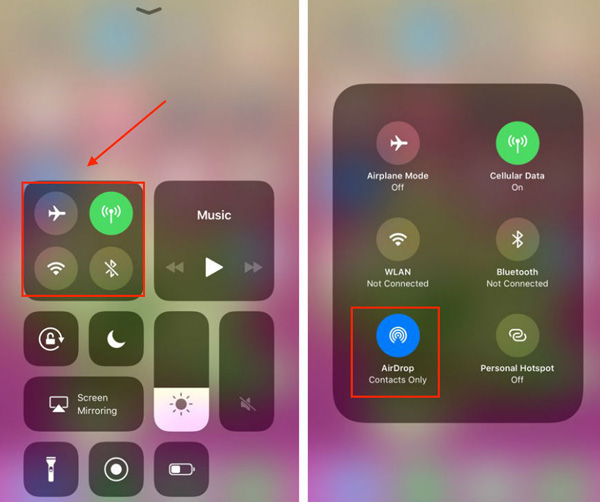
- Swipe down from the top-right corner of the screen to open Control Center. Press and hold the wireless panel, tap "AirDrop," and choose "Contacts Only" or "Everyone."
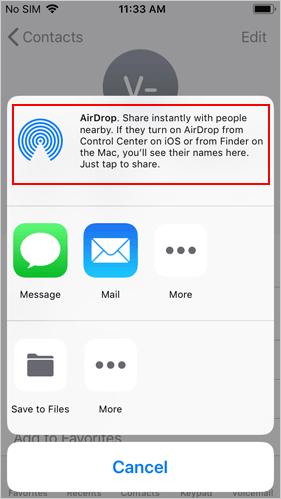
- Go to the Photos app or Files app on your iPhone. Select the files you want to back up.
- After selecting your files, tap the Share icon (a box with an arrow pointing up), then tap your Mac's name under AirDrop.
- A pop-up will appear on your Mac asking you to accept the files. Click "Accept." The files will be saved to your Downloads folder by default.
Bonus: Where to Find iPhone Backup on Mac & How to Restore it
Where Are iPhone Backups Stored on a Mac?
If you've backed up your iPhone to your Mac using Finder or iTunes, you might be curious about where those backups are actually saved. According to Apple, the backup files are stored inside a specific folder on your computer. Here's how you can locate your iPhone backup:
- Click the magnifying glass icon in the top-right corner of your Mac screen to open Spotlight Search.
- Copy and paste this path into the search bar:
~/Library/Application Support/MobileSync/Backup/ - Press Return on your keyboard. This will open the folder that contains all of your iPhone backups.
You'll see a list of folders, each representing a different backup. If needed, you can copy this Backup folder to another location to keep extra copies. However, avoid moving, renaming, or modifying these folders. Doing so might damage the backup files and make them unusable.
How to View Specific iPhone Backups in macOS Catalina or Later
If your Mac is running macOS Catalina or a newer version, there's another way to check your iPhone backups:
- Connect your iPhone to your Mac with a USB cable.
- Open Finder.
- In the sidebar on the left, select your iPhone under the "Locations" section.
- Go to the "General" tab.
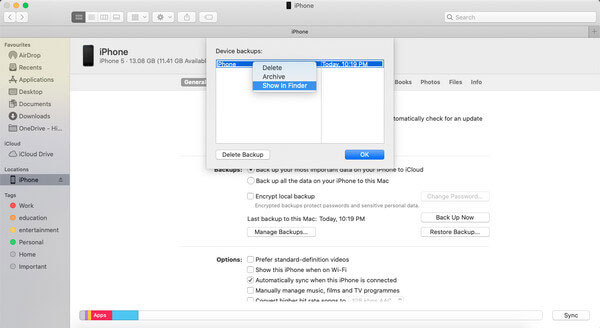
- In the "Backups" area, click the button labeled "Manage Backups."
A list of all your iPhone backups will appear. You can right-click on any of them and choose "Show in Finder" to see exactly where it's stored.
How to Restore Your iPhone Using a Backup on Mac
Once your iPhone is backed up and you know where the files are located, you can easily restore that data when needed. For example, if your phone has been reset due to performance issues or other problems, restoring a backup can help you get everything back.
Here's how to restore your iPhone from a Mac backup:
- Connect your iPhone to your Mac.
- Open a Finder window.
- In the sidebar, click on your iPhone under "Locations."
- Find the section labeled "Backups" and click "Restore Backup."
- Choose the backup you want to restore from the list that appears. If the backup is protected with a password, enter it.
- Click "Restore" and wait for the process to finish.
This method is also helpful if you're moving your data to a new iPhone and want everything transferred quickly and safely.
Summary
How to back up iPhone to Mac Air/MacBook/Mac/iMac? Explore reliable options like using MobiKin Assistant for iOS (Mac). It ensure efficient data transfer, secure backup, and flexible file management, safeguard your iPhone data regularly. Stay diligent with software updates, maintain a stable connection, and embrace the ease of creating backups to ensure the safety of your valuable information. Choose the method that suits your preferences for a seamless iPhone-to-Mac backup experience.
Relative Articles:
How to Transfer Files from iPhone to Mac Without AirDrop
[4 Ways] How to Transfer Messages from iPhone to Mac
