iTunes Wi-Fi Sync: How to Sync iPhone with iTunes Wirelessly
iTunes is a highly versatile tool for iPhone users, offering a range of features that enhance the experience. It lets you manage your iPhone's data directly from your computer, transfer music and other files, purchase media, back up your device, and even troubleshoot issues. Apple also regularly adds new features to iTunes, such as the ability to sync wirelessly via Wi-Fi.
That said, you might have some questions about using iTunes' Wi-Fi syncing feature. Do you know how to set it up or take full advantage of it? No worries! This guide will walk you through everything you need to know about getting started with Wi-Fi syncing.

Part 1: How to Sync iPhone with iTunes Wi-Fi Sync
Wi-Fi syncing is a handy feature introduced in iTunes 10.6 and later. To use it, make sure you're running the latest version of iTunes. Additionally, there are a couple of requirements for syncing your iPhone, iPad, or iPod Touch wirelessly:
- Your device should be running iOS 5 or later.
- Both your iOS device and computer must be connected to the same Wi-Fi network.
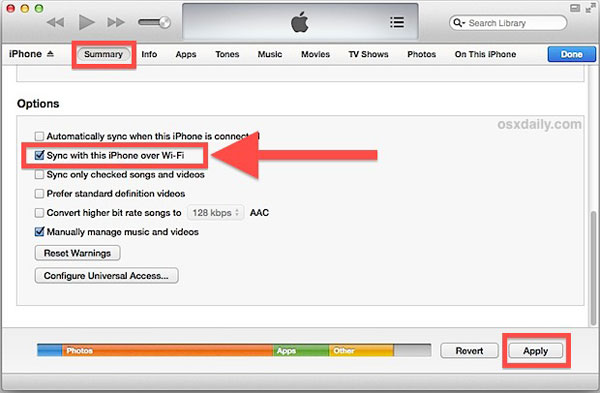
Step 1: Setting Up Wi-Fi Sync with iTunes
The first time you sync your iPhone wirelessly, you'll need to connect it to your computer via a Lightning cable to enable Wi-Fi sync. Here's how:
- Connect your iPhone to your computer using the Lightning cable that came with it.
- Open the latest version of iTunes and wait for it to recognize your device. Click on the device icon in the top-left corner of iTunes.
- Go to the "Summary" tab on the left-hand side, then find the "Options" section on the right panel.
- Check the box next to "Sync with this iPhone over Wi-Fi" and click "Apply" to confirm the changes.
- Once applied, click the eject icon next to your device in iTunes, then disconnect your iPhone from your computer.
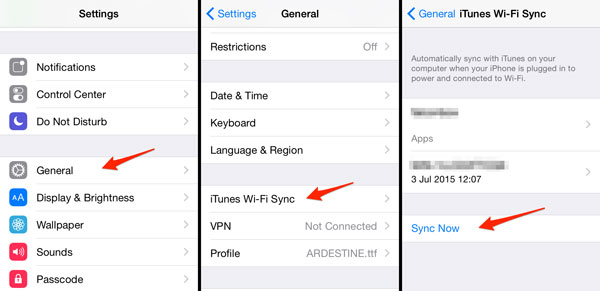
Step 2: Syncing Your iPhone Wirelessly via Wi-Fi
After you've set up Wi-Fi sync, it will remember your settings. To sync your iPhone wirelessly from here on out, just follow these simple steps:
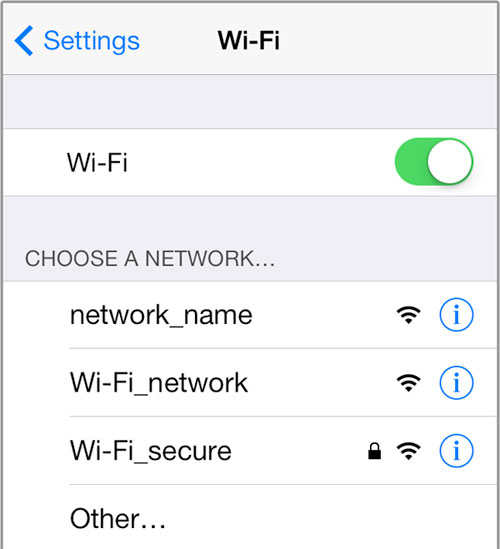
- Make sure both your iPhone and your computer are connected to the same Wi-Fi network.
- On your iPhone, open the "Settings" app and tap your name at the top.
- Tap "General" > "iTunes Wi-Fi Sync" and select your computer from the list.
- Tap "Sync Now" to start the process. When the sync is complete, you'll get a confirmation message.
Note: Syncing over Wi-Fi may be slower compared to using a cable, but it's much more convenient as the sync will happen automatically whenever your iPhone and computer are connected to the same network.
After the sync is finished, you can check the backup location in iTunes to confirm the process.
Part 2: How to Fix iTunes Wi-Fi Sync Not Working
If you're having trouble with Wi-Fi sync in iTunes, such as your iPhone not showing up or iTunes failing to detect it, don't worry! There are several ways to fix this issue. Here are a few solutions to try:
Solution 1: Verify the Setup and Wi-Fi Connection
First, ensure that you've enabled Wi-Fi syncing in iTunes at least once using a wired connection. After updating iTunes or iOS, reconnect your iPhone to iTunes, check the "Sync this iPhone over Wi-Fi" option, and click Apply.
Also, make sure your iPhone is connected to the correct Wi-Fi network. If there are multiple networks at home, the iPhone may not automatically connect to the right one, so you may need to manually select the correct network.
Solution 2: Set a Static IP Address
Even if your devices are on the same Wi-Fi network, syncing may fail due to differing IP addresses. To resolve this, consider setting a static IP for your devices. This process is a bit detailed, but you can find a guide on setting up DHCP reservations to help you fix any IP address issues.
Solution 3: Allow Bonjour Through the Firewall
Besides disabling antivirus software, you also need to allow Apple's Bonjour Service through your firewall. Here's how:
- Press the "Windows Key" + "E" to open the Run box, type "control", and press Enter to open the Control Panel.
- Go to "System and Security".
- Select "Allow an app through Windows Firewall".
- Click "Change Settings", check all the boxes for Bonjour Service, and click "OK".
Now try syncing your iPhone with iTunes again.
Solution 4: Restart Apple Mobile Device Service
The Apple Mobile Device Service is responsible for connecting your iPhone to iTunes. If there's an issue, restarting the service may help. Here's how:
- Press "Ctrl + Alt + Del" and open "Task Manager".
- Select "Services", find "Apple Mobile Device Service", right-click it, and choose "Restart".
If you're on a Mac, you can restart this service using "Activity Monitor".
Solution 5: Reinstall iTunes from Apple's Website
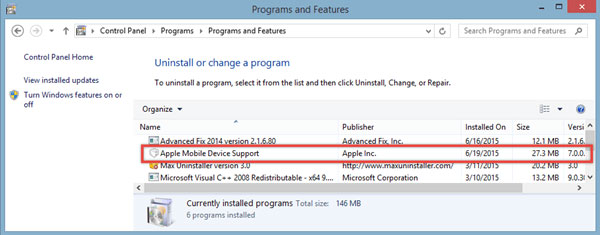
Some users have found that installing iTunes via the Microsoft Store can cause syncing issues. If the Wi-Fi sync option is greyed out or you're encountering other problems, try reinstalling iTunes from Apple's website. Here's how:
- Press "Windows Key + R", type "Control", and press Enter to open the Control Panel.
- Go to "Programs and Features".
- Uninstall "iTunes", "Apple Software Update", "Apple Mobile Device Support", "Bonjour", and "Apple Application Support". (How to Fix iTunes Driver Not Installed Issue?)
- Download and install iTunes directly from Apple's website.
- Once installed, connect your iPhone via USB, enable "Sync this iPhone over Wi-Fi," and click Apply.
- Disconnect your iPhone and reconnect both devices to the same Wi-Fi network. Your iPhone should now sync over Wi-Fi.
These steps should help resolve most Wi-Fi sync issues with iTunes.
Part 3: Best iTunes Alternative to Sync iPhone to Computer
While iTunes Wi-Fi sync can sometimes be unreliable or cumbersome, MobiKin Assistant for iOS offers a seamless offline syncing experience that ensures a smooth connection between your iPhone and computer. Unlike iTunes, this tool allows you to manage and transfer files without needing an active internet connection, offering greater flexibility and control. It also boasts a variety of other useful features for iOS device management.
Key Features of MobiKin Assistant for iOS:
- Easily back up and restore iPhone data without iTunes.
- Manage iPhone photos, videos, contacts, messages, notes, and more.
- Transfer data between iOS devices and computers quickly.
- Edit, delete and manage overall iOS data on computer directly.
- Install and uninstall apps on your iPhone from your computer.
- Works with various iPhone, iPad, and iPod models, including the latest iPhone 17 series.


Here's how to sync your iPhone without using iTunes or a Wi-Fi network:
Step 1: Connect your iPhone to the computer
First, download and install this reliable iTunes alternative on your computer. Then, connect your iPhone using a USB cable. The software will automatically detect your device.

Step 2: Sync your iPhone
Choose the type of data you want to sync, like Contacts, from the options on the left. To add contacts to your iPhone, click "Import," select the files you need, and add them.
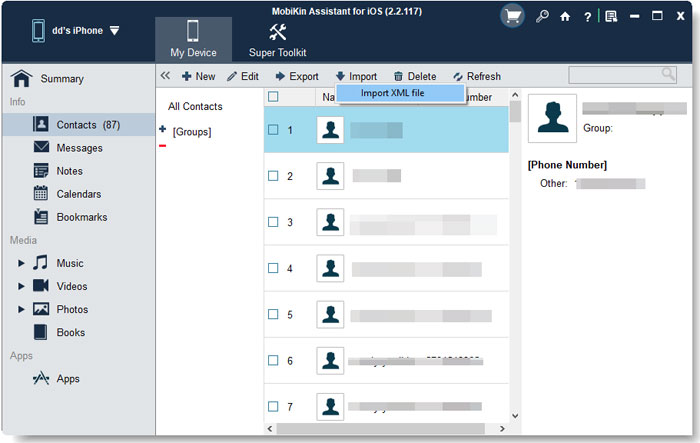
If you want to transfer contacts from your iPhone to the computer, select them and hit the "Export" button at the top.

Once the syncing is complete, simply close the program and disconnect your iPhone.
Video Guide:
Summary
This tutorial has covered the essentials of iTunes Wi-Fi syncing. In today's world, we're all used to the convenience of wireless networks, so it's no surprise that Apple added Wi-Fi syncing to iTunes. If you have any additional questions about iTunes Wi-Fi sync, feel free to leave a message below.
Related Articles:
5 Best iTunes Alternatives for Mac You Can't Miss
