How to Transfer Music from iPhone to Computer in 4 Simple Ways (PC & Mac)?
Q: Recently, I have reinstalled my computer system and downloaded iTunes. What made me annoyed is that my music library was wiped! Thankfully, my iPhone 14 still has the songs. So, how can I transfer my iPhone music library back to iTunes on my computer?
- From Apple Support Community
Maybe you lost all your music due to a system reinstall, computer repair, or iTunes crash, so you want to back up your iPhone music to your computer. Or, you're running out of storage on your iPhone and want to free up space by transferring music to your computer. Don't worry. This guide will walk you through the different ways to transfer music from iPhone to computer, whether you're using a Mac or PC.
- Way 1: Transfer Non-purchased Music from iPhone to Computer/Mac All at Once
- Way 2: Transfer Purchased-music from iPhone to PC with iTunes
- Way 3: Re-download iPhone Music from iTunes Store on Computer
- Way 4: Transfer Music from iPhone to Computer with Cloud Services
- How to Transfer Music from iPhone to Computer FAQs
Way 1: Transfer Non-purchased Music from iPhone to Computer/Mac All at Once
This method allows you to easily transfer all your music from your iPhone to your computer. While purchased music is easy to handle, many users also need to transfer unpurchased music. Unfortunately, iTunes doesn't support this feature, but third-party tools like MobiKin Assistant for iOS (Win and Mac) can help. Compatible with all iPhones (including the latest iPhone 16 series) and supporting iOS 18, this iPhone music transfer tool provides a reliable solution for transferring purchased and unpurchased music. Here are its key features.
Assistant for iOS - A reliable iPhone music transfer tool
- Transfer both purchased and non-purchased music to your computer.
- Preview data before transferring, allowing for selective file transfer.
- Ensure no damage to your music files or other iPhone content during transfer.
- Transfer additional files like photos, contacts, messages, notes, and more.
- Compatible with all iOS devices, including iPhone 16, 15, 14, 13, 12, 11, X, 8, 7, 6, and others.
Steps to transfer music from iPhone to computer using iOS Assistant without iTunes:
Step 1: Download and install Assistant for iOS on your computer. Launch the program and connect your iPhone using a USB data cable. Once the device is recognized, you will see the category management panel on the left.

Step 2: Click "Music" to access your iPhone's music library. Select the songs you want to transfer to the computer.

Step 3: Click the "Export" button to transfer the selected music from iPhone to computer. Once completed, your songs will be copied successfully.
Video Guide:
Way 2: Transfer Purchased-music from iPhone to PC with iTunes
Want to transfer music from your iPhone to your computer for free? Here's a solution. While iTunes allows you to transfer music, it's limited to purchased songs. Unfortunately, non-iTunes purchases can't be imported, and since iTunes can be buggy, it's a good idea to back up your iPhone data beforehand.
Steps to transfer iPhone music to your computer using iTunes:
- Download and install the latest version of iTunes on your computer. Connect your iPhone using a USB cable.
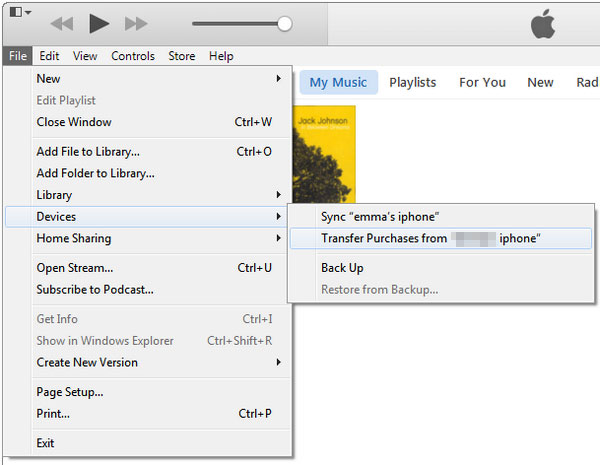
- In iTunes, click "File" > "Devices" > "Transfer Purchases from [your iPhone name]" in the upper-left corner.
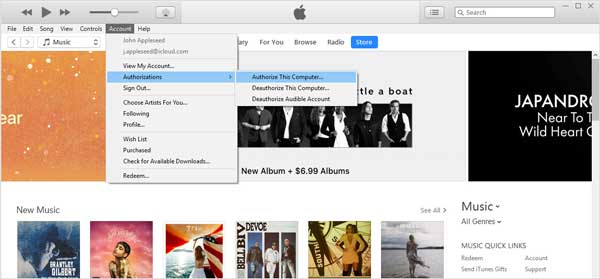
- If prompted, authorize your computer by going to "Account" > "Authorizations" > "Authorize This Computer".
- Wait for the transfer to complete. Then, click "Recently Added" on the left side of iTunes to view your purchased music.
- Select the songs you want to save and click the "Download" button. If you don't see the "Download" button, the music is already saved on your computer.
Way 3: Re-download iPhone Music from iTunes Store on Computer
If you just want to copy purchased songs from iPhone to PC, you can redownload them directly from iTunes Store to your computer without connecting iPhone.
Steps to redownload purchased music in iTunes Store:
- Open iTunes on your computer and click "Account" in the menu bar.
- Select "Sign In" and sign in with the Apple ID you used to purchase the songs.
- Go to "Account" > "Purchased" > "Music".
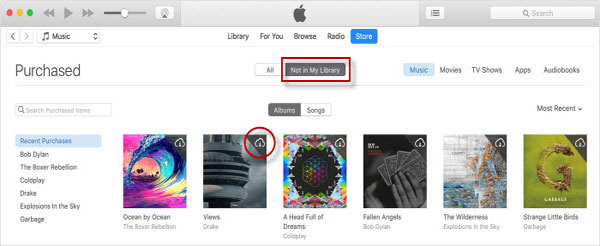
- Switch to the "Not in My Library" tab to view songs that are not yet on your computer.
- Click the cloud download icon next to a song to save it to your computer.
Way 4: Transfer Music from iPhone to Computer with Cloud Services
Another effective way to transfer music from iPhone to PC or Mac is to use cloud services. These platforms allow you to share files between devices logged into the same account. Whether you're moving music from iPhone to computer or vice versa, cloud services make it easy. Popular options like Dropbox, Google Play Music, and Amazon Music all support transferring music. Here's an example using Dropbox:
Steps to transfer music from iPhone to PC using Dropbox:
- Download and install the Dropbox app on your iPhone and computer. (Alternatively, you can access Dropbox via dropbox.com on your computer.)
- Sign in to Dropbox on both devices using the same account.
- Upload the songs you want to transfer from iPhone to Dropbox.
- Once the upload is complete, visit Dropbox on your computer to download the music files.
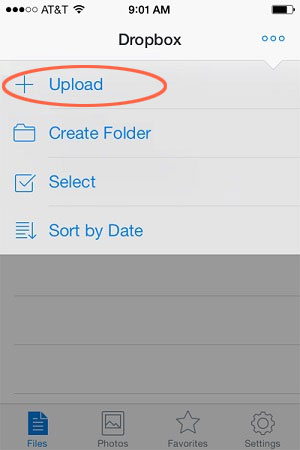
This method allows you to seamlessly transfer music from iPhone to PC or Mac. For tips on copying music from CDs to your iPhone, click here to learn more.
How to Transfer Music from iPhone to Computer FAQs
Q1: How to transfer music from iPhone to computer without iTunes?
There are several ways to transfer music from iPhone to computer without iTunes. You can transfer music files directly through third-party software such as MobiKin Assistant for iOS, re-download from the iTunes store, or share music files through cloud services such as network.
Q2: How to transfer non-iTunes music from iPhone to computer?
Unfortunately, there is no built-in method to transfer non-iTunes music directly to computer. To manage and transfer non-iTunes music, you can use a third-party application such as MobiKin Assistant for iOS. This tool allows you to transfer music, videos, contacts, and more between iOS devices and PC or Mac computers.
Q3: How to transfer audio files from iPhone to computer?
To transfer audio files such as music, tones, voice memos, etc. from iPhone to computer, third-party software such as MobiKin Assistant for iOS can help. Simply connect your iPhone via USB, select "Music" > "Voice Memos" (Songs or Tones), and click "Export" to move the files to the computer.
Q4: How do I download music from my iPhone?
To download music from Apple Music, open the app, find the song or album you want to add to your library, and tap the download icon at the top of the screen to save the music to your device.
The Bottom Line
All four methods allow you to transfer music from iPhone to computer, but they each have different features:
- MobiKin Assistant for iOS can transfer all non-purchased songs and playlists from your iPhone to PC or Mac in one go. It also supports transferring other types of content, making it a versatile choice.
- iTunes is great for transferring purchased music from your iPhone to your computer.
- Dropbox allows you to wirelessly access and transfer your non-purchased music on any device linked to the same Dropbox account.
Clearly, MobiKin Assistant for iOS offers a more comprehensive and user-friendly solution for managing your iOS content. Try transferring your music to your PC now!
Related Articles
iPhone Music Transfer - Easy Solutions to Transfer Music from iPhone to iCloud for Backup
How to Transfer Music from iPad to iPhone [2024 Updated]


