AirDrop is Not Working on Your Mac: 8 Quick Fixes
AirDrop is a favorite tool among Apple users because it makes file sharing quick and easy. But it can be really frustrating when your AirDrop on your Mac isn't working. A common issue is AirDrop getting stuck in the "Waiting" state. For example, your iPhone may recognize your Mac and show it as available, but when you try to send a file, it gets stuck, unable to complete the transfer. Your situation may vary slightly, but the good news is that AirDrop itself is reliable, and problems often have a simple cause.
In this guide, we'll share some simple fixes to get AirDrop working again. We'll also introduce a convenient alternative for smooth file transfers when you need a quick solution.

Part 1: Why is My AirDrop Not Working on My Mac?
Why isn't AirDrop working on your Mac? There are several possible reasons:
- Wi-Fi is turned off or unavailable.
- The file size is too large. (How to Transfer Large Videos from iPhone to PC?)
- Bluetooth is not working properly.
- Network or firewall settings are blocking the connection.
- The two devices are too far apart.
- You're not listed in the recipient's contacts.
- You aren't signed into iCloud.
- Other devices are interfering with the signal.
- The recipient declined the transfer.
- The file type isn't supported.
- Your Mac doesn't support AirDrop.
No matter the cause, the basics remain the same: make sure both Wi-Fi and Bluetooth are on, keep the devices within 30 feet (about 9 meters), and set your Mac to receive AirDrop requests. Below are the detailed steps to fix the issue.
You May Also Like:
Part 2: 8 Easy Ways to Fix AirDrop Not Working on Mac
Fix 1: Check if Your Mac Supports AirDrop
Before we discuss fixes, check whether your Mac actually supports AirDrop, especially if this is your first time trying to use it. You can confirm this by following these steps:
- Open "Finder" from the Dock.
- Click "Go" in the menu bar.
- Look for "AirDrop" in the list. If you don't see it, your Mac doesn't support it.
This step is important because sometimes the problem isn't a connection issue, but rather a compatibility issue. For example, one Mac might support AirDrop while another doesn't, which could explain why the transfer isn't working. Remember, AirDrop only works on Macs running OS X 10.7 or later.
Fix 2: Restart Both Devices
Sometimes, a simple restart is all it takes to get AirDrop working properly between your iPhone and Mac. Temporary software glitches, conflicting apps running in the background, or even overheating can cause AirDrop to fail. In some cases, low memory or system glitches can interfere with proper performance. Restarting both devices can resolve these minor issues and get them working again.
So, shut down your iPhone and Mac, restart them, and try AirDrop again. You may find that the problem has resolved.
You May Also Like:
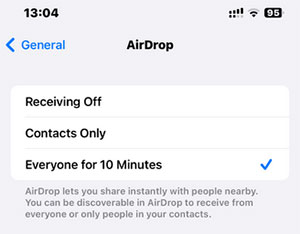
Fix 3: Make Sure the AirDrop Settings are Accurate
To successfully share files with AirDrop, you first need to make sure it's enabled on your Mac. Here's how to check:
- Open "Finder".
- Select "AirDrop" from the sidebar.
- Under "Allow me to be discovered by," choose either "Everyone" or "Everyone for 10 Minutes" (the exact option depends on your macOS version).
If you're sending files to an iPhone or iPad, double-check the settings on that device as well:
- Go to "Settings".
- Tap "General" > "AirDrop".
- Select "Everyone for 10 Minutes".
- Make sure "Bringing Devices Together" is turned on.
- Also, ensure "Use Cellular Data" is enabled.
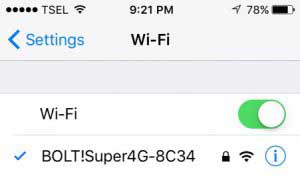
Fix 4: Make Sure that WiFi and Bluetooth are On for Both Devices
First, make sure both Wi-Fi and Bluetooth are turned on for your Mac and the other device. AirDrop relies on these connections to share files. In most cases, it uses Wi-Fi or Bluetooth, but if needed, it can also switch to cellular data. Keep in mind that if you're using Wi-Fi, both devices should be connected to the same network.
A quick way to fix connection issues is to simply turn Wi-Fi and Bluetooth off and then back on again.
- On a Mac, click the Control Center icon at the top right of the screen. Select Wi-Fi, choose your network, then click Bluetooth and toggle it off and back on to refresh the connection.
- On an iPhone or iPad, swipe down from the top-right corner to open Control Center. Tap the airplane icon to disable Wi-Fi and cellular, then tap the Bluetooth icon to switch it off. After that, tap the airplane icon again to re-enable Wi-Fi, Bluetooth, and cellular. Now, try sending your file with AirDrop.
Fix 5: Move Devices Closer Together
For AirDrop to work properly, keep your devices close together. This feature relies on Bluetooth and Wi-Fi, so distance and interference are crucial. Ideally, the two devices should be within 30 feet (9 meters) of each other, and even better if they're in the same room.
Obstacles like walls, heavy furniture, or metal objects can block or weaken the signal, resulting in an unstable or impossible connection. If the devices are too far apart, AirDrop might not detect them at all.
To avoid this, place the devices as close together as possible with few obstructions. This simple step can often quickly resolve connection issues. (Why Is AirDrop Taking So Long?)
Fix 6: Disable Personal Hotspot
Having your Personal Hotspot on can disrupt AirDrop and prevent devices from connecting. This is a frequent cause, but it's simple to fix.
To turn it off on your iPhone:
- Open "Settings" and tap "Personal Hotspot".
- Switch "Allow Others to Join" to "Off".
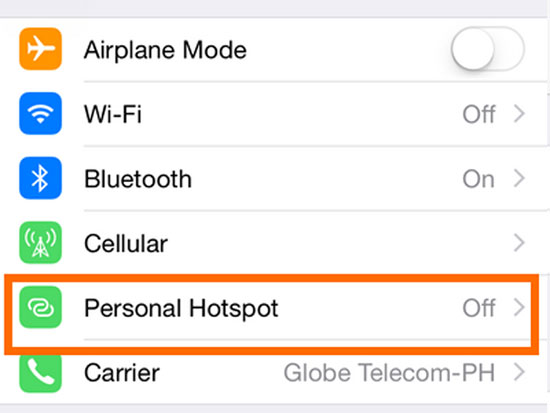
After turning off the Personal Hotspot, try using AirDrop again. With the hotspot disabled, your devices should connect smoothly without any interruptions.
Fix 7: Unlock the Firewall to AirDrop
Sometimes, your Mac's firewall can prevent AirDrop from working properly. To fix this:
- Open "System Settings", then go to "Network" > "Firewall".
- Click "Options".
- Make sure "Block all incoming connections" is turned off. Once done, click "OK" to save your settings.
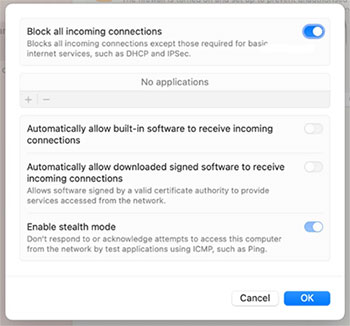
This ensures your firewall isn't stopping AirDrop from connecting.
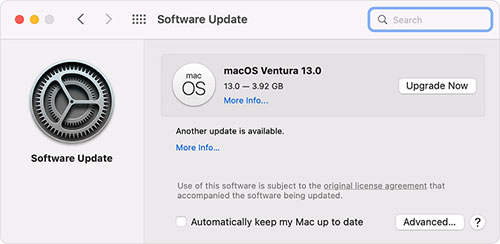
Fix 8: Keep macOS and iOS Up to Date
One of the easiest ways to fix AirDrop issues is to make sure your devices are running the latest software. Outdated versions can create compatibility problems, while updates often bring improvements and bug fixes for AirDrop.
To update macOS:
- Open the Apple menu and choose "System Settings".
- Navigate to "General > Software Update".
- If an update is listed, click "Install Now".
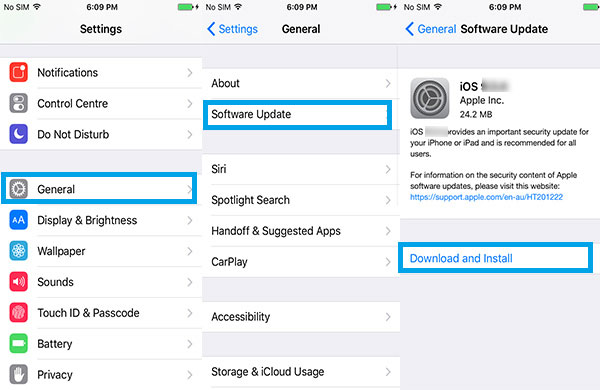
To update iOS:
- Open "Settings" and go to "General".
- Tap "Software Update".
- If a new version is available, select "Download and Install".
Part 3: Transfer Data From iPhone to Mac without AirDrop
If the above fixes are too time-consuming, or you need to transfer files quickly, try an AirDrop alternative for a smooth and fast experience. Mobikin Assistant for iOS is a great option. It allows you to easily and stress-free transfer data between iPhone and Mac, regardless of file size. Even large files can be completed in just minutes!
This software features an intuitive interface that makes it easy for anyone to use, without any technical knowledge. Furthermore, it supports transferring up to 15 different types of data from iPhone to Mac, some of which even AirDrop can't handle. It's fast, reliable, and user-friendly.
Key Features of Assistant for iOS:
- One click to transfer and backup your whole iPhone data on Mac/MacBook;
- Supports various data types, including iPhone contacts, text messages, music, movie, books, playlist, etc.;
- All models of iPhone are supported by this program well, including iPhone 17/16/15/14/13/12/11/X/8/7/6, and etc.;
- Support to restore the backup file back to your iPhone without any data loss;
- It also comes with Windows version: MobiKin Assistant for iOS.


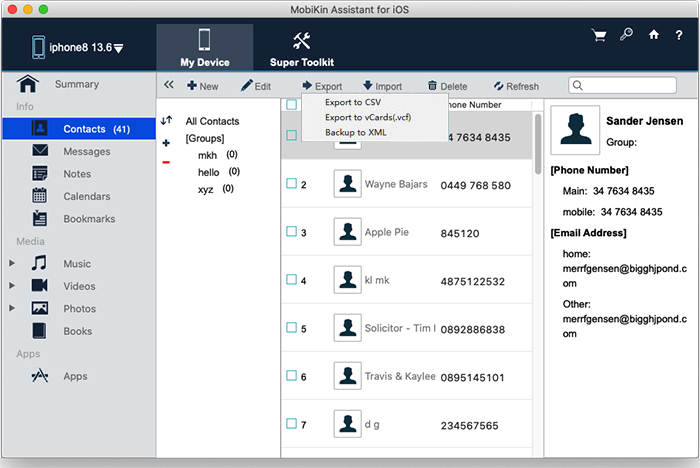
Follow these simple steps to move data from your iPhone to Mac with Assistant for iOS (Mac):
Step 1: Download and install the Assistant for iOS software on your Mac. Then, connect your iPhone to your Mac using a USB cable. Open Assistant for iOS, and it will automatically detect your iPhone.

Step 2: Select the file categories you want to export from the data categories in the left sidebar. After a quick scan, you can preview and select the files you want to export.

Step 3: Click the "Export" button. Keep your iPhone connected to your computer. Assistant for iOS will quickly complete the transfer process.
What if you decide later to transfer some or all of your data back to your iPhone? Assistant for iOS's "Import" feature makes this process very simple. Check out the steps:
Step 1: Connect your iPhone to your computer using USB, then open Assistant for iOS on your Mac.
Step 2: Select the data you want to import from the categories displayed in the left sidebar and click the "Import" button.
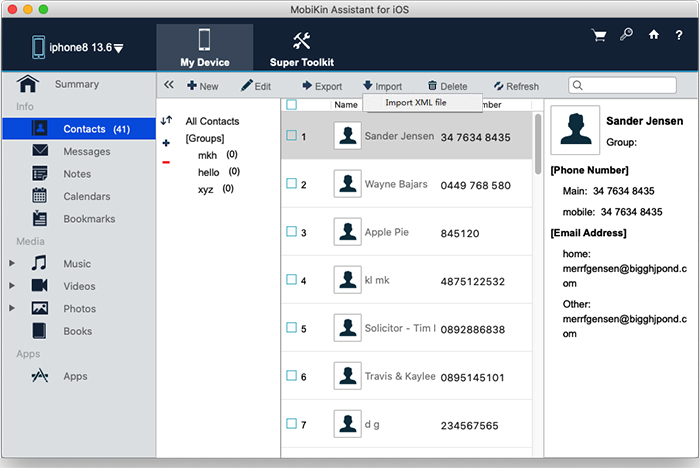
Step 3: In the pop-up window, select the data you want to import from your Mac to your iPhone. This will begin importing your data to your iOS device.
Video Guide:
Words in the End
AirDrop is a convenient way to quickly transfer files between your iPhone and Mac, but sometimes it doesn't work as expected. This article covered the main reasons why AirDrop might fail and offered solutions to get it back up and running.
Hopefully, one of these tips helped, and you can now share files effortlessly. If AirDrop still gives you trouble, you can try Mobikin Assistant for iOS as a reliable alternative. Simply install it on your Mac, and it lets you transfer all your data smoothly, without the usual AirDrop limitations.
Related Articles:
How to AirDrop Videos from iPhone to iPhone [Guide]
[Full Guide] How to AirDrop from iPhone to Mac/MacBook/iMac
[Solved] AirDrop Declined – 10 Best Fixes in 2025
How to Transfer Photos from iPad to iPad? 5 Ways You Must Know!
