[7 Ways] How to Transfer Photos from iPhone to PC in Windows 7?
At some juncture, the Photos app might monopolize storage, surpassing 30GB on a 64GB iPhone—significantly encumbering the device. It becomes imperative to contemplate moving all photos from the iPhone to a computer and subsequently deleting them to reclaim storage space. Despite Microsoft's launch of Windows 11, a portion of users persists with the dated Windows 7 OS. However, the process of transferring photos from an iPhone to a PC remains consistent, regardless of the operating system employed. This guide offers seven well-established techniques to transfer photos from iPhone to PC in Windows 7.

- Way 1: Transfer Photos from iPhone to PC in Windows 7 via Assistant for iOS
- Way 2: Transfer Photos from iPhone to Windows 7 via AutoPlay
- Way 3: Get Photos Off iPhone on Windows 7 with Windows Explorer
- Way 4: Download iPhone Photos to Windows 7 via iCloud
- Way 5: Import Photos from iPhone to Windows 7 with Dropbox
- Way 6: Copy Photos from iPhone to PC in Windows 7 with OneDrive
- Way 7: Transfer Pictures from iPhone to Computer in Windows 7 by Email
- FAQs: Why Can't I Transfer Photos from iPhone to Windows 7?
Way 1: Transfer Photos from iPhone to PC in Windows 7 via Assistant for iOS
To import photos from iPhone to Windows 7, MobiKin Assistant for iOS is probably the best way. This is a professional iPhone transfer software for Windows PC that can help you transfer photos from iPhone to PC safely and quickly in just a few clicks. In addition to photos, you can also transfer videos, music, text messages, books, call logs, contacts and many other types of files between iPhone/iPad/iPod and computer. It also makes it easy to export, import, delete iPhone photos to anywhere you like.
Assistant for iOS - Best iPhone Photo Transfer:
- Effortlessly move either your entire photo collection or hand-picked selections from iPhone to your PC/Mac.
- Seamlessly transfer all media - be it landscapes, portraits, videos, and more.
- Enable photo export from various albums like Camera Roll, Photo Library, and Photo Sharing.
- Swift transfer speeds without compromising photo quality.
- Intuitive interface and user-friendly layout facilitate easy initiation, ideal for beginners.
- Ensures wide compatibility across multiple iPhone models - from iPhone 7 to the latest 15.
Now, download and install Assistant for iOS, and follow the steps below to transfer photos from iPhone to PC in Windows 7.


Step 1. Run Assistant for iOS
Link your iPhone to a Windows 7 (or later) computer. Open MobiKin Assistant for iOS and adhere to the on-screen instructions to connect your iPhone via a USB cable.

Step 2. Select the photos you want to transfer
Assistant for iOS facilitates the transfer of various data types—choose "Pictures." By default, files are saved to your desktop. Modify the storage path if required.
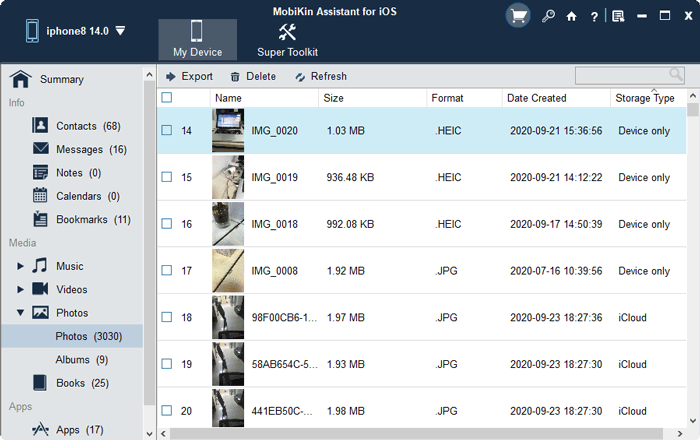
Step 3. Get photos off iPhone without iTunes in windows 7
Initiate the transfer by clicking "Export" to move photos from iPhone to PC. Transfer duration varies based on file sizes. Be patient during this process.
Video Guide:
You Might Also Need:
- 7 Ways to Transfer Photos/Pictures from Computer to Phone (iOS & Android)
- How to Transfer Photos from SD/Memory Card to iPhone? [Fixed in 2023]
Way 2: How to Transfer Photos from iPhone to Windows 7 via AutoPlay
Upon connecting an external storage device to your Windows PC, an AutoPlay window will appear. Utilize this function to transfer pictures and videos to a Windows 7 laptop/PC.
How do I transfer photos from my phone to my computer Windows 7 via AutoPlay?
- Connect your iPhone to the PC using a USB cable.
- Upon the prompt on your iPhone to "Trust This Computer," tap "Trust."
- Once this PC recognizes your iPhone, the AutoPlay window will emerge. Select "Import pictures and videos" to initiate the import process.
- All your pictures will then transfer to your computer, stored in a folder labeled "My Pictures." To alter the default storage location, access "Import Setting" at the bottom left corner and follow the on-screen instructions.
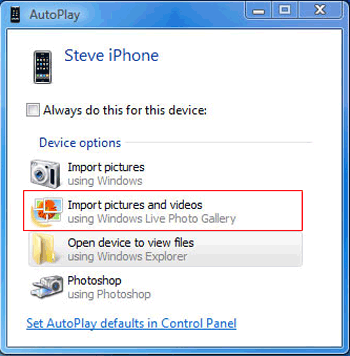
Note: AutoPlay may restrict the export of specific pictures. For selective photo exports, explore alternative available methods.
See More:
- iPhone Photos Disappeared from Camera Roll? Here Are 9 Useful Fixes
- How to Fix iPhone/iCloud Photos Not Showing Up on Mac? [Ways Most People Don't Know]
Way 3: How to Get Photos Off iPhone on Windows 7 with Windows Explorer
Windows Explorer offers an alternative, free method to download iPhone photos to Windows 7. Similar to the AutoPlay method mentioned earlier, you'll need to install the latest iTunes on your Windows 7 computer to enable access to your iPhone's content. Subsequently, proceed with the following steps.
- Link your iPhone to the PC using a USB cable. Access My Computer to locate your connected iPhone.
- Perform a double-click to reveal the Internal Storage icon.
- Upon double-clicking, the DCIM (Camera Roll) folder becomes visible.
- Access the folder and choose the desired photos for transfer. Employ drag-and-drop to copy and paste the selected iPhone photos onto your Windows 7 PC.

Way 4: How to Download iPhone Photos to Windows 7 via iCloud
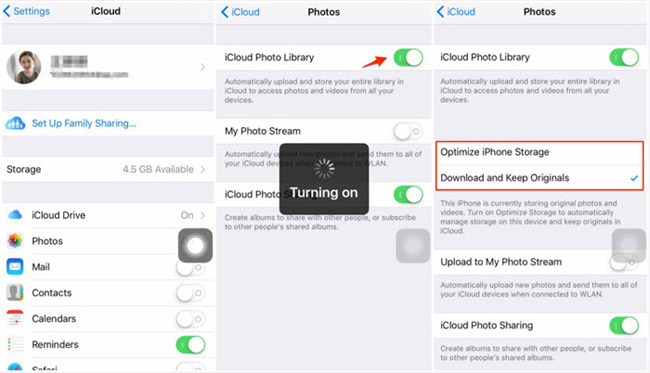
iCloud, Apple's sanctioned cloud service, enables the uploading of data for backup or synchronization purposes. You have the option to activate iCloud Photos, subsequently gaining access to retrieve the required photos from your iCloud storage.
- To sync photos using iCloud: Navigate to Settings > Photos > iCloud Photos (or iCloud Photo Library) on your iPhone.
- Ensure your device is connected to a stable Wi-Fi network.
- Install and set up the iCloud for Windows application on your PC, using the same Apple ID as your iPhone.
- Within the Photo section, opt for "Download new photos and videos to my PC," then confirm and select "Apply" to import iPhone photos to Windows 7.
- Automatically, any fresh iPhone photos will be transferred to your PC when connected to Wi-Fi.
Way 5: How to Import Photos from iPhone to Windows 7 with Dropbox
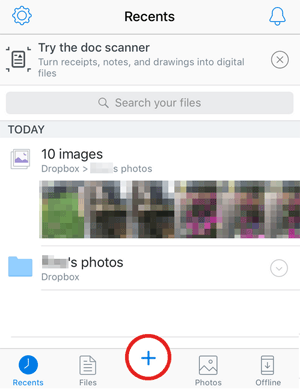
With 2 GB of free storage, Dropbox lets you copy photos from iPhone to Windows 7 with great ease. Yet, it makes the transfer without retaining the original folder structure and may create duplicates after the migration. Next, go through the steps for copying photos from iPhone to PC Windows 7 by Dropbox:
- Get Dropbox for iOS installed on your iPhone and log in with your existing Dropbox account, or, if you don't have one, kindly set up a new Dropbox account before proceeding.
- Navigate to Files, designate the intended destination folder, and access the three dots located at the top-right corner. Opt for Upload File, tap on Photos, and then choose the specific photos you wish to upload. (Detailed guide on how to back up files to Dropbox.)
- For your PC, either visit Dropbox via a web browser or install the Dropbox application, then log in. Navigate to the folder where you recently synchronized your photos.
- Access the folder and proceed to download the photos that interest you.
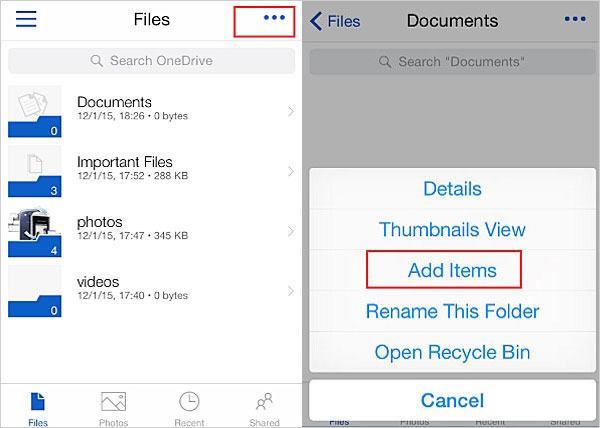
Way 6: Copy Photos from iPhone to PC in Windows 7 with OneDrive
OneDrive serves as Microsoft's cloud backup tool. Similar to iCloud, you have the option to establish a OneDrive account for storing pictures, and subsequently transfer these photos to your computer. How do I import photos from iPhone to computer Windows 7 using OneDrive? Follow the steps below:
- Get the OneDrive app installed on your iPhone, then open it to set up your OneDrive account and make sure to keep a record of your login details.
- Tap the three dots icon at the screen's top, and choose "Add Items". Proceed to select Upload > Choose Photos from iPhone > Upload > Finish to store photos within OneDrive.
- Next, access the OneDrive website on your computer, navigate to Folder options, and choose the Download folder.
- Extract the photos from the downloaded zip file onto your PC.
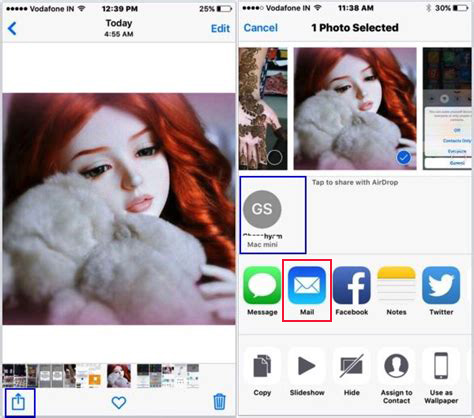
Way 7: How to Transfer Pictures from iPhone to Computer in Windows 7 by Email
In addition to the previously mentioned techniques, an alternative way for importing photos from iPhone to Windows 7 is through the traditional method of using email. However, it's important to note that this approach is suitable only when transferring a limited number of photos, as email attachments are subject to size restrictions.
How to transfer photos from iPhone to Windows 7 without iTunes using Email:
- Launch the Photos application on your iPhone.
- Access your Camera Roll within the app.
- Choose the specific photos, limiting the selection to no more than five, that you intend to transfer.
- Tap the export icon positioned in the lower-left corner of the screen.
- Select "Mail" from the list of available options.
- Follow the on-screen instructions to input the required details for the transfer.
- Subsequently, log in to your email account on the computer and proceed to download the images to your PC.
FAQs: Why Can't I Transfer Photos from iPhone to Windows 7?
Encountering issues during the iPhone photo transfer using the aforementioned methods is possible. Here are some frequently asked questions (FAQs) addressing the problems related to transferring iPhone photos to a Windows PC:
Q1: iPhone Shows Empty Internal Storage or DCIM Folder
If you encounter an issue where your iPhone's DCIM folder appears empty, consider these potential solutions:
- Ensure your iPhone permits access by your PC: Navigate to iPhone Settings > Reset > Reset Location & Privacy > Unplug and re-plug the cable.
- On your PC, access Device Manager from the Start menu, then expand Portable Devices. Right-click on Apple iPhone > Select Uninstall and mark "Delete the driver software for this device." Reboot your PC after unplugging the iPhone, then reconnect to verify the issue.
- Check if the DCIM folder is hidden: Open File Explorer on your PC > View > Show/Hide > Ensure the visibility of the DCIM folder.
Q2: "File Explorer" is Absence on Windows 10
To access File Explorer in Windows 10:
- Press the Windows logo key + E on your keyboard.
- Select Start > Documents.
- Open This PC from the desktop.
To rectify File Explorer's absence:
- Check for Windows updates: Click Start > Settings > Update & Security > Windows Update.
- Adjust text size in Display settings: Start > Settings > System > Display > Set text size to 100% (avoid 175%).
- Clear File Explorer history: Open My PC or any folder > Locate Quick Access > Right-click and select Options > Clear File Explorer history.
Q3: My Computer Doesn't Recognize My iPhone
If your computer fails to recognize your iPhone or if it doesn't appear on your PC/Mac, attempt the following tips:
- Repeatedly unplug and plug in your iPhone.
- Restart either your iPhone or computer.
- Test with an alternate USB cable.
- Update the device driver: On your PC, access Device Manager from the Start menu > Expand Portable Devices > Right-click the device name > Choose Update driver > Opt for "Search automatically for updated driver software."
Ending Words
The preceding information detailed the process of copying photos from iPhone to PC in windows 7, providing multiple methods for accomplishing this task. However, some approaches may have drawbacks. For instance, utilizing "AutoPlay" can result in a disorderly arrangement of exported images, and there might be instances where your iPhone doesn't appear in Windows Explorer.
Comparatively, the MobiKin Assistant for iOS offers an optimal solution. Not only does it facilitate photo transfers from iPhone to computer, but it also extends support for transferring various other iOS content, including contacts, messages, videos, notes, call history, music, and more. Get started with the Assistant for iOS Free Trial now to experience its capabilities firsthand.
Related Articles:
How to Back Up iPhone to Windows 10/11/8/7? [Way 1 Is the Quickest]
5 Popular Ways to Mirror iPhone/iPad to Windows 10/11 [2023 Latest]
Photos Didn't Transfer to New iPhone? Reasons & Awesome Solutions
6 Ways - How to Delete Photos from iPhone but Not iCloud?
How to Transfer Photos from Android to PC Easily?
How to Transfer Photos from iPhone to iPad Easily (iPad Pro/Air/mini Included)
