6 Ways - How to Delete Photos from iPhone but Not iCloud?
Q: Can I delete photos off my iPhone to free up capacity but keep them on iCloud?
My iPhone has run out if capacity. Can I delete photos off but leave them on my iCloud?
In order to keep iPhone run smoothly, most people tend to delete some pictures from their devices but keep them on iCloud so that they can view and use the wanted images when needed. However, the majority of users have no the right idea about how to delete photos from iPhone but not iCloud.
Maybe you also interested in:
- Best 2 Ways to Permanently Delete Photos from iPhone or iPad
- Can't Delete Photos from iPhone/iPad? Here are Solutions!
If you are also one of these users, don't worry! This tutorial will tell you 6 quick and safe solutions to delete photos from iPhone without deleting from iCloud, including disabling iCloud Photos, signing out of iCloud, logging in with another iCloud account, using iCloud alternative to backup photos, syncing iPhone photos to iCloud on computer and directly erasing all pictures from iPhone.
- Way 1. Disable iCloud Photos on iPhone
- Way 2. Sign out of iCloud then Delete Photos
- Way 3. Log in with Another iCloud Account
- Way 4. Sync iPhone Photos to iCloud from Computer
- Way 5. Directly Erase All Photos from iPhone via MobiKin Eraser for iOS
- Way 6. Use iCloud Alternative to Backup iPhone Pictures
#1 How to Delete Pictures from iPhone but Not iCloud by Disabling iCloud Photos?
Turning off iCloud Photos on your iPhone will allow you to make any changes on the phone without deleting or adding any files to iCloud. This is because there'll be no synchronization taking place after disabling iCloud Photos. Therefore, the first method you can try is to disable iCloud Photos on your iPhone and then delete the pictures.
The followings are the detailed steps on how to delete pictures from iPhone but not iCloud by disabling iCloud Photos:
Step 1. Open the "Setting" App on your iPhone.
Step 2. Click on your name and then choose "iCloud" option.
Step 3. Another menu will appear with the available settings under iCloud. Just find out the "Photos" option and click on it.
Step 4. Toggle off the button next to "iCloud Photos" to turn off the iCloud synchronization.
Step 5. Open the "Photos" App on your iPhone and select the images you don't want to keep then press "Delete".

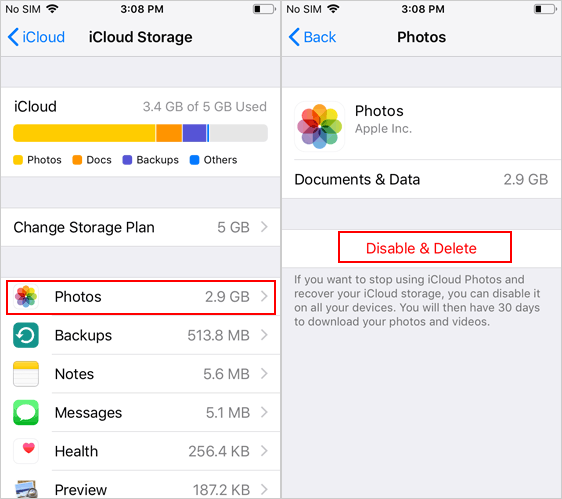
This is the way to disable iCloud Photos on iPhone individually. If you wish to disable this feature on all your iDevices, you can go to "Settings" > your name > "iCloud" > "Manage Storage" > "Photos" > "Disable & Delete".
#2 Sign out of iCloud to Delete Photos from iPhone but Not iCloud Photo Library
Signing out of iCloud is also a feasible way to remove photos from iPhone but not iCloud. By signing out of iCloud, you'll disable the connection between your phone and iCloud thereby blocking synchronization of your data. This will ensure that your photos remain intact in your account even when they are deleted on the phone.
Now let's see how to delete photos from iPhone but keep on iCloud by signing out of iCloud:
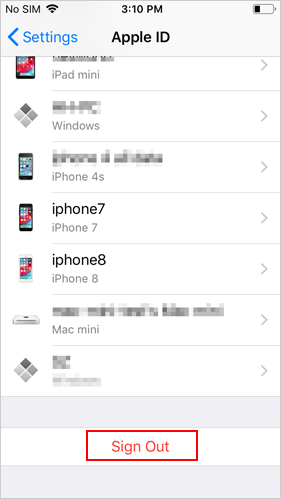
Step 1. Unlock your iPhone and open "Settings". Then tap on your name to enter next section.
Step 2. Select "Sign Out" which should be located towards the bottom of the page.
Step 3. A pop-up window may appear asking if you truly want to sign out. Confirm this action then proceed to switch off "Find My iPhone" if required.
Step 4. After signing out, you can go to "Photos" App to move your unwanted images to trash bin.
You may want to know:
#3 Log in with Another iCloud Account to Delete Photos from iPhone but Keep on iCloud
For those who have 2 iCloud accounts, you have one more option - log in with another iCloud account on your iPhone. After syncing your iPhone with another iCloud account, the files saved in the previous account won't be changed after you delete the pictures on your iPhone since you have synced your phone data with the new account rather than the old one.
Here is how to log into another iCloud account to delete pictures from iPhone but not iCloud:
Step 1. Make sure you have copied all your photos to your iCloud account.
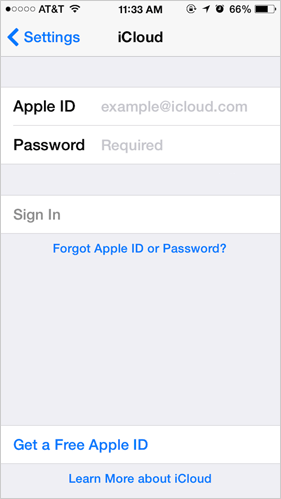
Step 2. Sign out of that account then log in with another account.
Step 3. Go to your "Photos" App then select all the pictures you don't want then delete them.
#4 Delete Photos from iPhone but Not iCloud by Syncing iPhone Photos to iCloud from Computer
To keep photos on iCloud but delete from iPhone, you can try to sync your images to iCloud from computer as well. What does that mean? That means you can first export all your iPhone photos to computer and then transfer them from computer to iCloud Drive instead of Photo Library. This may sound a little bit troublesome but you still can have a try.
Here is how to sync iPhone photos to iCloud from computer:
Step 1. Transfer all photos from iPhone to your computer.
Step 2. Go to "Photos" App to delete all the pictures that you don't want to keep on your iPhone.
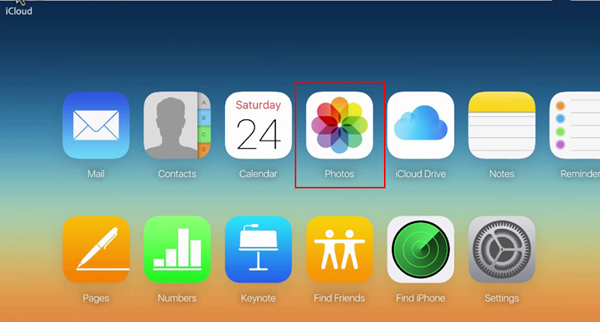
Step 3. Go to iCloud.com to upload the exported pictures from computer to your iCloud Drive. To get a detailed tutorial, you can go to the page "How to Back Up Photos to iCloud Effortlessly".
#5 How to Delete Photos from iPhone without Deleting from iCloud via MobiKin Eraser for iOS?
MobiKin Eraser for iOS should be a helpful tool to help you delete photos from iPhone without deleting from iCloud. However, this means would only be suitable for those who want to permanently remove pictures from your iDevice - it will erase and overwrite all files and settings on iOS devices, leaving no chances of recovery. Thus, you can take it into consideration if you wish to completely remove the photos on your phone.
Notice: Before using the software to erase your photos, please remember to backup your iPhone data. Meanwhile, to ensure that your wanted files won't be deleted due to synchronization, please sign out your iCloud account before doing the erasure.
Want to get this tool? Just click the icon below to download the right version onto your computer and then go with the wizard to properly install it.


After completing the installation, you can follow the steps below to remove photos from iPhone but not iCloud:
Step 1. Open the program and connect your phone to the computer that has the software installed in it.
Step 2. Follow the on-screen prompts to make the phone recognized by the software.
Step 3. On the primary interface, you can tap on "Erase".
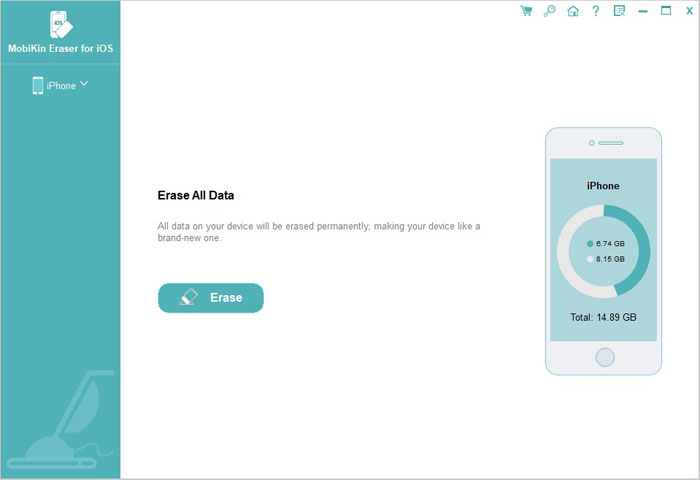
Step 4. Next, please click on "Medium" to select an erasing level and then click on "OK" to confirm your option.

Step 5. Type in "delete" in the blank box and hit "Erase" to start erasing your phone data.

#6 Use iCloud Alternative to Backup iPhone Photos
If you delete photos just for freeing up the device storage space, then you can use an iCloud alternative to backup your images so that you do not need to worry about losing them after a deletion. And here, MobiKin Assistant for iOS is strongly recommended.
MobiKin Assistant for iOS is one of the most powerful tools to manage and backup different types of files in iDevice. With the help of this tool, you will be able to transfer your iPhone photos to computer with simple clicks. And if you want, you can even directly use it to backup all your phone data to iTunes with one simple click. It is worth mentioning that it allows you to backup files to iTunes repeatedly and these backup files won't be covered. After saving your pictures to computer or iTunes, you can remove them from your device without worries.
If you are interested in this program, just click the icon below to download and install it on your computer:


Then you can use the iCloud alternative to backup your pictures:
Step 1. Launch the software and use a USB cable to connect your iPhone to the computer.
Step 2. Go with the prompts on the screen to make the connected iPhone recognized and once done, you will get the following interface:

Step 3. Choose "Photos" > "Albums" in the left panel and then all the pictures on your device will be displayed in the right pane.
Step 4. Tick off the images that you want to backup and hit the "Export" button to save your photos to computer.
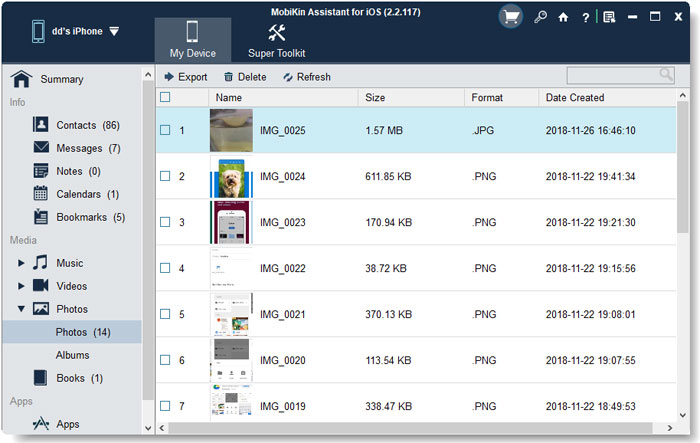
This would be the easiest way to transfer photos from iPhone to computer. But if you want to get more choices, you can turn to the page "How to Transfer Photos from iPhone to Laptop? 4 Solutions for You". After backing up your photos to computer, you are free to delete any pictures on your iPhone.
The Bottom Line
These methods show you how to delete photos from iPhone but keep on iCloud, which ensures that even when you create more space on your iPhone, you still retain all your precious memories through your pictures. You can, therefore, choose any method you like to achieve this goal. A choice shouldn't be difficult to make considering how easy they all are.
Related Articles:
How to Delete iCloud Backups from iPhone, Mac, and Windows?
4 Simple Tactics to Delete Everything on Your Phone Samsung Galaxy
4 Ways to Delete Albums on iPhone/iPad Completely
How to Delete Tango Chat History from iPhone?
