How to Transfer Photos from Sony Xperia to Computer in 8 Easy Ways
With advancing technology, Sony Xperia users can collect countless images, whether by capturing them with the phone's camera or downloading them from the internet. However, as storage fills up, freeing space becomes necessary to save new photos. In this situation, copying pics to a PC is a smart solution - and there are 8 effective ways to transfer photos from Sony Xperia to a computer.
- Way 1: How to Transfer Photos from Sony Xperia to PC/Mac with Assistant for Android (Handy)
- Way 2: How to Download Photos from Xperia to Computer with Android Backup & Restore
- Way 3: How to Transfer Photos from Sony Xperia to Computer via USB
- Way 4: How to Get Pictures from Sony Xperia to Laptop via Dropbox
- Way 5: How to Transfer Photos from Sony Xperia to Computer Using Email
- Way 6: How to Copy Photos from Sony Xperia to PC via Bluetooth
- Way 7: How to Transfer Photos from Xperia to PC by Xperia Companion
- Way 8: How to Move Pics from Xperia to PC via Google Photos
Way 1: How to Transfer Photos from Sony Xperia to PC/Mac with Assistant for Android
Well, to effortlessly and effectively copy photos from Sony to PC, the best way is to turn to the Sony Photo Assistant - MobiKin Assistant for Android. This tool can sync all or individual images from Sony to the computer with simple clicks. And not only photos, other media files like music, videos, and more file types like contacts, text messages can be copied between Sony devices and computers.
Core features of this Sony Photos Assistant:
- Transfers not only photos but also contacts, text messages, call logs, apps, music, videos, and more between Sony Xperia and laptop/PC/Mac.
- Back up and restore Android data with one click.
- Enables you to transfer, edit, backup, manage, delete, and view mobile data.
- Supports almost all Android phones and tablets, including Xperia 1 VII, 1 VI, 10 VI, 5 V, 1 V, 10 V, rumored 10 VII, Xperia Zoom 2025, Xperia Pro II (concept), and the cancelled Xperia 5 VI, Sony Z5/Z4/Z3/Z2/Z1, and more.
- Manage your device data on your PC directly.
- Easy to use, powerful function, and 100% secure.
You can click the blue icons below to download the free trial version to have a try.


When you complete the software installation, you can start to transfer Sony photos to PC in simple 3 steps. Here we will take the Windows version as an example.
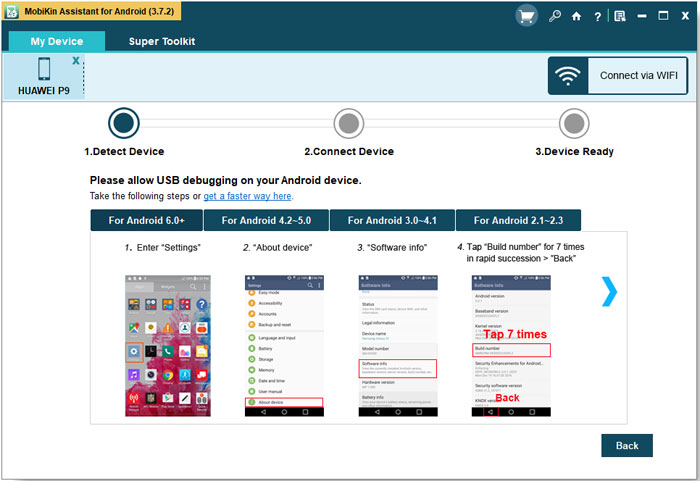
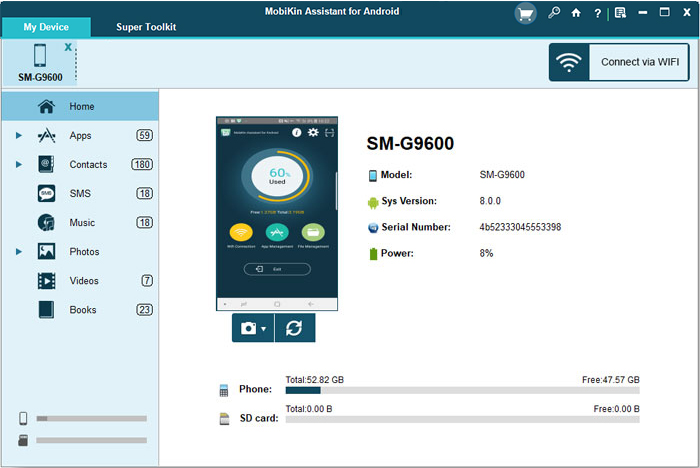
Step 1. Link Sony Xperia - Launch the software on your computer and connect Xperia to PC via its USB cable. Then follow the prompt to get your device recognized. After that, the program will automatically detect the connected device, and you can see the interface of the tool like below when the recognition succeeds. (Want to connect your phone to PC via WiFi?)
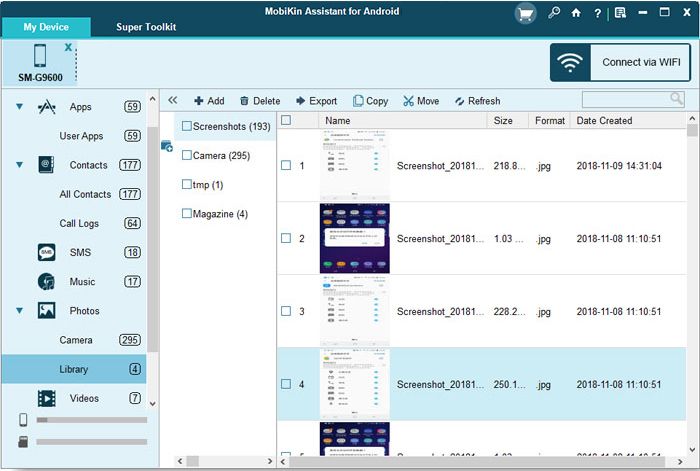
Step 2. Preview the Files - Choose the "Photos" tab from the left side menu, and the program will scan the connected Sony phone and show all the photos in the right panel. You can carefully preview the photos scanned out.
Step 3. Select the Photos to Transfer - Choose the photos you want to transfer to the computer and click the "Export" button from the top menu to start transmission.
Apart from exporting photos or other files, you can also use this Android phone manager to import, delete, or add data to your Android phone. Mac users can install the Mac version to perform Sony Xperia Mac File Transfer.
Video Guide:
Way 2: How to Download Photos from Xperia to Computer with Android Backup & Restore
Android data backup & restore tool, also called MobiKin Backup Manager for Android (Windows/Mac) is another bet for you to download photos from your Sony phone to your computer with ease. You can not only create a backup for your photos, but also bring out all the contacts, SMS, music, videos, etc. from the device to a computer.
MobiKin Android Backup & Restore allows you to save these files on your computer for backup, or it can help you restore them to other Android devices with one click.

How to Use Android Backup & Restore to transfer photos from Sony to computer?
Step 1: Run Android Backup and Restore after installing it, and plug your Sony phone into the computer via a USB cable. The program will recognize the connected phone, and then the main interface will appear like the following picture.
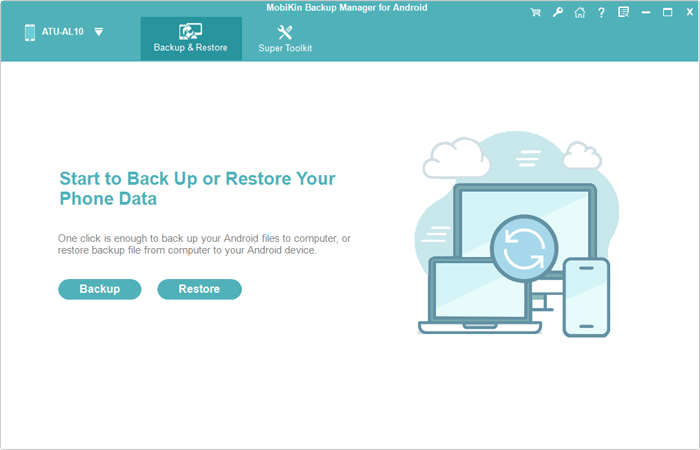
Step 2: Choose the "Backup" option from the new interface, and all transferred file types are listed here. Just make the "Photos" category checked and click the "Browser" button to specify a location to save the backup photos.
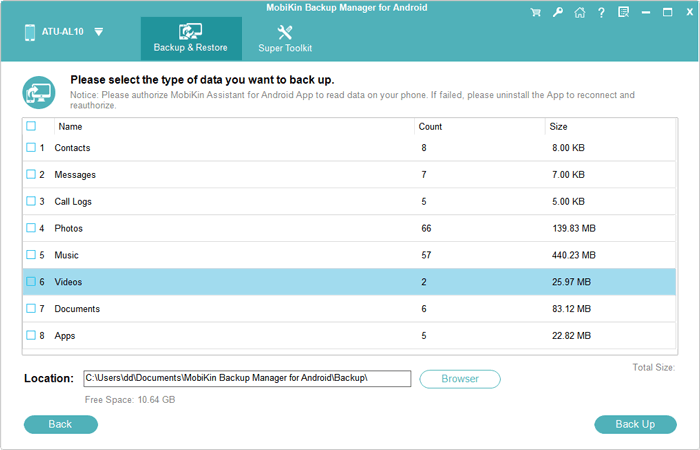
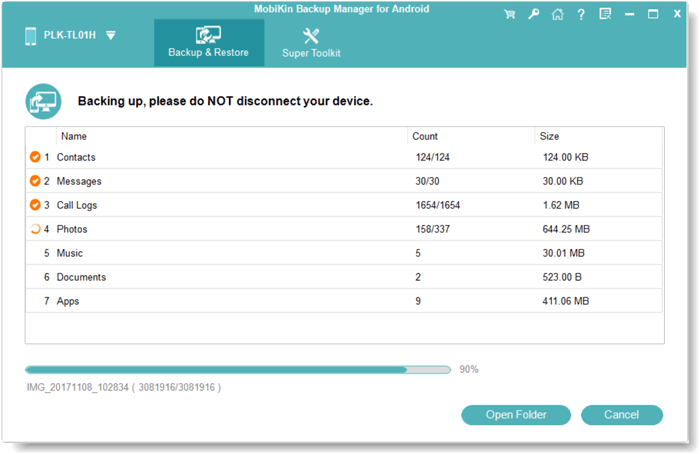
Step 3: After all the above settings, you can give a click on the "Back Up" button, and Android Backup and Restore will copy all pictures from your OnePlus to the computer.
You May Like:
Way 3: How to Transfer Photos from Sony Xperia to Computer via USB
The most common method to transfer photos from a Sony Xperia to a computer is by connecting the phone with a USB cable and using copy & paste. However, this can sometimes be a bit inconvenient. If you'd like to try it, simply follow the steps below:
Step 1. Use an Android USB cable to connect Xperia to PC and turn on the USB debugging on your device if required. (If you get a prompt about selecting a connection type, just choose the "File Transfer" option.)
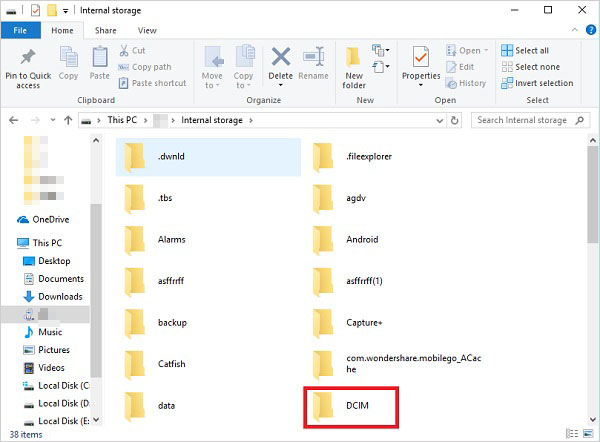
Step 2. Enter "This PC" on your computer and then click your Sony device to open it.
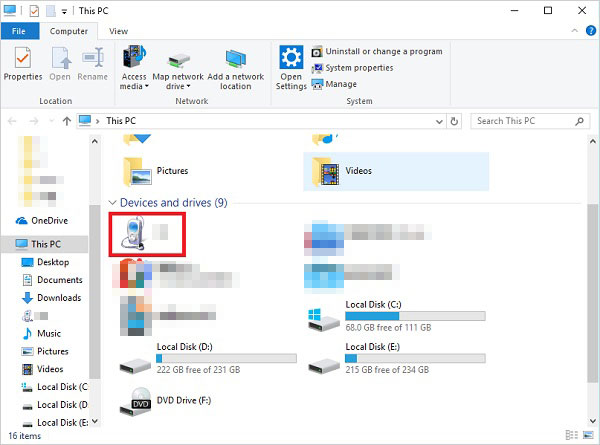
Step 3. Find out and double-click the folder of "DCIM" to open it, and then double-click the "Camera" folder where your photos are stored. You have to open other folders if your photos are not in the selected album.
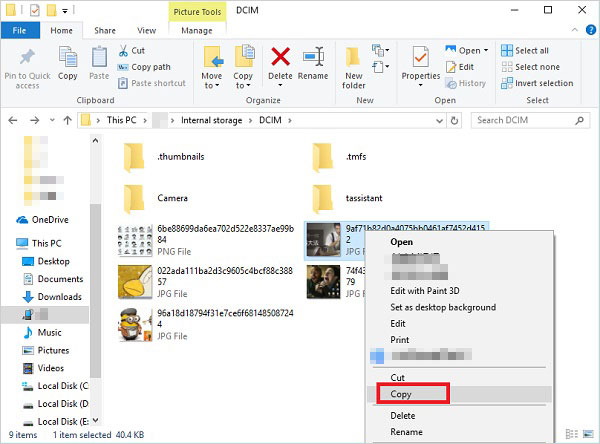
Step 4. Select the photos you want to move to your computer and right-click to choose the "Copy" option. Or you can directly press "Ctrl + C" to copy these images.
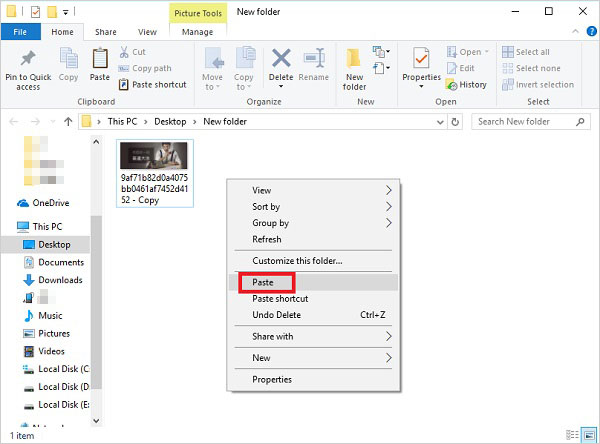
Step 5. Create a new folder where you want to save the copied Sony photos. Then right-click to choose the "Paste" option, or you can directly press "Ctrl + V" on your keyboard to paste the photos to the folder.
If you want to transfer photos from the computer to Sony, you can select the photos on the computer and copy and paste them into the "Camera" folder on your Sony phone.
Way 4: How to Get Pictures from Sony Xperia to Laptop via Dropbox
Another way is to sync the Sony photos to a computer via Dropbox. Dropbox is a free cloud service that allows you to store different files like photos. So you can first sync the images to the server and then download them to your computer. Here's how to back up Android pics with cloud:
Step 1. Download - Download Dropbox App from Google Play Store and go with the wizard to properly install it on your device.
Step 2. Upload - Open the application and sign in with your account. Then you can tap on the "+" icon and choose "Upload photos or videos". After that, you can select all the pictures you want to save from your phone and upload them to the Dropbox App.
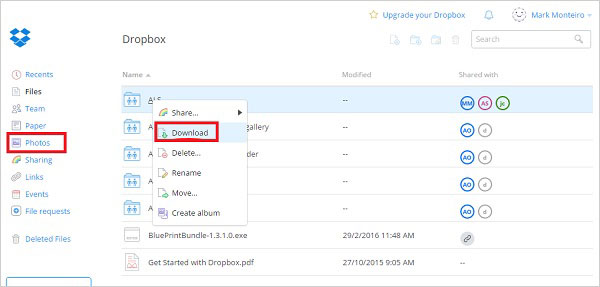
Step 3. Transfer - You can now go to dropbox.com on your computer and log in to the same account you used to upload images. Then you can download them to your computer.
Way 5: How to Transfer Photos from Sony Xperia to Computer Using Email
To transfer photos from your Sony Xperia Z5/XZ/XA to the computer via Email, you need to connect the Sony device to a stable WiFi network to ensure the smooth transmission of photos. The WiFi network determines the transmission speed. Here's how it operates:
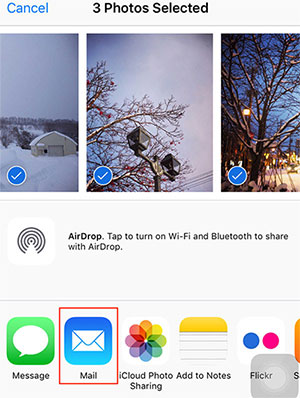
Step 1. Go to the "Gallery" app on your Sony phone. Preview and select the photos that you want to transfer to the computer. Then, tap on the "Share" icon represented by two dots connected to one, and choose "Mail".
Step 2. You will be popped up with a "Recipient" section. Type your own email address and send.
Step 3. Now, go to your computer and connect to your email account. Finally, open the mail you sent from your Sony phone and download the attached photos on your computer.
Don't Miss:
Way 6: How to Copy Photos from Sony Xperia to PC via Bluetooth
How to transfer files from Sony Xperia to PC via Bluetooth? To do so, you need to make sure your computer has a Bluetooth option. (Here is a guide on how to move files from Android to Mac by Bluetooth). Learn how it works:
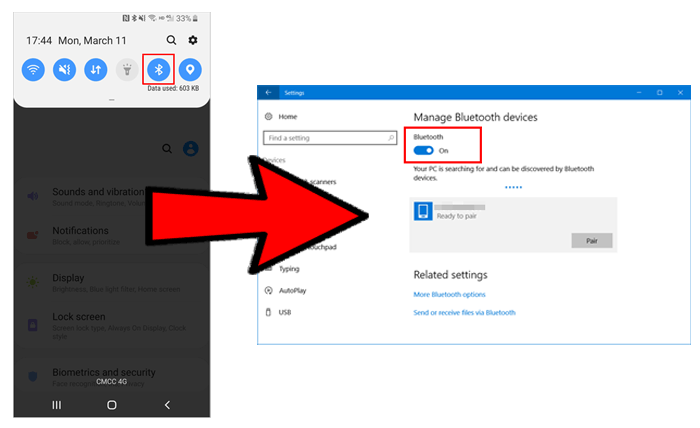
Step 1. Turn on Bluetooth in the "Settings" menu on your laptop. And do the same for your Sony Xperia.
Step 2. Pair your Sony phone and computer together via Bluetooth. To do that, you need to search for other devices connected via Bluetooth when you turn the Bluetooth on your Sony phone. Find your computer's name and select it.
Step 3. Once the two devices are paired, go to the "Gallery" app on your Sony phone and select the photos that you want to transfer.
Step 4. Tap on the "Share" icon represented by two dots connected to one and select "Bluetooth", then tap on the name of your computer.
Way 7: How to Transfer Photos from Xperia to PC by Xperia Companion
Xperia Companion provides a backup feature that allows you to transfer photos from Sony Xperia 1 VII, 1 VI, 10 VI, 5 V, 1 V, 10 V, Z5, Z4, Z3, etc., to PC. However, it doesn't allow you to select the photos before transferring. Learn how it works:
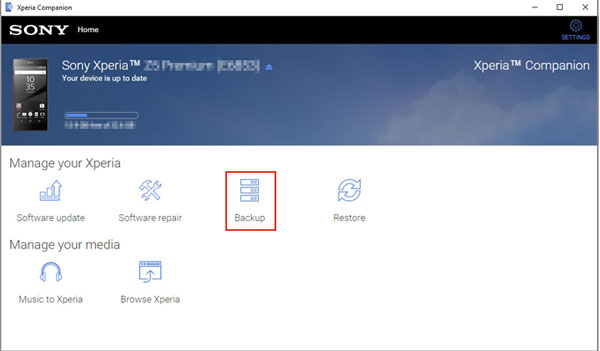
Step 1. Download, install and launch the Xperia Companion on your computer. Then, link your Sony Xperia to the computer via a USB cord and wait until this program automatically detects your phone.
Step 2. After the connection, click "Backup" from the home screen of this tool. Give a name to your backup file and click "Next".
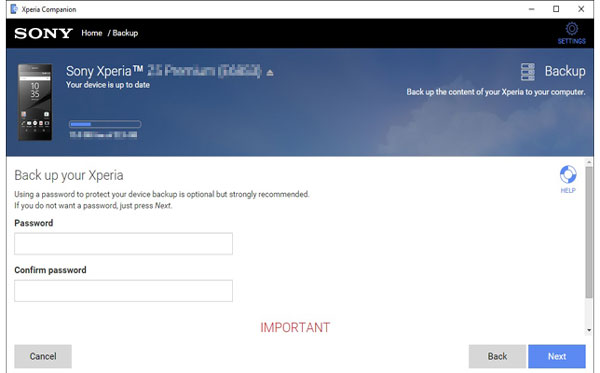
Step 3. Select the "Camera" only if you just want to transfer photos. Then, click "Next" to continue. Set a password to your backup if you need it, and click "Next" again to start the backup process.
Way 8: How to Move Pics from Xperia to PC via Google Photos
Google Photos lets you sync and back up pictures from your Sony Xperia to the cloud automatically, ensuring they are safe and accessible anytime. Once uploaded, you can move pics from Xperia to PC via Google Photos by simply logging into your account on photos.google.com and downloading them. Here's how:
- On your Xperia, open the Google Photos app.
- Sign in with your Google account.
- Turn on Backup & Sync to upload your photos to Google Photos.
- On your PC, open a web browser and go to photos.google.com.
- Sign in with the same Google account.
- Browse and select the photos you want.
- Click the Download button to save them to your computer.

Final Thoughts
Above are 8 common and easy ways to transfer photos between a Sony Xperia and a computer. You can compare and select the suitable one to move your images. For those who want to perform the transfer effortlessly and securely, the first means - using MobiKin Assistant for Android would be the optimal way. Of course, if you have a better solution to implement this task, please feel free to share it in the comments.
Related Articles:
How to Recover Deleted Photos on Sony Xperia 1V/10V/5IV/1IV? 4 Tactics
How to Hard Reset Sony Xperia 1V/10V/5IV/1IV/Z7/Z6/Z5? 4 Flexible Ways
7 Solutions to Unlock Sony Xperia When Locked by Various Locks
Sony Xperia Broken/Dead Screen Data Recovery: 4 Solutions & Extra Tips
