How to Transfer Music from iPhone/iPad to External Hard Drive [Full Guide]
Today, iPhones and iPads have much more storage space than before, but a large music library can quickly take up a lot of space. If you're running low on storage, you'll have to delete some songs to make more room for new files. But what if every song is important to you? You can transfer your music to an external hard drive for safekeeping before deleting them.
So, how do you accomplish this music transfer task? You may have tried using iTunes, but found that it only allows the transfer of purchased songs. Don't lose heart. iTunes isn't the only way to move music from your iPhone or iPad to your computer. Read on to learn about better ways to transfer music to an external drive!
Method 1: Transfer Music from iPhone/iPad to External Hard Drive via Assistant for iOS
"Can I back up my iPhone/iPad/iPod to an external hard drive without any effort?" Well, that isn't hard to do, and a smart program is a necessary given. For example, if you get a tool like MobiKin Assistant for iOS (Win and Mac), you can complete the transfer in three easy steps. Let's now take a quick look at this software.
Principal features of Assistant for iOS:
- Transfer music from iPhone/iPod/iPad to external hard drive in only a few clicks.
- Let your selectively copy purchased & non-purchased songs before the transfer.
- Transfer data between iDevices and computers.
- Back up and restore an iOS device within one tap.
- It is the best iTunes alternative to manage iOS content on a computer directly.
- The supported data types: Music, Photos, Videos, Notes, Contacts, SMS, Books, Safari Bookmarks, Voice Memos, Podcasts, Playlists, and more.
- Work well with various iDevices, including iPhone 17/17 Pro/17 Pro Max/Air/16/15/14/13/12/11/X/8/7/6, iPod touch, iPad, etc.
- It won't disclose your privacy.


How to transfer songs from iPhone/iPad/iPod to external hard drive via Assistant for iOS?
Step 1. Connect iDevice to a computer
Install and launch the program on your computer. Connect your iPhone/iPad/iPod touch to the computer via a USB cable. Also, don't forget to insert your external hard drive into the computer.

Step 2. View and select your wanted songs
When your device is recognized, select "Music" from the left sidebar. Here, all music files on your iDevice will be scanned out. You can preview and mark whatever you want.
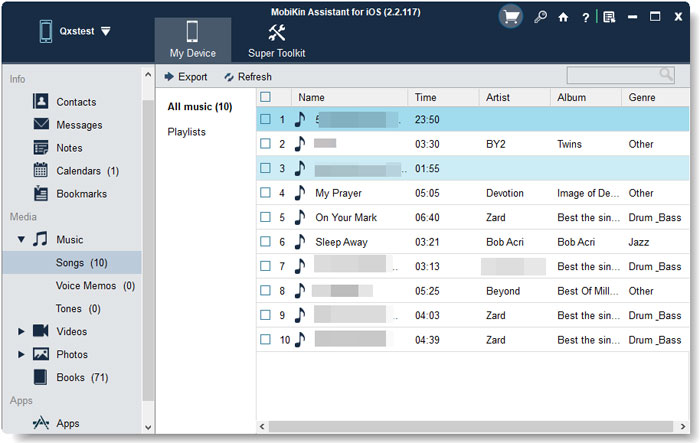
Step 3. Transfer music from iPhone to external hard drive
After the selection, tap "Export" from the top screen, choose the external hard drive as the output location, and all your desired songs will be stored on the hard drive at once.
Video Guide:
You May Also Need:
Method 2: Transfer Songs from iPhone to External Hard Drive via iTunes
Some Apple users may want to do the job with iTunes. This is feasible in general. However, please note that iTunes only enables you to deal with the purchased songs and transfer such formats as MP3, AAC, M4A, WAV, M4R, M4B, AIF, and AIFF.
To copy iPhone songs to a hard drive via iTunes, you can:
- Run iTunes and plug your iPhone into the computer.
- Tap on "Trust" on your device when asked. (iTunes couldn't connect to this iPhone?)
- Click on Account > Authorizations > Authorize This Computer.
- Tap File > Devices > Transfer Purchases from "[your iPhone name]".
- Click "Recently Added" to check your songs.
- You can select the music and click the "Download" button to save the song on your computer.
- If you don't see the "Download", just right-click the song > select "Show" in Windows Explorer to open the directory where your songs are located.
- Copy and paste music to your external hard drive.

Method 3: Transfer iPhone Songs to Hard Drive by Streaming
There are a variety of tools out there that help stream data from your iPhone/iPad to a PC and then to an external hard drive. And Apowersoft Phone Manager is such a product, allowing you to copy songs to the hard drive from your device via streaming. Yet, during the use, the transfer doesn't continue when it is interrupted.
How to copy music from iPhone to external hard drive by streaming?
- Download, install, and launch the Apowersoft tool on your computer.
- Then connect your PC and iPhone to the same WiFi network.
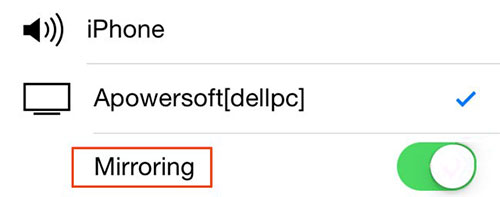
- Go to the "Control Center" on your phone and enable Airplay.
- Choose your computer and turn on the "Mirroring" option.
- You can now play any songs on your iPhone, and you can copy them from your PC to the connected hard drive.
Extended Reading:
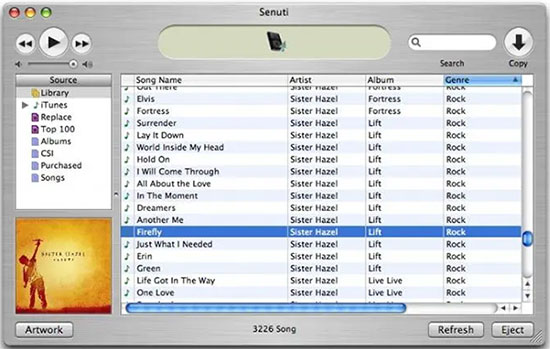
Method 4: Copy Music from iPhone/iPod to Hard Drive via Senuti
Senuti can be used to transfer or back up music collections from iPhone to a computer running macOS X 10.5 or later. And you need to drag and drop the songs to your external hard drive afterward. Here, note that it is free to try but costs $19 after 1,000 song transfers.
How to transfer music from iPhone to an external hard drive via Senuti?
- Open the latest version of iTunes on your Mac computer.
- Click on "Edit" > "Preferences" and select the "Devices" tab.
- Check the box for "Prevent iPods, iPhones, and iPad from syncing automatically" and click "OK".
- In iTunes, click on "Edit" > "Preferences" and select "Advanced".
- Enable "Share iTunes Library XML with other applications" and tap "OK".
- Launch Senuti and plug your iPhone into your Mac.
- When you receive a hint asking you whether you would like to erase and sync your iPhone/iPad/iPod, click "Cancel".
- All the music files stored on your iDevice should be displayed on the program window.
- Just select the tracks you want and click "Copy" to add your songs on your iPhone to your Mac computer.
- Get your external hard drive linked to your Mac.
- Finally, copy the entire music folder you just created onto it.
Words in the End
Judging from the methods above, we can clearly draw the conclusion that MobiKin Assistant for iOS is an all-rounder compared with the rest tools. Because it assists you in managing your iOS music and other content, in addition to helping transfer a lot of music files in the simplest way possible. Finally, if you find this page valuable, please share it on social media to let more folks know.
Related Articles:
How to Transfer iTunes Library to External Hard Drive?
3 Feasible Ways to Transfer Music from Windows Media Player to iPhone/iPad
Can I Delete Songs from iPhone But Keep Them on iTunes? Of Course, You Can!
