
How to Transfer Music from iPhone to PC Windows 11/10 with or without iTunes
TL;DR:
Want to transfer music from iPhone to Windows 11/10? Here are several practical methods to help you move songs from iPhone to PC easily:
- Transfer music from iPhone to Windows 11/10 without iTunes using MobiKin Assistant for iOS.
- Move purchased iPhone songs to Windows PC with iTunes.
- Sync iPhone music to Windows 11/10 through iCloud Music Library.
- Transfer iPhone music files using Google Drive, email, or messaging apps.
- Re-download previously purchased songs from the iTunes Store to your computer.
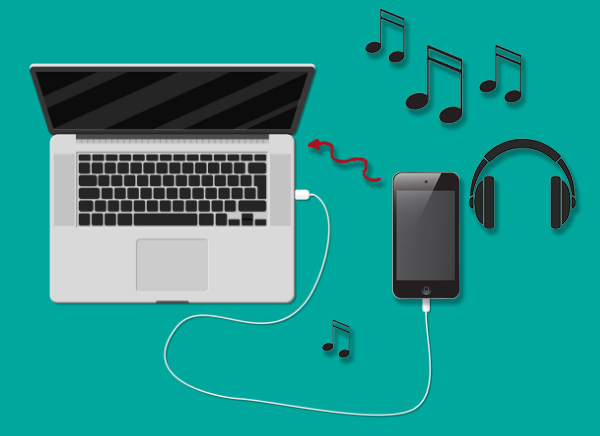
Transferring music from iPhone to a Windows 11/10 computer is a common way to back up songs, free up storage space, or manage your music library more easily. However, since iPhone does not allow users to directly copy music files through File Explorer, you may need other solutions to complete the transfer. In this guide, we will show you several practical ways to transfer music from iPhone to Windows 11/10, including using professional transfer software, iTunes, iCloud Music Library, and cloud storage services.
- Part 1: Transfer Music from iPhone to Windows 11/10 without iTunes
- Part 2: Transfer Purchased Music from iPhone to Windows 11/10 via iTunes
- Part 3: Transfer Music from iPhone to Windows 11/10 via iCloud Music Library
- Part 4: Transfer Music from iPhone to Windows 11/10 Using Google Drive
- Part 5: Transfer Music from iPhone to Windows PC Using Email or Messaging Apps
- Bonus: How to Re-download Purchased Songs from iTunes Store to Computer
- FAQs About Transferring Music from iPhone to Windows 11/10
Part 1: Transfer Music from iPhone to Windows 11/10 without iTunes
If you want to transfer music from your iPhone to a Windows 11/10 computer, iTunes may not be the ideal choice, especially when you need to export both purchased and non-purchased songs selectively. In this case, MobiKin Assistant for iOS (Win and Mac) provides a simpler solution. It allows you to transfer music from iPhone to PC without iTunes while keeping the original audio quality. Besides music transfer, it also supports managing, backing up, and restoring various iPhone data types on your computer.
Key Features of MobiKin Assistant for iOS:
- Transfer music from iPhone to Windows 11/10 PC without quality loss.
- Export selected songs or the entire music library from iPhone to computer.
- Manage various iOS data, including music, photos, videos, contacts, messages, notes, calendars, books, and more.
- Back up and restore iPhone with just one tap.
- Manage iPhone content directly from Windows or Mac without using iTunes.
- Support a wide range of iPhone and iPad models, including iPhone 17/16/15/14/13/12/11/X, iPad 11/10/9/8/Pro/Air/mini, etc.
- Protect your personal data during the transfer process.


How to Transfer Music from iPhone to Windows 11/10 with Assistant for iOS:
Step 1. Connect Your iPhone to Windows 11/10 PC
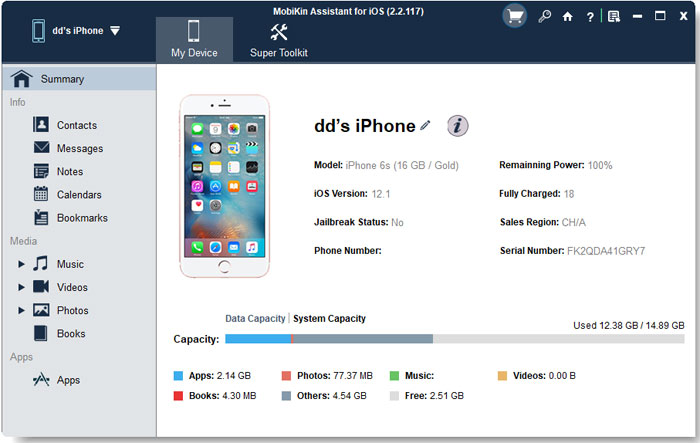
Download and install MobiKin Assistant for iOS on your Windows computer. Launch the program and connect your iPhone to the PC using a USB cable. Follow the on-screen instructions to let the software recognize your device. (What if my iPhone fails to connect?)
Step 2. Select Music Files from Your iPhone
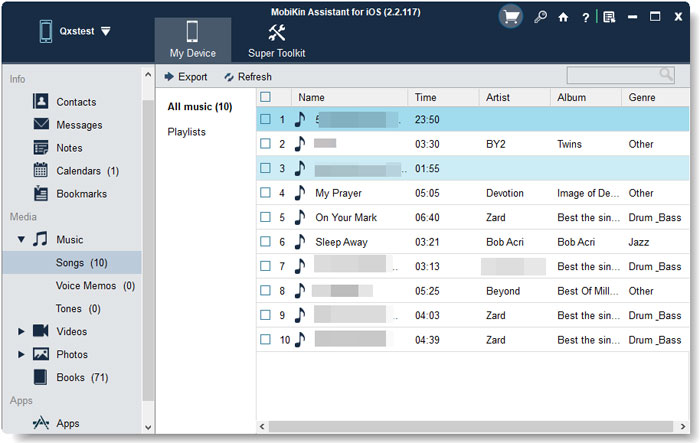
Once your iPhone is detected, click "Music" from the left sidebar. The program will load all available songs stored on your iPhone. Preview the music files and select the songs you want to transfer.
Step 3. Export Music from iPhone to Windows 11/10
Click "Export" from the top menu, choose a destination folder on your computer, and the selected iPhone songs will be transferred to your Windows 11/10 PC within a short time.
Video tutorial on how to transfer music from iPhone to computer:
Part 2: Transfer Purchased Music from iPhone to Windows 11/10 via iTunes
iTunes can help transfer purchased songs from your iPhone to a Windows 11/10 computer, but it has some limitations. Unlike third-party iPhone transfer tools, iTunes does not support exporting all music stored on your device, such as imported MP3 files or non-purchased songs. This method only works for music purchased from the iTunes Store.
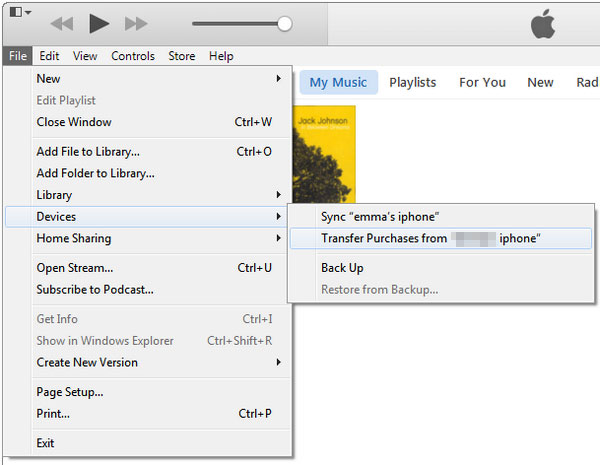
- Install and open the latest version of iTunes on your Windows PC. Connect your iPhone to the computer using a USB cable. (iTunes couldn't connect to this iPhone?)
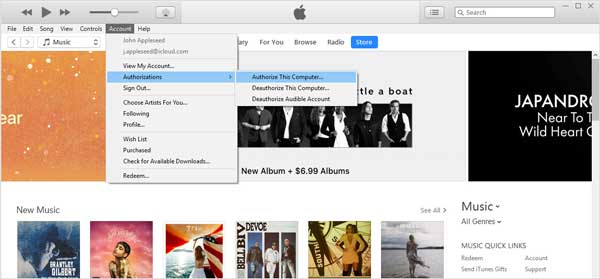
- Click "Account" from the top menu and choose "Authorizations" > "Authorize This Computer". Then sign in with the Apple ID used to purchase your music.
- Click "File" > "Devices" in iTunes, and select "Transfer Purchases from [your iPhone name]".
- iTunes will transfer eligible purchased songs from your iPhone to the iTunes library on your computer.
- After the process finishes, open the "Music" section in iTunes Library to view the transferred songs.
Part 3: Transfer Music from iPhone to Windows 11/10 via iCloud Music Library
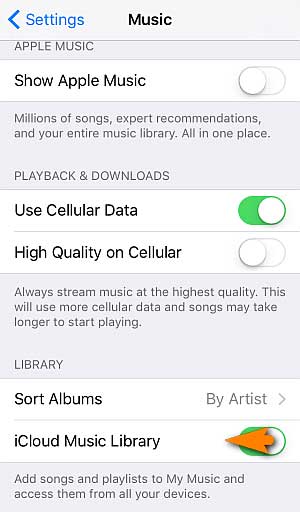
If you use Apple Music or iTunes Match, iCloud Music Library (now called Sync Library) is another way to access your iPhone music on a Windows 11/10 computer. Instead of directly copying songs from your iPhone to PC, it syncs your music library across your Apple devices using the same Apple ID. This method is convenient if you mainly listen to music through Apple Music, but it requires an Apple Music subscription or iTunes Match.
- Open the "Settings" app on your iPhone and tap your name at the top. Then go to "Media & Purchases" and make sure you are signed in with the same Apple ID used on your Windows computer.
- Go back to "Settings", tap "Music", and turn on "Sync Library". Wait for your iPhone music library to sync with iCloud.
- Install and open the Apple Music app or iTunes on your Windows 11/10 computer. Sign in with the same Apple ID as your iPhone.
- In the app settings, enable the "Sync Library" option. After that, your music library will start syncing to your Windows computer.
- Once the sync process is complete, open the "Library" section to view your iPhone music. You can then stream the songs or download available tracks to your computer.
See More:
Part 4: Transfer Music from iPhone to Windows 11/10 Using Google Drive
Cloud storage services can also help you move music files from your iPhone to a Windows 11/10 computer. This method is more suitable for DRM-free audio files, downloaded songs, or music files saved on your iPhone. Here, we take Google Drive as an example. You can upload music files from your iPhone to the cloud and then download them to your Windows PC.
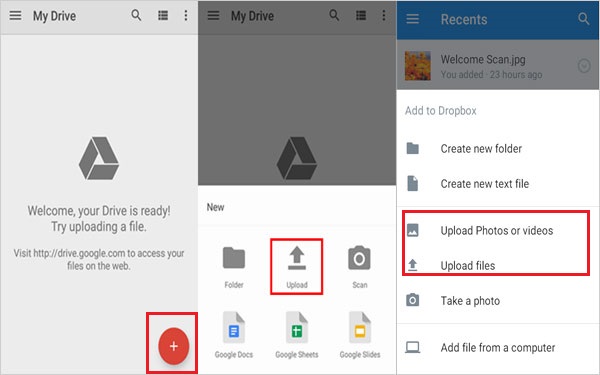
- Install and open the Google Drive app on your iPhone. Sign in with your Google account and tap the "+" button at the bottom-right corner.
- Select "Upload" and choose the music files you want to transfer from your iPhone. Wait until the upload process is complete.
- Open a browser on your Windows 11/10 computer and visit Google Drive. Sign in with the same Google account.
- Find the uploaded music files, right-click the songs you need, and select "Download" to save them to your computer.
- After the download finishes, you can open the destination folder on your Windows PC and access the transferred music files.
Using cloud storage is a simple way to move individual music files between iPhone and Windows computers, especially when you do not want to install additional desktop software. However, it may take more time when transferring a large music collection due to upload and download speeds.
You May Also Need:
Part 5: Transfer Music from iPhone to Windows PC Using Email or Messaging Apps
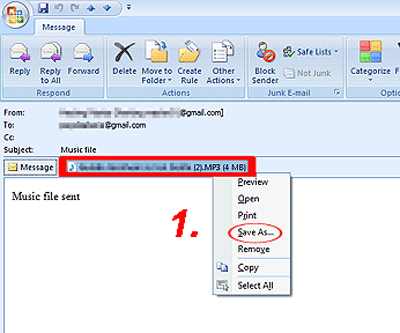
For transferring a small number of audio files, email or messaging apps can be a quick and convenient option. You can send music files from your iPhone and download them on your Windows PC. This method works best when you only need to transfer a few small files instead of an entire music library. Here, we take email as an example.
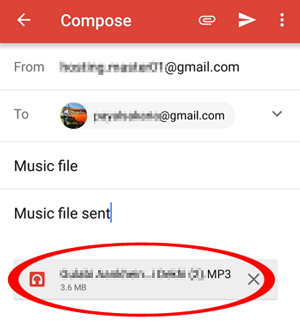
- Open the "Mail" app on your iPhone and create a new email. Tap the attachment option and select the music file you want to send.
- Enter your own email address as the recipient and tap "Send" to upload the music file.
- Open your email account on your Windows 11/10 computer and find the message you just sent.
- Download the attached music file and choose a location to save it on your PC.
- After the download is complete, you can open the folder and access the transferred music file on your Windows computer.
Bonus: How to Re-download Purchased Songs from iTunes Store to Computer
If you purchased songs from the iTunes Store but cannot find them on your computer, you can download them again with the same Apple ID. This method allows you to restore previously purchased music without transferring files from your iPhone. (How to delete music from iPhone but not iTunes?)
On Windows 11/10 and macOS Mojave or earlier:
- Install and open iTunes on your computer.
- Click "Account" from the top menu and sign in with the Apple ID you used to purchase the songs.
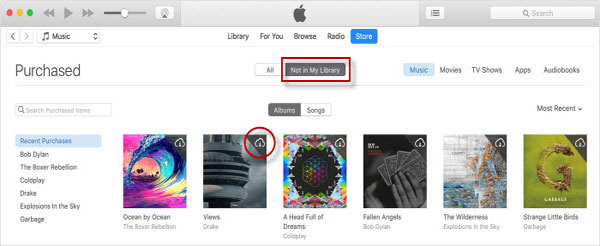
- Select "Account" > "Purchased" and choose "Music".
- Click "Not in My Library" to view purchased songs that are not currently stored on your computer.
- Find the songs you want and click the "Download" icon to save them again.
On macOS Catalina or later:
- Open the "Music" app on your Mac.
- Click "iTunes Store" from the sidebar.
- Select "Purchased" and choose "Music".
- Find the songs you want to restore and click the "Download" button.
FAQs About Transferring Music from iPhone to Windows 11/10
Q1. Where are transferred iPhone songs saved on a Windows PC?
The saved location depends on the method and software you use. When using a transfer tool, you can usually choose a destination folder before exporting music. For iTunes, transferred purchased songs are stored in the iTunes media folder on your computer.
Q2. What music file formats can be transferred from iPhone to Windows PC?
Common audio formats such as MP3, AAC, WAV, and AIFF can usually be transferred and played on Windows computers. However, some protected files may not be available for direct transfer due to copyright restrictions.
Q3. Why is my iPhone music not showing up on my Windows computer?
This can happen if your iPhone is not properly connected, the computer is not trusted by your iPhone, or the music is only available through Apple Music streaming. Try reconnecting the device, updating related software, or checking whether the songs are stored locally on your iPhone.
Q4. Why can't I transfer Apple Music songs from iPhone to my computer?
Apple Music songs are protected by DRM (Digital Rights Management), which prevents users from exporting downloaded Apple Music tracks as regular audio files. You can access them by signing in with the same Apple ID and enabling Sync Library.
Last Words
Transferring music from iPhone to Windows 11/10 is easier when you choose the right method. iTunes works well for moving purchased songs, while cloud services can be useful for transferring a few audio files. However, if you want to export more types of music from your iPhone without complicated syncing steps, MobiKin Assistant for iOS provides a more flexible solution. It allows you to selectively transfer songs to your computer while keeping the original quality. Choose the method that best fits your music library and transfer needs.
Related Articles:
9 Easy Ways to Fix "Music Disappeared from iPhone/iTunes Library"
3 Best Methods to Add Music from iTunes to iPhone
8 Best Music Managers for iPhone to Manage Your Music
How to Transfer Music from iPhone to iPhone? [6 Proven Tips]