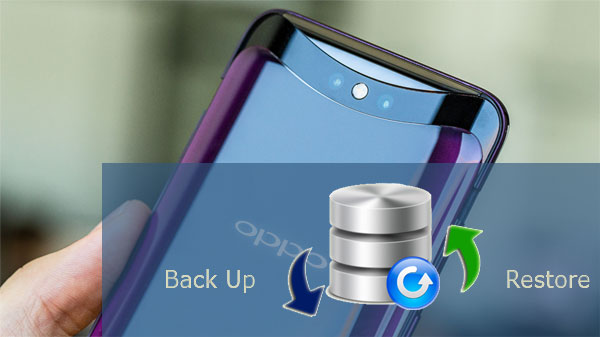
How to Back Up & Restore OPPO Reno/Find/R/K/A/F in 6 Trusted Ways?
OPPO phones, known for sleek design, premium features, and up to 1TB storage, hold vast amounts of data, making regular backups crucial to prevent loss from damage or theft. OK, you'll learn our full content of the guide here with 5 wonderful solutions for OPPO backup and restore. And it is easy for you to take a complete or selective backup for your OPPO Reno 16/15/14/13/R19/Find X8/X7, etc.
- Way 1: How to Perform OPPO Backup and Restore with Android Backup and Restore
- Way 2: How to Back Up OPPO Phone to PC and Restore It via Assistant for Android
- Way 3: How to Back Up and Restore OPPO Phones with Local Backup
- Way 4: Way 4: How to Do OPPO Backup and Restore Using OPPO Cloud
- Way 5: How to Back Up OPPO Phone and Restore It with Gmail Account
- Way 6: How to Back Up and Restore OPPO with Google One
Way 1: How to Perform OPPO Backup and Restore with Android Backup and Restore
While choosing a backup and restore tool for an OPPO device, 3 factors are considered generally: the security, the supported types of data, and whether it is easy to operate. In this connection, MobiKin Backup Manager for Android (Windows and Mac) is your must-have software. Ad-free with an intuitive interface, it lets you back up any Android phone in one click and is a top DIY choice for many users.
Why choose this Android backup and restore software?
> Back up 8+ file types (photos, videos, audio, documents, apps, contacts, SMS, call logs) to a computer.
> Restore Android data with one click.
> View file name, size, date, and count before backup.
> Add other backup files for restoring.
> Connect OPPO via USB or Wi-Fi.
> Works with all major OPPO series and other Android devices, covering (X8, X7, X6, N5, N3/N3 Flip, N2/N2 Flip), Reno series (16, 15, 14, 13 variants), A series (A5–A93, A96 5G), F series (F29 Pro), and K series (K9s, K9 Pro, K10, K12x), etc.
> Easy and secure to use.


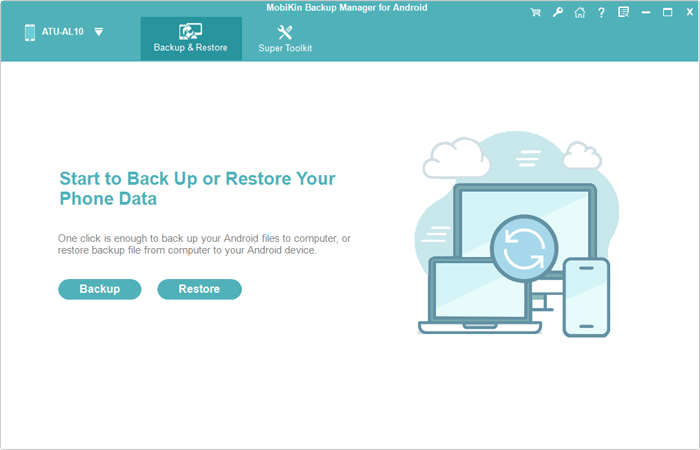
- Back up OPPO to PC with MobiKin Backup Manager for Android (Known as Android Backup and Restore):
Step 1. After downloading and installing the OPPO Backup and Restore software on your PC, open it and get your OPPO phone plugged to computer with a USB cable. Then follow the easy on-screen instructions to create a virtual connection between your OPPO and this tool. After that, tap "Backup" to go ahead.
Step 2. All the supported types of files will then be listed on the next page. Just tick on the one(s) you need to back up and tap "Browse" to locate a folder on this PC to store them.
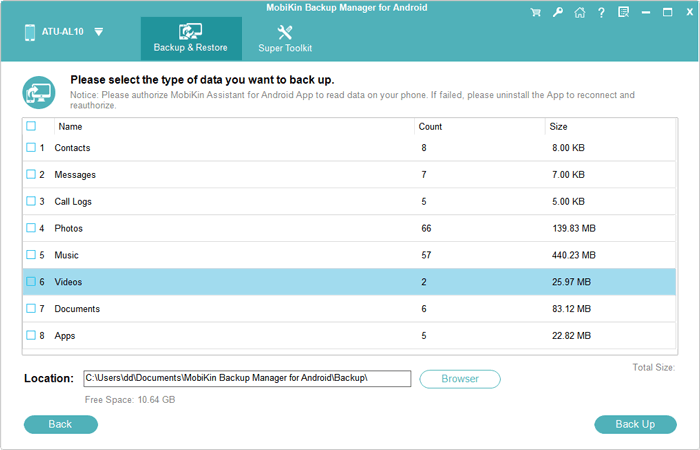
Step 3. Click on the "Back Up" button at the bottom right to put the chosen files from OPPO to your computer as a secure backup. (Want to hard reset your phone after the backup?)
- Restore OPPO from your PC with MobiKin Android Backup and Restore
Tap the "Restore" button from the main interface, and this tool will list what you've backed up. Then choose the type(s) of the backups you need, and click "Restore" to get them to the linked OPPO phone (or other connected Android device).
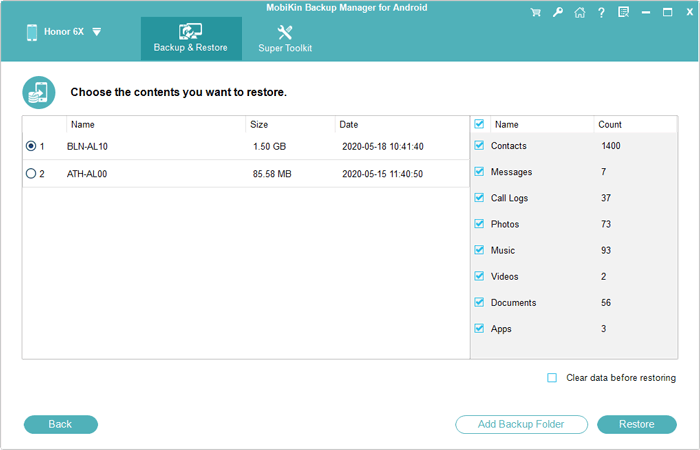
You can also add other backup files in the non-program default directory to the list for restoration by clicking Add Backup Folder near the Restore option.
Video Guide:
Way 2: How to Back Up OPPO Phone to PC and Restore It via Assistant for Android
If you want to back up and restore the phone selectively or in bulk, and meanwhile, want to do advanced management of some files, then you can turn to MobiKin Assistant for Android (Win and Mac).
It is committed to providing customized management for music, contacts, apps, SMS, and so on. For example, if you want to edit, add, delete contacts, or send SMS in groups on your computer, it provides great convenience for you.
Besides, this adept software also has advanced 1-click backup and restore ability to help you back up and restore your Oppo phones, so you don't have to worry about any poor experience while using it.
- Back up OPPO to PC/Mac with MobiKin Assistant for Android:
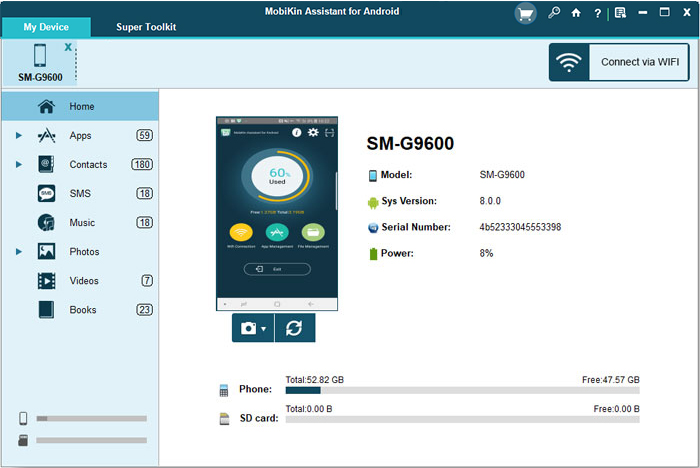
Step 1. Download MobiKin Assistant for Android program and then install and open it on your PC. Then make a physical connection between OPPO and the machine using a USB cable.
Step 2. Have your phone identified by the tool, going with the simple specifications on the screen. Afterwards, the left panel will show you the detected file types.
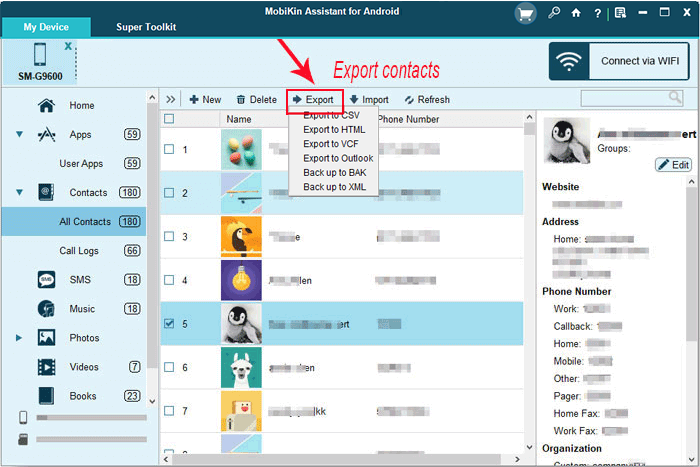
Step 3. Press the data types from the left menu. For instance, choose "Contacts" > "All Contacts" if you need to back up phone numbers to this PC. You'll then be allowed to preview and select the exact files easily as needed. After the preview and the selection, hit "Export" on the top menu to fulfill the backup task.
- Restore OPPO with MobiKin Assistant for Android:
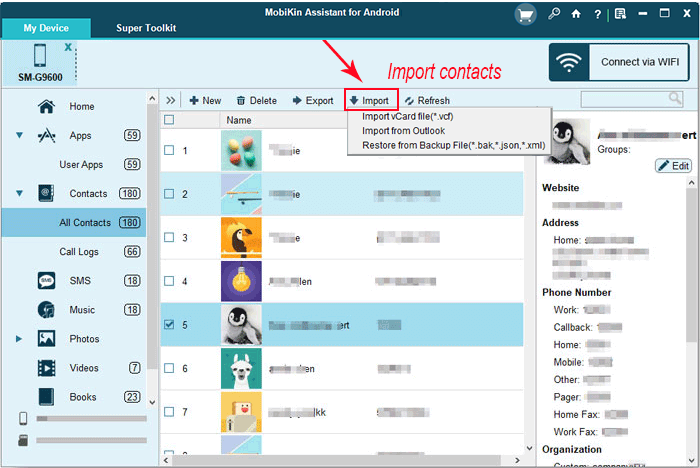
Go for the data type like "Contacts" from the left menu. And then tap "Import" at the top menu to choose the backup files to move them to the connected OPPO or other Android device.
Note: While using this software, you are also allowed to back up OPPO in bulk by going for "Super Toolkit" > "Backup" > choose data types > "Back Up", and then restore them by tapping "Super Toolkit" > "Restore" > choose backup files > "Restore" if needed.
See Also:
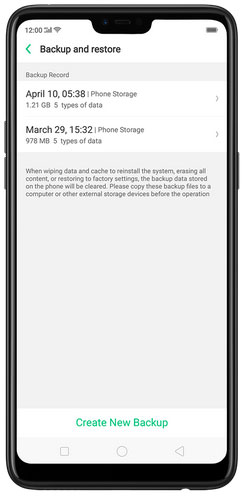
Way 3: How to Back Up and Restore OPPO Phones with Local Backup
Local backup is an easy strategy for OPPO backup and restore, Yet, it can be an expedient measure, for it will occupy a certain amount of OPPO's storage space, and there will be some unexpected security risks if something happens to OPPO. Again, you'd better not restart your OPPO during the restore, or your data will likely be lost.
- Back up OPPO phone to phone storage:
Unlock your OPPO and navigate to Settings > Additional Settings > Backup and reset to turn on Backup & Restore. Your mobile will be backed up to the phone storage later on.
- Restore OPPO phone from the storage:
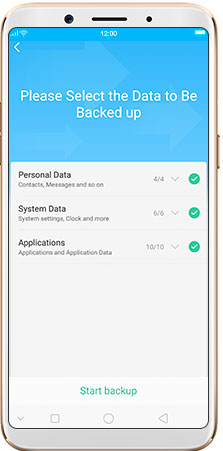
Simply head to Settings > Additional Settings > Back up and reset > Backup & Restore. Choose the needed data from the backup record - Personal Data, System Data, and Applications, and then tap Start restoring to get back your wanted data to your OPPO phone.
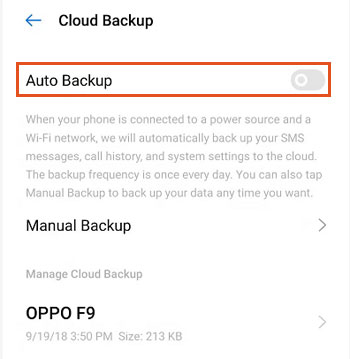
Way 4: How to Do OPPO Backup and Restore Using OPPO Cloud
OPPO Cloud (also called HeyTap Cloud) offers 5GB of free cloud storage. It can be used to back up OPPO contacts, messages, photos, and videos. Using it, you should register for a HeyTap account in advance. After the backup, the deleted files can be regained from the recycle bin in the cloud.
- Take an OPPO backup on OPPO Cloud:
Step 1. First, make sure that the WiFi network is turned on. Then open HeyTap Cloud from your OPPO phone, and log in to your cloud account to get to the main screen.
Step 2. Go to Manage Cloud Storage > Cloud Backup to enable the Auto Backup feature. (You can also switch on Back Up Now to make a backup manually here.)
- Restore OPPO phone from OPPO Cloud:
On your OPPO phone, sign in to the same cloud account to enter OPPO cloud. Then you'll get the list of previously backup records. Choose whatever you need from the list and fetch them to your OPPO when needed.
Note: What should I do if my OPPO Cloud backup fails? 1. Check your internet connection. 2. Make sure there is enough cloud storage. 3. Update your OPPO Cloud app or system software. 4. Try again or contact OPPO support if the issue persists.
Further Reading:
Way 5: How to Back Up OPPO Phone and Restore It with Gmail Account
If you have or are to sign up for a Gmail Account, you can back up your phone settings and other data to the Google server. Then it's easy to find the backup records and choose one of them to restore to your OPPO phone at any time.
- Back up OPPO A9/A8/A7 with your Gmail account:
Enable the WiFi feature, and open your OPPO to navigate to Settings > Additional Settings > Back up and reset to toggle on Back up my data. These actions will help you back up OPPO data automatically. (During the procedure, you may need to log in to your Gmail account as prompted.)
- Restore OPPO phone from Gmail:
Follow the same steps as the backup process to go to Backup and reset. You'll now see the Backup and restore option. Just tap it and the backup list will be displayed on the incoming screen. Here, choose the specific backup record to restore it to your OPPO phone.
NOTE: You can choose to enable the Automatic restore button under the Backup & Restore option if necessary.
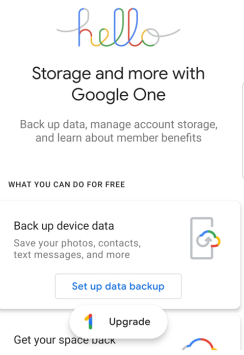
Way 6: How to Back Up and Restore OPPO with Google One
Before you start:
- Make sure your OPPO phone is connected to Wi-Fi.
- Sign in with your Google account (Settings > Google > Sign in).
- Ensure you have enough Google One storage (15 GB free by default, more if subscribed).
What gets backed up:
- App data.
- Call history.
- Contacts.
- Device settings (Wi-Fi passwords, wallpapers, etc.)
- SMS messages.
- Photos & videos (if Google Photos backup is enabled).
Back Up:
- Open Settings on your OPPO phone.
- Scroll down and tap Google.
- Select Backup (on some models, it may be "Backup & Restore").
- Toggle Back up to Google One ON.
- Tap Back up now to immediately create a backup.
Restore:
- Turn on your OPPO phone and connect to Wi-Fi.
- On the "Copy apps & data" screen, choose Next.
- Sign in with the same Google account used for the backup.
- Select the backup you want to restore.
- Choose which data to restore (apps, contacts, messages, etc.).
- Tap Restore and wait for the process to finish.
Google One backups are automatic if your phone is charging, idle, and connected to Wi-Fi. You can check the last backup date in Settings > Google > Backup.
Verdict
That's all for today's topic. Now, I believe you've got what you want from the above. Finally, here are 2 warm tips. Firstly, most OPPO phones have face unlock and fingerprint authentication, with the latter being more secure. Next, fast charging is useful but requires the original charger.
Related Articles:
6 Tactics: How to Recover Deleted Photos from Private Safe OPPO
How to Bypass OPPO FRP/Google Lock in 5 Easy Ways? Fixed
5 Feasible Solutions to Recover Deleted WhatsApp Messages on OPPO
How to Transfer Apps to SD Card on OPPO Effortlessly? 4 Techniques