[Full Guide] How to Back up iPhone to External Hard Drive on Windows & Mac?
"I need to back up my iPhone 17 and save the backup to my Seagate external hard drive. I'm using a Dell PC with Windows 11. Can you help me with that?"
- From Apple Support Community
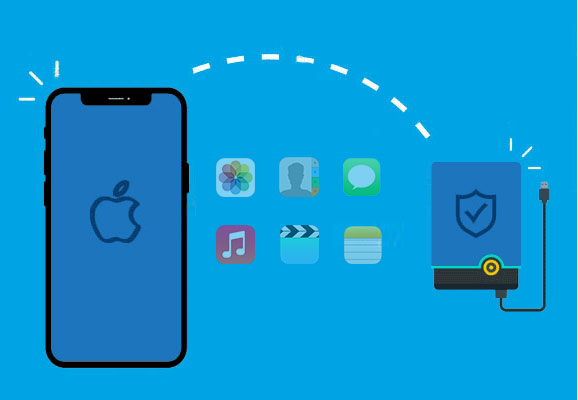
Backing up your iPhone is a smart way to protect important files, photos, documents, and more in case your device breaks or gets lost. There are many ways to back up your iPhone, but iCloud offers only a small amount of free space, and your Mac or Windows PC might run low on storage. Because of this, many people prefer backing up their iPhones to an external hard drive, which is both portable and more secure.
Part 1: Why Use an External Hard Drive to Back up Your iPhone Data?
Using an external hard drive to back up your iPhone data offers several advantages and is a good practice for data security and management. Here are some reasons why you might want to use an external hard drive for iPhone backups:
- Better Security: Since external hard drives aren't connected to the internet, they're less likely to be hacked or accessed by unauthorized users compared to cloud storage options.
- More Storage Space: External hard drives usually offer much more storage than your iPhone, so you can keep multiple backups and store other important files like photos, videos, and documents.
- Faster Restores: If you need to restore data on your iPhone, doing it from a local external hard drive can be faster than waiting for the cloud to download everything—especially if your internet connection is slow or unreliable.
- No Subscription Costs: Cloud services often require a subscription, but an external hard drive only costs once. Over time, it's a more affordable option.
- No Internet Dependency: You can back up your iPhone even if you're in an area with no internet. This is perfect for when you're somewhere with limited or no Wi-Fi access.
Guess you like:
Part 2: How to Back up iPhone to External Drive on Windows & Mac
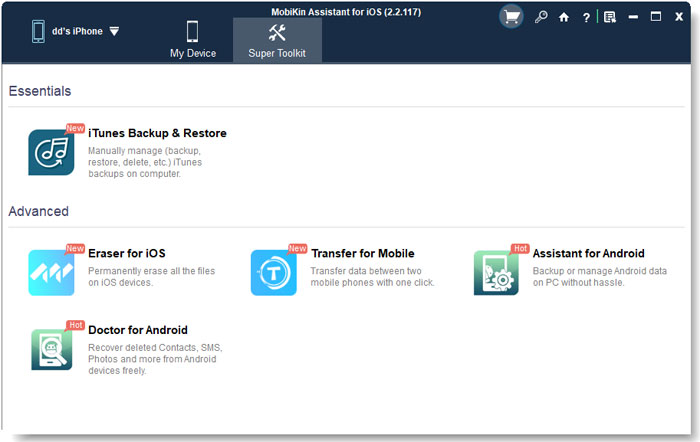
To make it simple for all users to back up their iPhone data to an external hard drive, you'll need a third-party application for this task, and one recommended option is MobiKin Assistant for iOS. This software is a comprehensive iOS phone manager that allows you to perform various iOS-related tasks without relying on iTunes. With MobiKin Assistant for iOS, you can effortlessly back up your iPhone's music, photos, videos, and more to an external hard drive with minimal effort. It streamlines the process, ensuring that you can back up both individual files and entire folders to your external hard drive in just a few clicks.
One-stop Tool to Backup iPhone Data with One Click
- Supports backing up iPhone/iPad data to computer, iTunes and external hard drive.
- Restore data from backup to iOS device with one click.
- Allows you to preview any items, and selectively back up and restore iOS devices.
- No data loss during the backup and restore.
- Supports almost all iOS data types, including Video, Photo, Music, Contacts, Messages, Notes, Safari Bookmarks, Voice Memo, etc.
- Fully compatible with iPhone 17/Air/17 Pro/17 Pro Max/16/15/14/13/12//11/X/8/7/6, iPod touch, iPad, etc.


A quick tutorial you can follow to back up iPhone/iPad to external hard drive with Assistant for iOS.
Step 1: Connect your iPhone to computer
After getting the MobiKin Assistant for iOS downloaded and installed on your PC or Mac computer, launch it and connect your iPhone and the external hard drive to the computer. Once connected, Assistant for iOS will recognize your iPhone automatically.

Step 2: Select the iPhone data to back up
On the next page of the Assistant for iOS, you can see all accessible file types are listed on the left sidebar. Go ahead to preview and select the files you want to back up by ticking them off.

You can also go to the top menu to choose "Super Toolkit" > "iTunes Backup & Restore" > "Backup" to back up your whole iPhone data to any location of your computer with one click.
Step 3: Backup iPhone to external HD
After selecting all the iPhone data you need, you can click on the "Export" button on the top menu, choose the connected external hard drive as the output location. After that, all the selected iPhone files will be saved to the external drive automatically.
Video Guide:
Part 3: How to Back up iPhone to External Drive on Mac
If you're using iOS 13 and macOS Catalina or newer versions, the process of how to back up iPhone to external hard drive on Mac is relatively straightforward. You can now back up iPhone directly to external hard drive using the Finder application. Here's a step-by-step guide:
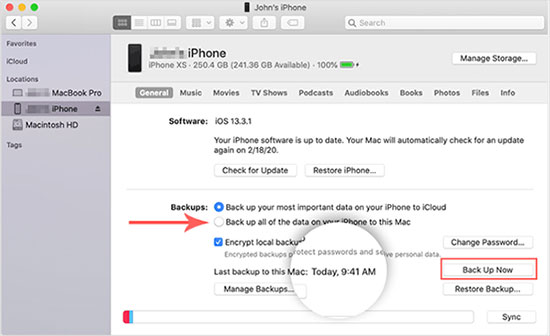
Step 1: Backup iPhone data to Mac
- Begin by connecting your iPhone and the external hard drive to your Mac.
- Locate the Finder application on your dock or use the Command + Spacebar shortcut to access Spotlight Search and search for "Finder."
- In the left panel, find the "Location" section and select your iPhone.
- Under the "General" tab, check the option that says, "Back up all the data on your iPhone to this Mac."
- If required, tap the "Trust Computer" button on your iPhone.
- Now, click on the "Back Up Now" button.
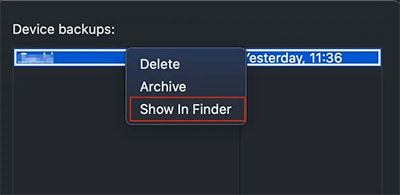
Step 2: Transfer iPhone backup from Mac to the external drive
- Once the backup process is complete, click on the "Manage Backups" button.
- Control-click on your backup and choose the "Show in Finder" option. (Where is your iPhone backup?)
- Control-click on your backup folder and select "Copy."
- Locate your external drive in the left panel and paste the copied backup.
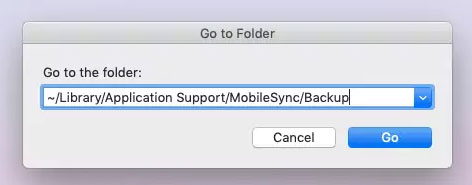
- Alternatively, you can access the "Go" menu and choose "Go to Folder."
- Paste the following path: ~/Library/Application Support/MobileSync/Backup.
- Now, copy and paste the folder onto your external hard drive.
Can't Miss:
Part 4: How to Back up iPhone to External Hard Drive on Windows
A more conventional method for creating a backup of your iPhone data on an external hard drive from your Windows computer involves utilizing iTunes. This approach consists of two primary stages: transferring your iPhone data to your Windows PC via iTunes and subsequently relocating the iPhone backup to the external hard drive.
- Commence by connecting your iPhone to your Windows computer using the Lightning to USB cable. If it's your initial pairing of the iPhone with your PC, your iPhone might request permission to 'Trust' the computer.
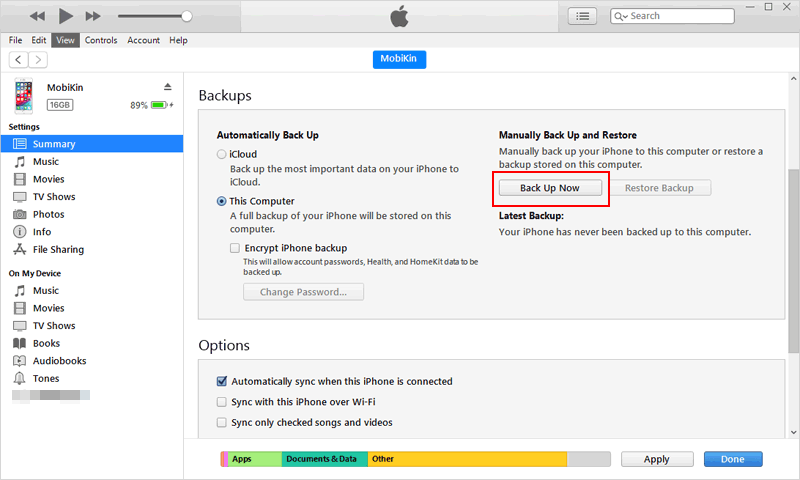
- Open iTunes on your computer and click on the Device icon positioned in the top-left corner of the iTunes interface, representing your iPhone.
- Within the "Automatically Back Up" section, opt for the "This Computer" choice. Initiate the backup procedure by selecting the "Back Up Now" button.
- The duration of the process may vary depending on the size of your backup. You can track the backup's progress from the top section of the iTunes window.
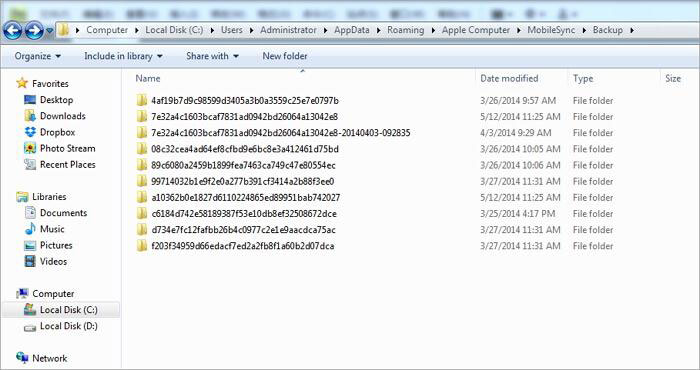
- After your iPhone data has been effectively backed up on your computer, disconnect your iPhone and establish a connection with your external hard drive. You can then generate a dedicated folder on the external hard drive for the clear identification of your backed-up data.
- Input "%appdata%\Apple Computer\MobileSync\Backup" in the File Explorer folder's address bar to find the iPhone backup data. Then, proceed to copy the backup data and paste it into the designated folder on your external hard drive.
FAQs about Back up iPhone to External Hard Drive
Q1: Can I just back up my photo library to an external hard drive?
Yes, you can. MobiKin Assistant for iOS provides selective backup functionality, allowing you to back up only the file types you want to back up. If you just want to back up your photo library, you can select just the photos, then select the external hard drive as the backup location, and finally click "Export" to start the backup.
Q2: Why is my iTunes not recognizing my iPhone?
When you connect your iPhone to your computer, a few key factors come into play. Firstly, it's essential to ensure that your iPhone is unlocked. Furthermore, confirming that you've tapped the "Trust this computer" option on your iPhone is crucial, as it grants iTunes full access.
Should the problem persist, here are some troubleshooting steps you can take:
- Disconnect your iPhone, then reconnect it to your computer.
- Force close the iTunes application and initiate a restart.
- Ensure that you've updated iTunes to the most recent version.
- Consider updating your iOS operating software to the latest version as well.
Q3: How to Transfer Photos from iCloud to External Hard Drive?
If you find yourself running low on iCloud storage and need to free up space, you can achieve this by transferring your iCloud photos to an external drive. Here's how you can go about it:
- Begin by opening your web browser and navigating to iCloud.com.
- Enter your login credentials and access your iCloud account by signing in.
- Double-click on the Photos app to access your photos on iCloud.com.
- Select the photos you wish to transfer and click on the "Download" option located in the top right corner.
- If you've downloaded multiple images, they will be compressed into a zip file.
- Now, find the downloaded zip folder and make a copy of it.
- Finally, paste this zip folder into your external drive.
Summary
Backing up your iPhone to an external hard drive is a secure and space-saving choice. This article provides three comprehensive methods for users. We recommend you use MobiKin Assistant for iOS. This approach doesn't occupy your phone storage and offers more portable backups. It can be done through USB or WiFi. While Finder and iTunes offer built-in options for backup, their limitations make third-party apps, like MobiKin Assistant for iOS, a superior choice for control, security, and storage, ensuring your essential iPhone data is well-preserved.
Relative Articles:
8 Best iCloud Alternative for iPhone Backup & Transfer
How to Transfer Large Videos from iPhone to PC
