[2025] How to Transfer Photos from iPhone to Mac, MacBook Pro, MacBook Air
As your photo collection grows, photos and camera rolls can take up a lot of space on your iPhone. In this case, transferring photos and videos to a computer for backup and then deleting them from your phone is a great way to free up storage space. If you're looking for an easy way to transfer photos from iPhone to Mac, you've come to the right place.
Whether you need to clear up space on your iPhone or want to use your Mac for photo editing, here are 7 easy ways to move photos from iPhone to Mac, MacBook Pro, MacBook Air, and more.
- Method 1: Transfer Photos from iPhone to Mac with Photos App
- Method 2: Import Photos from iPhone to Mac via Assistant for iOS
- Method 3: Move Photos from iPhone to Mac with AirDrop
- Method 4: Download Photos from iPhone to Mac via iCloud
- Method 5: Copy Photos from iPhone to Mac Using Files App
- Method 6: Upload Photos from iPhone to Mac with Image Capture
- Method 7: Transfer Pictures from iPhone to Mac via Email or iMessages
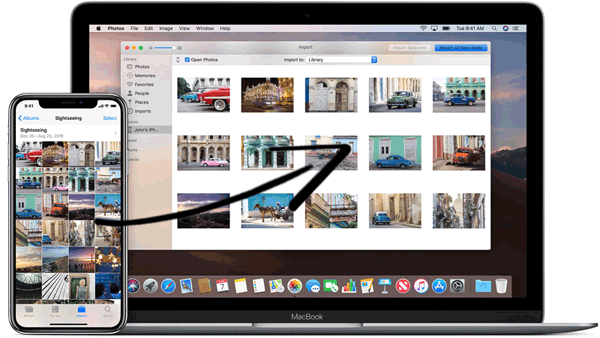
Method 1: Transfer Photos from iPhone to Mac with Photos App
One swift approach involves utilizing the Lightning-to-USB cable used for iPhone charging, plugging it into one of your Mac's USB ports. Upon connecting the iPhone, the macOS Photos app will automatically initiate, proposing to import your photos. Here's a breakdown of the import process:
- Connect your iPhone to the Mac using the Lightning-to-USB cable.
- If necessary, unlock your iPhone and authorize it to trust the connected device.
- The Photos app should open and display the images from your iPhone in the main window. If it doesn't, select your iPhone from the left-hand menu within the Photos app. You'll then have access to all the images and videos stored in your iPhone's Camera Roll.
- Click on "Import All New Items" located in the top right corner or manually go through the photos, select the ones you wish to import, and click on "Import Selected."

Upon the completion of the import process, you can prompt Photos to automatically erase the pictures from your iPhone, freeing up space to capture more images.
Only two simple steps, you can copy pictures from iPhone to Mac's iPhoto/Photos easily, and you can preview or edit the images with iPhoto/Photos as you like.
Method 2: Import Photos from iPhone to Mac via Assistant for iOS
If you have trouble transferring photos from iPhone to Mac, MobiKin Assistant for iOS can help you, allowing you to seamlessly transfer photos and videos from iPhone to any Mac. In addition, it also has photo management features, such as previewing and deleting unwanted photos directly on the computer. Not only photos, this tool can also transfer various iPhone files such as music, contacts, videos, and text messages. In addition, this tool also provides a convenient full iPhone backup option, which you can restore at any time if needed.
MobiKin Assistant for iOS - Optimal Tool to Transfer iPhone Photos to Mac
- Effortlessly transfer photos to a Mac with just one click.
- Maintain the original quality of photos, ensuring well-organized albums.
- Move photos from your PC/Mac to your iPhone without erasing existing data.
- Compatible with all Mac and Windows PC systems.
- Free Download, 100% Clean & Safe


Selective Transfer of Photos from iPhone to Mac using Assistant for iOS:
Step 1: Download MobiKin Assistant for iOS on your Mac, and connect your iPhone to the computer via USB cable.

Step 2: Navigate to the left side of the program interface and select the "Photos" option. Choose the album containing the desired photos and select the images you wish to transfer.
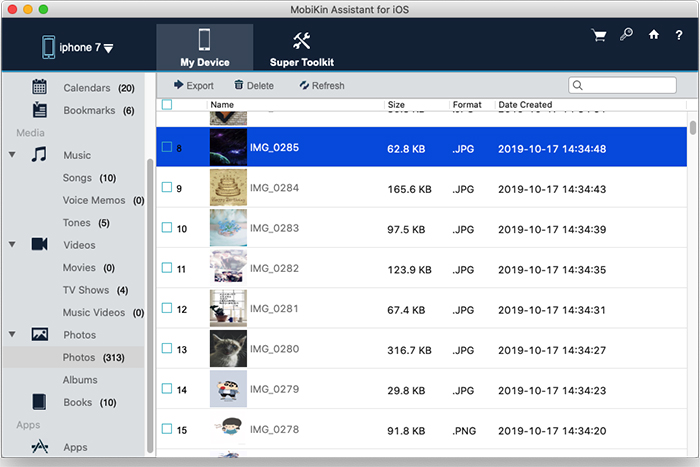
Step 3: Click on the "Export" button located in the top menu to initiate the transfer of the selected photos to your Mac.
Video Guide:
Part 3. Move Photos from iPhone to Mac with AirDrop
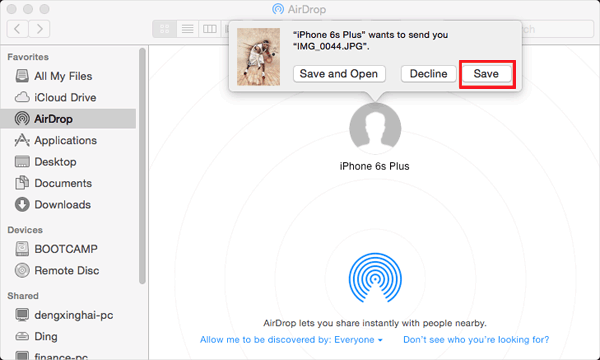
Avoid using the Photos app on your Mac? No worries. Another swift method to transfer photos from your iPhone to your Mac involves using AirDrop. AirDrop operates via Bluetooth Low Energy, establishing a direct WiFi link between two Apple devices, enabling data transfer among various Apple gadgets like iPhone to Mac, iPhone to iPhone, or even iPhone to iPad. This feature ensures rapid, energy-efficient, and secure file sharing.
The process of how to back up photos on iPhone to Mac is remarkably user-friendly by using AirDrop:
- Open the Photos app on your iPhone or iPad.
- Locate the photos or videos intended for transfer to your Mac, whether individual images or multiple photos in a batch.
- Tap on the Share icon positioned in the lower right corner.
- Choose AirDrop from the options.
- Select the Mac device to which you wish to send the images.
- On your Mac, the AirDropped image should promptly appear within a Finder window.
Part 4. Download Photos from iPhone to Mac via iCloud
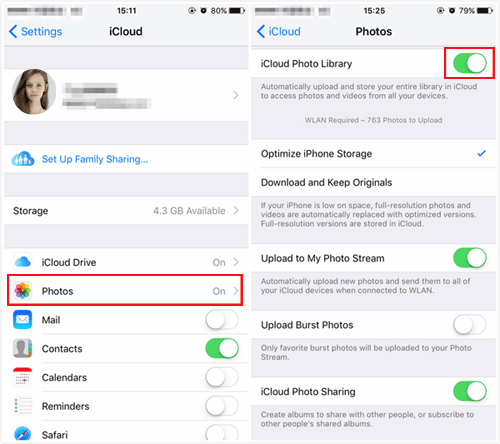
An additional method to transfer photos from an iPhone to a Mac involves utilizing iCloud. iCloud Photo Library or iCloud Photos ensures automatic synchronization of all your photos and videos across your Apple devices. Apple provides 5 GB of free storage, with options to upgrade to 50 GB, 200 GB, or 2 TB for a monthly fee.
To set up iCloud Photo Library on your iPhone, here's the process:
- Access Settings and tap your name at the top of the screen.
- Go to iCloud to view all the apps using iCloud.
- Tap on Photos and activate iCloud Photos.
Now, to configure it on your Mac:
- Open the Photos app.
- Click on Photos in the menu bar.
- Choose Preferences and switch to the iCloud tab.
- Tick the box next to iCloud Photos or iCloud Photo Library.
Ensure both devices are linked to the same Apple ID and follow the above steps meticulously. Your photos and videos will automatically sync between your iPhone and Mac, eliminating the need for additional effort in importing iPhone photos to your Mac.
However, there's an important point to consider: while iCloud Photos remains active, any modifications made to photos on one device will seamlessly sync to the other. This means that if you delete photos on your iPhone, those photos will also vanish from your Mac. To retain the photos on your Mac after deleting them from your iPhone, deactivate the iCloud Photos sync after completing the transfer.
Part 5. Copy Photos from iPhone to Mac Using Files App
The Files app operates as a comprehensive file manager accessible on your iPhone, allowing integration with various cloud services such as Dropbox, Google Drive, and Microsoft OneDrive. Leveraging these services, you can seamlessly transfer files across devices. This tool facilitates the structuring of photo transfers, offering the option to compress if necessary, and employing any cloud service as an intermediary to convey these photos to your Mac. Naturally, the initial step involves connecting and enabling these services.
To commence the process:
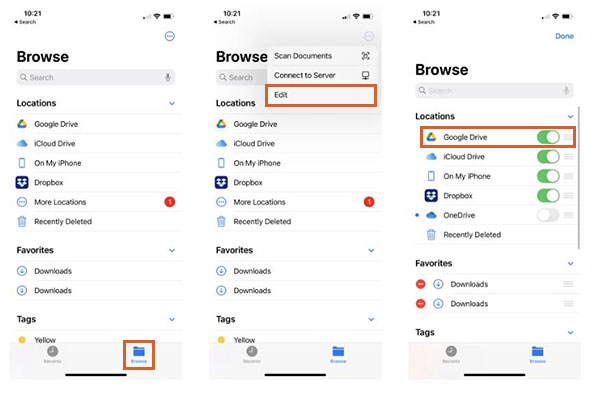
- Launch the Files app on your iPhone.
- If you're on a different screen, navigate to the Browse tab.
- Access the ellipsis icon situated in the upper right corner.
- Choose the Edit option.
- Under Locations, activate the third-party service or application from the list.
- Confirm the changes by tapping Done.
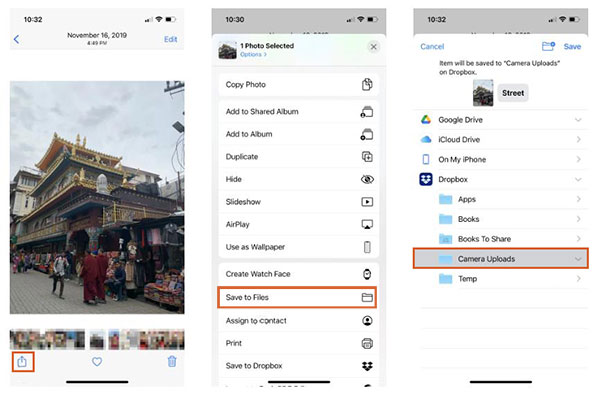
How to transfer photos from iPhone to MacBook/Mac through the Files app? Adhere to these steps:
- Utilize the Locations feature within the Files app.
- Handpick the desired photo(s) for transfer from your iPhone.
- Tap the Share icon to unveil the share sheet.
- Opt for Save to Files.
- Select the specific cloud service and its designated folder to store the photos. Feel free to create a new folder if necessary. Additionally, renaming individual photos before exporting is an available option.
- Finalize by tapping Save.
- Head over to your Mac to view the saved photos or videos in iCloud Drive.
This method showcases that the Files app isn't restricted solely to iCloud usage. It offers a swifter alternative for sharing photos through shared cloud folders among friends and family, while also serving as a reliable option for backing up iPhone photos.
Part 6. Upload Photos from iPhone to Mac with Image Capture
On a Mac, Image Capture comes pre-installed specifically designed to facilitate the effortless transfer of photos from your iPhone. Here are the steps involved on how to access iPhone photos on Mac:
- Connect your iPhone to your Mac using a USB cable, then initiate Image Capture on your Mac.
- If your iPhone isn't automatically selected, choose it from the list of available devices. Next, designate the output folder for your iPhone photos.
- Click on either Import or Import All to initiate the transfer of photos from your iPhone to your Mac.

Part 7. Transfer Pictures from iPhone to Mac via Email or iMessages
You have a couple of options to transfer photos from your iPhone to your Mac: using email or Apple's iMessage. Similar to other methods, this approach comes with its own advantages and disadvantages.
Sending photos via email imposes limitations on the size and quantity of images you can attach, which may hinder the convenience of this method. However, it serves as a viable fallback option in case of any issues with your computer. If needed, you can always recover your photos by downloading them from your emails on any device capable of accessing your email account.
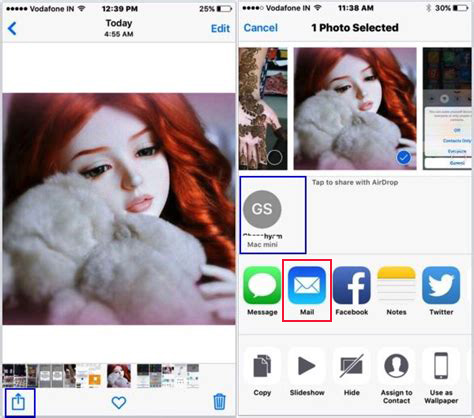
Here's how to save photos from iPhone to Mac via email:
- Access the photo gallery on your iPhone and choose the desired images and videos for forwarding.
- Tap on the Share icon, typically located in the bottom left corner of the screen.
- From the menu that appears, select the email option. Ensure that you're logged into your email account.
- Send the email containing the selected photos.
Wrapping Up
After reviewing various methods for how to put photos from iPhone onto Macbook/Mac, the highly recommended approach for importing photos from an iPhone to a Mac is through MobiKin Assistant for iOS. This specialized data transfer software ensures a swift and secure transfer of photos and other data between your iPhone and Mac. While Assistant for iOS stands out as a top choice, alternative methods such as utilizing Dropbox, Google Photos, or other cloud-based services also exist for downloading pictures from an iPhone to a Mac.
Choose the method that aligns best with your requirements to effortlessly transfer your iPhone photos to your Mac in just minutes.
FAQs on Transferring Photos from iPhone to Mac
Q1. Where are the photos stored on my Mac?
When you import photos to your Mac using the Photos app, they are saved in the Photos Library folder. You can also change the location to another folder on your Mac or external drive and still access them in Photos.
To find your photos in the Photos app, follow these steps: Open Finder > Go to Pictures > Right-click on "Photo Library" > Select "Show Package Contents" > In the folder called "Masters", you will find the photos categorized into various subfolders.
Q2. What if my computer doesn't recognize my iPhone?
If your computer doesn't recognize your iPhone, try the solutions here to fix the problem: What To Do When My Computer Won't Recognize My iPhone?
Q3. What if the photos don't show up on my Mac?
Photos stored in iCloud may not show up when imported via the Photos app or Image Capture. To fix this, download the photos from iCloud and try to import them again. The Camera Roll only contains photos or screenshots taken with your iPhone's camera.
Q4. How to fix iPhone disconnecting and reconnecting to Mac?
If your iPhone keeps connecting and disconnecting, try the following steps to fix the problem:
- Check if the USB cable is damaged and use a different cable if necessary.
- Check the iPhone's charging port for any debris.
- Avoid using cables that are not Apple certified or damaged.
- Restart your iPhone and Mac.
- Make sure your iPhone is running the latest iOS version (iOS 14 or later).
- Disconnect your iPhone from your Mac, go to "Settings > General > Reset" on your iPhone, and tap "Reset Location & Privacy".
Q5. Can I transfer photos from iPhone to Mac wirelessly?
Yes, you can transfer photos from iPhone to Mac wirelessly. The fastest way is to use AirDrop. Alternatively, you can email the photos to yourself or set up syncing between devices for easy transfers.
Q6. Why won't my photos import from iPhone to Mac?
If your photos won't import, try the following steps:
- Make sure the cables are securely connected to both devices and working properly. - Check that both devices have the latest software.
- Make sure both devices are connected to the same Wi-Fi network.
- Verify that you are signed in with the same Apple ID on both devices.
- Restart both devices and try again.
Related Articles
How to Import Contacts from iPhone to Mac? [4 Proven Ways]
[Total Guide] How to Add New Contacts to iPhone Easily
