How to Transfer Photos from Mac to iPhone [5 Easy Ways Included]
If you want to keep your favorite photos with you on your iPhone, transferring photos from your Mac to your iPhone is a smart and convenient option. Whether you're sending a full photo album or just a few selected shots, it's easy to get them onto your iPhone.
There are several ways to make the Mac to iPhone transfer happen, such as using a USB cable or cloud services. In this guide, you'll learn different methods to move pictures from your Mac to your iPhone, so you can enjoy them anytime, no matter where you are.
Method 1: Transfer Photos from Mac to iPhone Using iTunes/Finder
If you want to transfer photos from your Mac to your iPhone, using iTunes or Finder is a reliable and straightforward method. You just need a USB cable to move your entire photo library or selected folders directly from your Mac to your iPhone. Keep in mind that iTunes is available on macOS Mojave and earlier, while Finder takes over on macOS Catalina and newer versions.
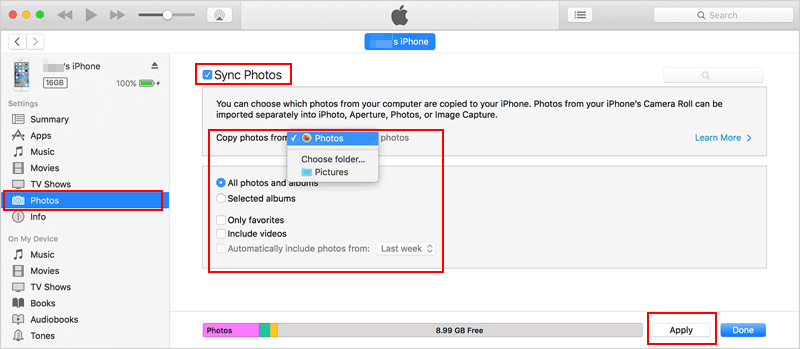
Using iTunes to import photos from Mac to iPhone:
- Connect your iPhone to your Mac using a USB cable.
- iTunes should open automatically. Click the device icon when it appears.
- Go to the "Photos" tab, check the box that says "Sync Photos," and choose the folder or library you want to sync from the "Copy photos from" option.
- Click "Apply" to begin syncing your photos from your Mac to your iPhone.
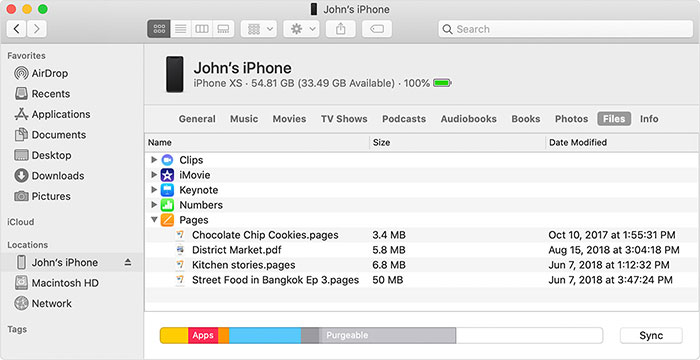
Using Finder to transfer photos from Mac to iPhone:
- Open Finder and plug your iPhone into your Mac.
- Unlock your iPhone and tap "Trust" if prompted.
- In Finder, select your iPhone from the sidebar.
- Click on the "Photos" tab, then check the box to sync photos. Choose the albums or folders you want to transfer.
- Click "Apply" to start the transfer.
- Once it's done, open the Photos app on your iPhone to see your pictures.
You can also click to learn:
Method 2: Import Photos from Mac to iPhone with iPhone Transfer
If iTunes doesn't suit your preferences for syncing photos from Mac to iPhone, consider utilizing iPhone Transfer software. This application simplifies the process of copying photos with just a few clicks. Beyond images, it provides the flexibility to transfer and manage various file types such as music, videos, information, apps, and more. To explore its capabilities, download and install the software on your Mac. Click the icon below to initiate the download and give it a try for a seamless photo transfer experience.
Useful Features of iPhone Transfer:
- Transfer photos from Mac to iPhone without iTunes.
- Support photos, videos, music, contacts, messages, and more.
- Preview and selectively transfer files before importing.
- Export iPhone data from iPhone to Mac easily.
- Compatible with most iPhone, iPad, and iPod models.
- Keep original image quality during the transfer process.


Three simple steps to import photos from MacBook/Mac to iPhone:
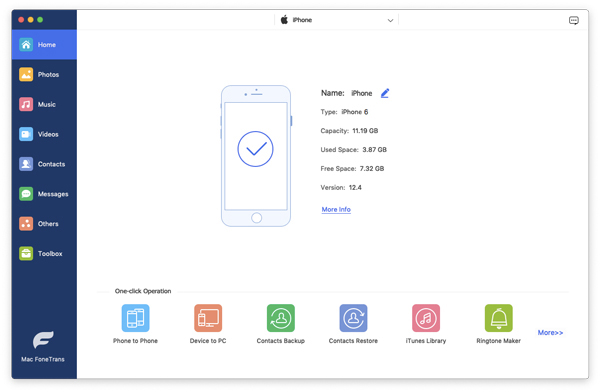
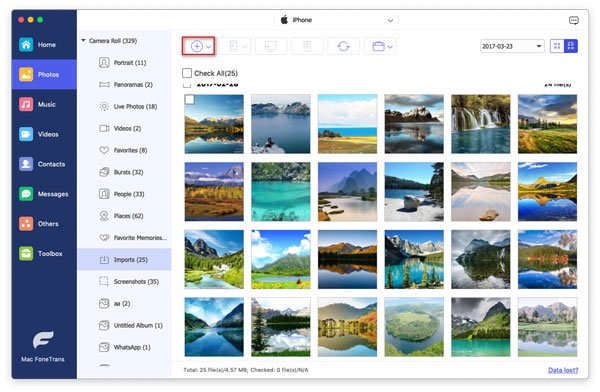
Step 1. Launch the software on your Mac and connect your iPhone to the Mac via a USB cable. Click on the "Photos" icon located at the top of the program's main window.
Step 2. Click on the "Add" button. From the menu that appears, select "Add Folder" or "Add File".
Step 3. Choose your wanted images from your Mac computer and tap on "Open" to export them from Mac to iPhone.
Method 3: Move Photos from Mac to iPhone via iCloud
When you turn on iCloud Photos (also known as iCloud Photo Library) on your Mac, all your pictures will be automatically uploaded to your iCloud account. This way, they'll stay in sync across all your Apple devices that use the same Apple ID.
Before you begin, make sure of the following:
- You have enough storage space in your iCloud account.
- Your Mac is running macOS Yosemite or later and has the Photos app installed.
- You've created a folder on your Mac with the photos you want to move to your iPhone.
Once everything is ready, you can transfer photos from your Mac to your iPhone using one of these two methods:
Use iCloud Photos on your devices:
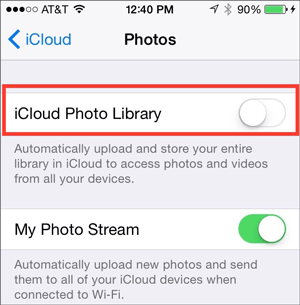
- On your iPhone, open the "Settings" app. Tap your name at the top, then choose "iCloud" and select "Photos".
- Make sure the "iCloud Photos" option is turned on. (For older iPhones, it may be called "iCloud Photo Library.") (iCloud Photos Not Syncing?)
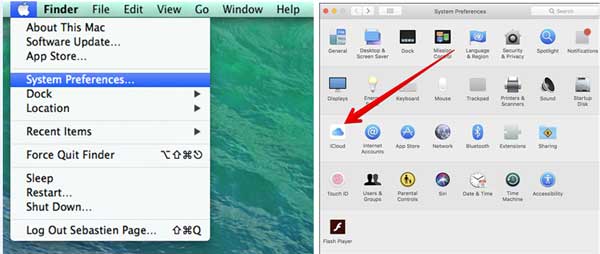
- Now, go to your Mac and open the Apple menu. Select "System Preferences".
- Click on iCloud and log in with your Apple ID.
- Next to the Photos option, click on Options, then check the box for "iCloud Photos" and click "Done".
- Once the syncing is complete, open the Photos app on your iPhone to view the images from your Mac.
Use the iCloud website:
- First, confirm that iCloud Photos is turned on in your iPhone settings, just like in the first method.
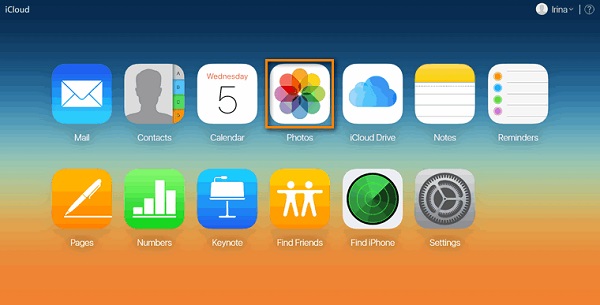
- On your Mac, open a web browser and go to icloud.com. Sign in with your Apple ID.
- Click on the Photos icon.
- At the top of the page, click the Upload button (it looks like a cloud with an arrow).
- Select the photos from your Mac that you want to upload.
- Click Choose, and your selected images will begin uploading to iCloud. (How to Access iCloud Photos?)
Method 4: Get Photos from Mac to iPhone Using AirDrop
AirDrop, an Apple-provided application, serves as a wireless means to transfer photos from your MacBook to your iPhone. This versatile tool allows seamless sharing of various content types, including photos, documents, videos, locations, and more, with nearby iOS devices. To send photos from your Mac to iPhone, follow these steps to export photos from MacBook/Mac to iPhone:
- Enable Wi-Fi and Bluetooth on both your Mac and iPhone.
- Navigate to "Control Center" > "AirDrop" on your iOS device, selecting "Contacts Only" or "Everyone."
- On your MacBook, click "Finder" and choose "AirDrop" from the "Go" option.
- The AirDrop window displays nearby users.
- Drag the desired photos onto the target recipient in this window.
- On your iPhone, a prompt to accept or reject the file appears. Click "Accept" to initiate the photo transfer.

If needed, you can also click to learn how to AirDrop from iPhone to Mac >>
Method 5: Send Photos from Mac to iPhone with Google Photos
For those seeking an alternative to transfer photos from their Mac to iPhone, Google Photos proves to be an excellent choice. Offering 15 GB of free cloud storage, a larger capacity than iCloud, it simplifies the process of syncing photos across Apple devices. Follow these steps to sync photos from MacBook/Mac to iPhone:
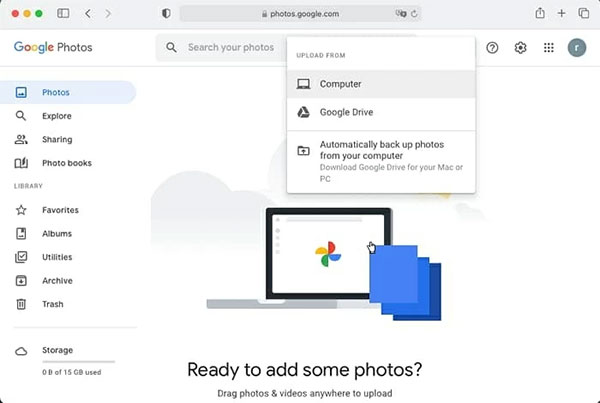
- Open Google Photos on your Mac and log in with your Gmail ID, or access it via the Google Photos website.
- Click 'Upload' > 'Computer' in the upper right corner. Select photos or entire folders from your Mac for upload.
- Click 'Upload' after making your selections.
- On your iPhone, open the Google Photos app, and sign in with the same Gmail ID.
- Locate your pictures on Google Photos, select the desired images, tap 'Share,' and choose 'Save Image' to add the photos to your iPhone Photos Library. (How to transfer Google Photos to iCloud?)
While there are various cloud storage apps available, remember that cloud services have storage limits. For large photo transfers, using a physical cable may be more efficient, as mentioned above.
The Bottom Line
With the diverse methods outlined in this guide, moving photos from Mac/MacBook to iPhone should be a seamless process. Whether you prefer using a USB cable or opting for wireless solutions, the choice depends on your preferences and the quantity of photos you wish to transfer. Beyond photos, you can extend these methods to transfer music, videos, and other documents from your Mac to any iOS device. If you encounter any issues or have innovative ideas about this tutorial, feel free to reach out – we're here to assist you.
Related Articles:
How to Transfer Large Videos from iPhone to PC? (5 Ways Included)
How to Transfer Contacts from Computer to iPhone?
[Updated in 2026] How to Transfer Photos from Mac/Macbook to iPad?
