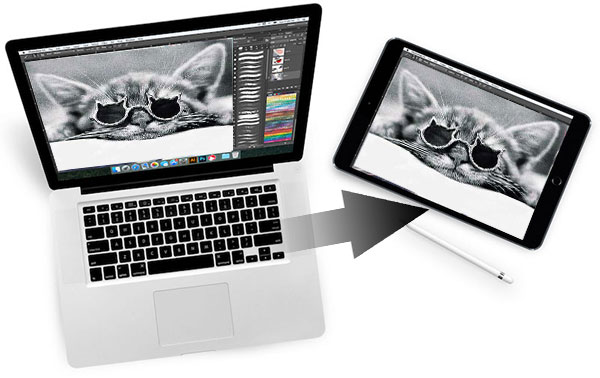
[Updated in 2024] How to Transfer Photos from Mac/Macbook to iPad?
Are you looking for a safe and secure way to transfer the wonderful moments captured and saved on Mac to iPad? This is essential for you as it allows you to carry and enjoy these moments anywhere and anytime. While we are generally clear about how to transfer photos from iPad to Mac, the other way around, how to transfer photos from Mac to iPad, can be a challenge, especially for those who are new to the world of technology.
But don't worry, in this article, we will cover the six best ways to transfer photos from Mac to iPad. All the steps will be mentioned in simple terms so that everyone can benefit from this guide. Let's walk through each solution with a detailed step-by-step guide.
- Part 1: Import Photos from Mac to iPad with iTunes
- Part 2: Transfer Photos from Mac to iPad without iTunes Using iOS Transfer (Quick & Flexible)
- Part 3: Sync Photos from Mac to iPad with iCloud Photos Library
- Part 4: Copy Photos to iPad from Mac with AirDrop
- Part 5: Export Photos to iPad from Mac with Dropbox
- Part 6: Send Photos from Mac to iPad with Email
Part 1: Import Photos from Mac to iPad with iTunes
Although iTunes has one or another of its drawbacks, generally iTunes is still the first choice at the mention of iOS files transferring. We still want to remind you that when iTunes transfers photos to iPad, all existing photos will be deleted. Therefore, be sure to think about whether you really want to transfer photos from Mac to iPad using iTunes.
- Open iTunes on your Mac and connect your iPad to the Mac using a USB cable. The connected iPad will be soon detected by iTunes and shown in iTunes primary window.
- Choose "Summary" > "Photos" tab from the left sidebar, which is under the location of the iPad icon.
- Tick "Sync Photos" option on the right side window and choose to copy all photos and albums from Mac or selected photos from Mac to iPad. Then, turn to the right lower corner to click the button of "Apply".
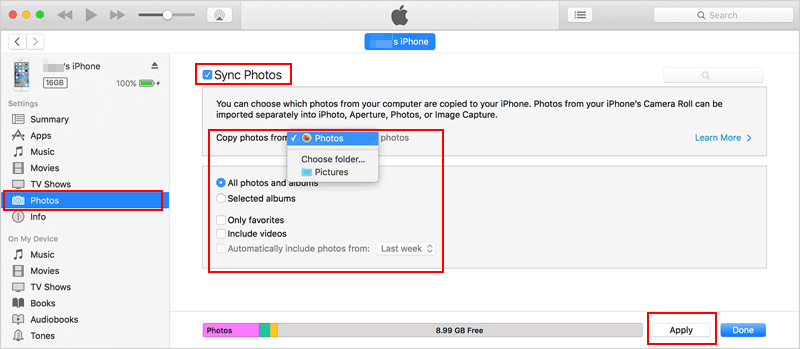
After above operations, iTunes will start to sync photos from Mac to iPad.
Part 2: Transfer Photos from Mac to iPad without iTunes Using iOS Transfer
As we all know, transferring pictures from Mac to iPhone using iTunes can be quite challenging. Therefore, many people choose to use third-party applications to simplify the process. One of the most popular iOS management and transfer tools is iOS Data Transfer. This app is known for its user-friendly interface, which makes it easier to use compared to iTunes. What's more, it allows you to transfer photos from Mac to iPad without risking data loss. To learn how to import pictures from Mac to iPhone using iOS Data Transfer, follow the instructions below.
Core Features of iOS Data Transfer for Mac?
- Transfer files between iPhone/iPad/iPod and Mac without using iTunes.
- Copy photos, SMS, videos, songs, books, voice memo, ringtone, podcast, playlist, etc. from Mac to iPad, and vice versa.
- The picture format and quality would be kept after the transfer.
- Backup data from iOS device to iTunes default backup location and restore iTunes backup to your target device with ease.
- Support all iPad models, including iPad 10/9/8, iPad Pro, iPad mini, New iPad, iPad Air, iPad 4, iPad 2, iPad, as well as iPod touch, as well as all generations of iPhone and iPod touch.
Download and install the iOS Data Transfer for Mac and follow the steps below to import photos from Mac to iPad. If you have a Windows based PC, try the Windows version to transfer photos from PC to iPad.


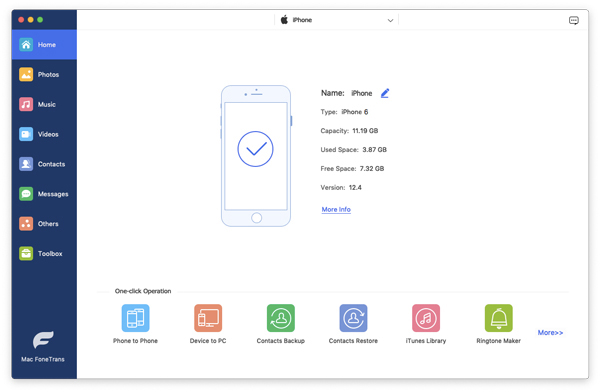
Step 1: Connect your iPad to the Mac computer
Run the installed iOS Data Transfer for Mac and connect your iPad to the Mac via a USB cable. Press on the button of "Trust" on the pop-up window of your iPhone and then the iOS Transfer for Mac will detect your iPad and display its info in the starting window.
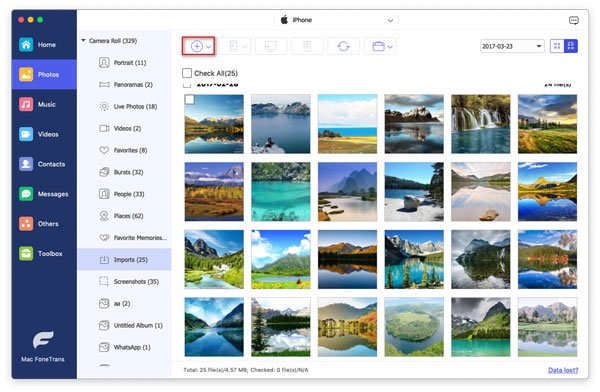
Step 2: Start to transfer pictures from Macbook to iPad
All data categories will show on the left sidebar of the software. Choose "Photos" from the left to enter the photos managing window. Then, turn to the top menu to choose the button of "+", browse for the pictures on the Mac you need and upload them from Mac to your iPhone.
Part 3: Sync Photos from Mac to iPad with iCloud Photos Library
You have the ability to transfer pictures from Macbook/Mac to iPad using the iCloud Photo Library. Just follow these steps:
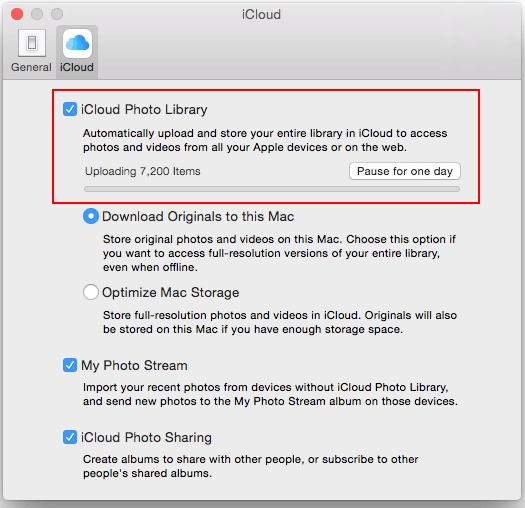
- Open the Photos app on your Mac and go to the Preferences menu.
- In the Preferences window, enable the "iCloud Photo Library" option.
- Alternatively, you can manage your entire photo collection directly through iCloud's official website.
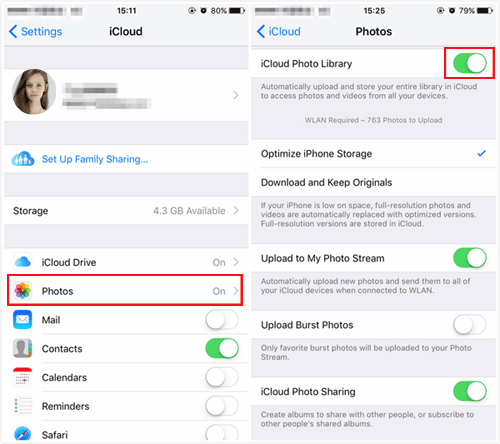
- On your iPad, enable the "iCloud Photo Library" by navigating to Settings > iCloud > Photos.
Once these steps are completed, all your photos will be available on any Apple device signed in with the same iCloud account, ensuring a unified library across devices. You can use this section to find out how to export photos from Mac to iPhone.
Part 4: Copy Photos to iPad from Mac with AirDrop
AirDrop is an iOS data transfer application provided by Apple. It helps users to transfer data and files between Mac and iOS devices like iPad, iPhone and iPod. No need to use a USB cable, it can be shared wirelessly to put photos from Mac to iPad. (AirDrop not working on iPad or iPhone?)
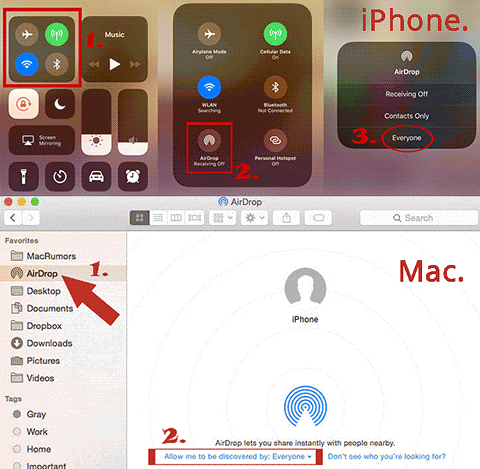
- Open AirDrop on your iPad: Turn on your iPad and swipe up from the bottom of the screen to call out the "Control Center". Long press and hold your finger on the box featuring the airplane button, and then press the "AirDrop" button on the newly popup screen. Then you are allowed to choose to set your iPhone to be discovered by Contacts Only or Everyone. Here, you could choose Everyone.
- Open AirDrop on your Mac: Navigate to "Finder" > "Go" > "AirDrop", or you could choose AirDrop in the sidebar of a Finder window. The pop up Airdrop window will then show you all AirDrop users that are nearby.
- Once the Mac and iPad are connected successfully, you can drag one or more photos to the recipient shown in the window to start to transfer photos to selected recipient (your iPad).

Or, you can also open the photos app on your iPad, select the photos you want to transfer from Mac to iPad and then click the "Share" icon to choose "AirDrop" option. Then, choose your iPad as the recipient and start to send the selected photos from Mac to your iPad.
Part 5: Export Photos to iPad from Mac with Dropbox
Dropbox is a popular online backup cloud service and personal cloud storage service. It is widely used to transfer photos from Mac to iPad. It also provides 2GB of free cloud space for users to store files (how to back up files to Dropbox). Dropbox is suitable for various desktop operating systems, such as Windows, Mac, Linux, and various portable devices, such as iPhone, iPad, Android, and so on.
Here we introduce how to put photos from Mac to iPad via Dropbox.
- Open a browser on your Mac computer and go to the URL: https://www.dropbox.com/.
- Sign in to your Dropbox account, go to the "Photos" section and choose "Upload files" on the right side of the interface to select the photos that you want to import from Mac to Dropbox.
- Once all the selected photos have been uploaded successfully, you can go to the iPad, launch the Dropbox app and log into with the same account you used on Mac. Then, you will find the photos you just uploaded and download them to your iPad.

Part 6: Send Photos from Mac to iPad with Email
You could also try to import photos from Mac to iPad by using email. That's to say, you can either send photos from Mac to iPad as email content or attach photos for sending from Mac or Macbook to iPad. Below are the detailed steps on how to transfer pictures from Mac to iPad using email:
- Open a web browser on your Mac and log in to your email account.
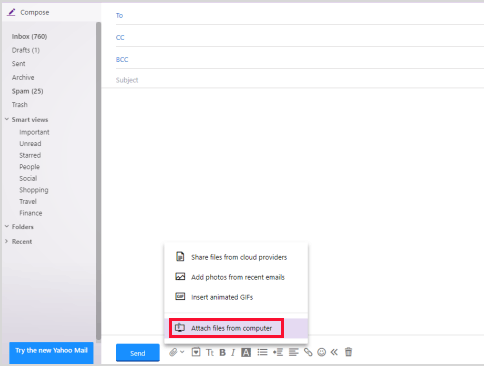
- Click "COMPOSE" button to create a new mail and enter your own email address as the recipient.
- Click the "Attach files" icon to select the photos that you want to transfer from the Mac as attachment, and then send the email.
- After the email is successfully sent, you can log in your email account on your iPad to receive the mail you sent from your Mac.
- Tap the attached photos and download them to your iPad.
Sending photos from Mac to iPad via email is very simple, but it is only suitable for transferring a small amount of files. If you have a lot of photos to send, then the way of sending email is not suitable for you, because it will consume you a lot of waiting time.
The Bottom Line
The above six solutions can help you easily transfer photos from Mac to iPad, you can choose any method to help yourself. In fact, these methods can transfer other data and files besides photos. Of these five methods, iOS Transfer for Mac not only supports transferring files between Mac and iOS devices, but also allows you to simply manage your iPad content on Mac. It is a one-stop strong compatible iOS transfer and management tool for Windows, Mac and iOS. Download it now and try it out.
Related Articles:
[Top 7 Ways] How to Transfer Photos from iPad to Flash Drive?
How to Transfer Photos from iPad to iPad? 5 Ways You Must Know!
[Guide] How to Recover Deleted Photos from iPad with/without Backup?
6 Savvy Ways to Transfer Photos from iPad to Android [Step-by-step Guide]
