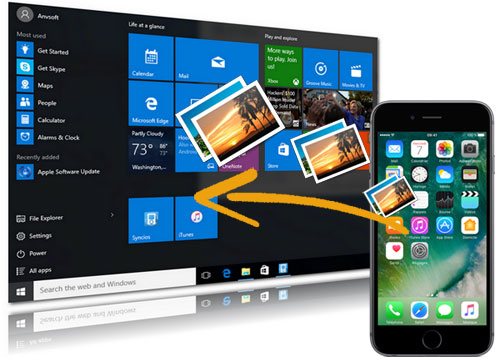
How to Transfer Photos from iPhone to PC in Windows 11/10: A Full Guide
Quick Tips:
- If you're transferring photos from your iPhone to a Windows 11 PC using a USB cable, you can try using the Microsoft Photos app or File Explorer.
- For transferring a large number of photos at once, the iPhone's data transfer feature could be a good option.
- Cloud services like iCloud and OneDrive can help you wirelessly move photos from your iPhone to your Windows 11 computer.
- For just a few photos, you can simply email them from your iPhone to your computer.
iPhones often run low on storage, especially when you have a large collection of high-resolution photos and videos. To free up space and easily manage or edit your media, many people choose to save their photos and videos to a Windows 11 PC. In this post, we'll guide you through four quick and simple ways to transfer photos from iPhone to Windows 11 computer.
- Part 1: Transfer Photos from iPhone to PC in Windows 11 Using Photos App
- Part 2: Import Photos from iPhone to PC in Windows 11 Using File Explorer
- Part 3: Import Photos from iPhone to Windows 11 Using Assistant for iOS [One-click Way]
- Part 4: Import iPhone photos to Windows 11 Using iCloud Photos
- Part 5: Transfer Photos from iPhone to Windows 11 With OneDrive
- Part 6: Download Photos from iPhone to Windows 11 Using Email
Part 1: Transfer Photos from iPhone to PC in Windows 11 Using Photos App
The Windows Photos app, included with Windows 11, makes it easy to manage and organize your photos. You can use it to import photos and videos from your iPhone to your Windows PC without needing any third-party software. Simply connect your iPhone to your PC with a compatible data cable, and you're all set to transfer your photos.
- Connect your iPhone to the Windows 11 PC using a suitable USB cable. Make sure you allow your iPhone to trust the computer in order to proceed.
- Go to the Start menu, desktop or taskbar to run the Photos app on your PC if it can not run automatically.
- Navigate to the top-right corner of the window to click the "Import" button. Then, the Photos app will start listing all photos and videos on your iPhone. (How to transfer videos from iPhone to PC?)
- With default settings, the Photos app selects all photos and videos on your iPhone. If you want to select individual picture on your device, you can deselect the photos you don't want and click "Import selected" button.
After that, all the selected photos will be transferred from your iPhone to Windows 11/10 computer.

Can't Miss:
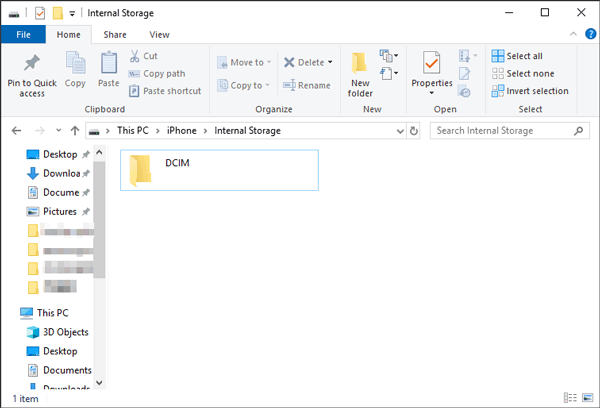
Part 2: Import Photos from iPhone to PC in Windows 11 Using File Explorer
Besides using the Photos app, you can also use Windows 11's File Explorer to transfer photos and videos from your iPhone to your PC. File Explorer automatically organizes your photos and videos into the DCIM folder by accessing your iPhone's storage. Just follow these simple steps to copy your iPhone photos to your Windows 11 PC using File Explorer.
- Connect your iPhone to your Windows 11 PC using a USB cable. Unlock your iPhone and select "Trust" if prompted.
- Open File Explorer on your PC. Your iPhone should show up under "This PC."
- Click on your iPhone, go to the "DCIM" folder, and select the photos you want to transfer.
- Right-click the selected photos or folder and choose "Copy."
- Navigate to the folder on your PC where you want to save the photos, right-click, and select "Paste."
Once the transfer is complete, you can organize the imported photos into folders or your preferred location on your Windows 10 PC.
Guess you like:
Part 3: Import Photos from iPhone to Windows 11 Using Assistant for iOS
The most effective way to upload pictures from iPhone to Windows 11 is using MobiKin Assistant for iOS, a program that is specially designed for data transfer between iPhone/iPad/iPod and computer, and it is also a good assistant for you to manage iOS device data on PC and Mac computer. It only takes you a few minutes to copy all photos from iPhone to Windows 10 PC:
- Transfer photos from iPhone to Windows 11/10/8/7 PC or Mac within minutes.
- Zero quality loss during the photos transferring process.
- Besides photos, it can also transfer Video, Music, Contacts, Text Messages, Notes, Voice Memo, etc. from iOS devices to computer, and vice versa.
- Manage iPhone/iPad/iPod content on computer, delete, remove, or add any file as you like.
- Backup and restore data on your iDevices with one click.
- Import iTunes backups from PC to your device, or delete any unwanted iTunes backups from your PC.
- Fully compatible with iPhone 16/15/14/13/12/11/X/8/7 and all models of iPad and iPod.


How to transfer photos from iPhone to Windows computer with Assistant for iOS? Simply follow the steps below:
Step 1. Connect your iPhone to Windows 11 PC
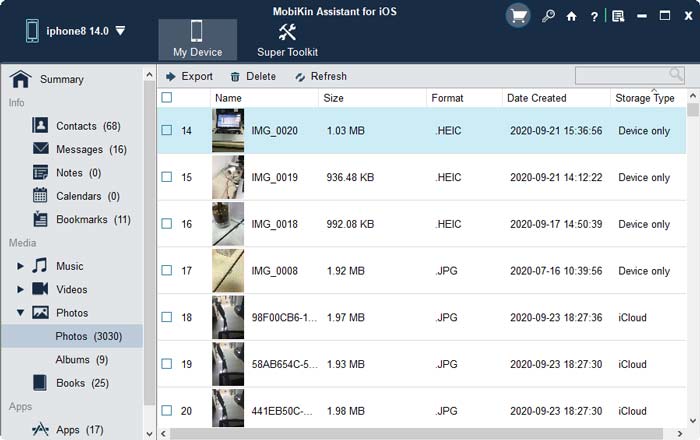
Download and install MobiKin Assistant for iOS on your Windows 11 PC. Run the program and connect your iPhone to PC via USB cable. Once connected successfully, your iPhone will be detected and pop up you with its main interface like the screenshot below.

Step 2. Select the photos you need
All file types in your iPhone will be displayed on left side menu in categories. For this topic, you should click on "Photos" tab and all photos in your iPhone will be scanned out and displayed on the right. Preview these photos and find those you need.
Step 3. Copy photos from iPhone to windows 10
After you have selected all the photos you need, you can click "Export" on the top menu to transfer these photos from your iPhone to Windows 11 PC. You can specify an output location to save the transferred iPhone photos.
Video guide:
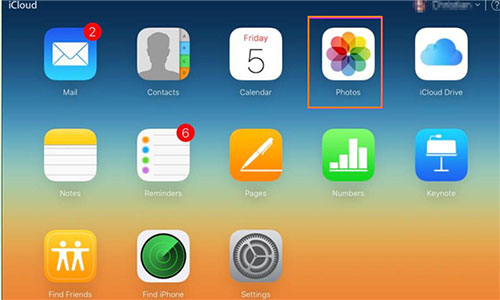
Part 4: Import iPhone photos to Windows 11 Using iCloud Photos
Utilize iCloud Photos on Windows to sync your iPhone photos with iCloud, enabling easy downloading of pictures to your PC. Follow these steps for moving pictures from iPhone to PC Windows 10 through iCloud Photos:
- Activate iCloud Photos or iCloud Photo Library according to your device: Access "Settings" > "Photos" > "iCloud Photos" (or "iCloud Photo Library").
- Automatic uploading of photos to iCloud will occur via Wi-Fi.
- Download and install the iCloud for Windows application on your PC. Sign in using your Apple ID, the same one linked to your iPhone.
- Navigate to "Photos" > Choose "Download new photos and videos to my PC" > Click "Done" > "Apply".
Subsequently, newly captured iPhone photos will be automatically transmitted to your PC whenever connected to Wi-Fi.
- To download photos from iCloud, access Windows File Explorer on your Windows system.
- Navigate to This PC (or Computer on Windows 7) in the left-hand menu. Double-click on iCloud Photos.
- Access the Downloads folder to view your iCloud photo folders.
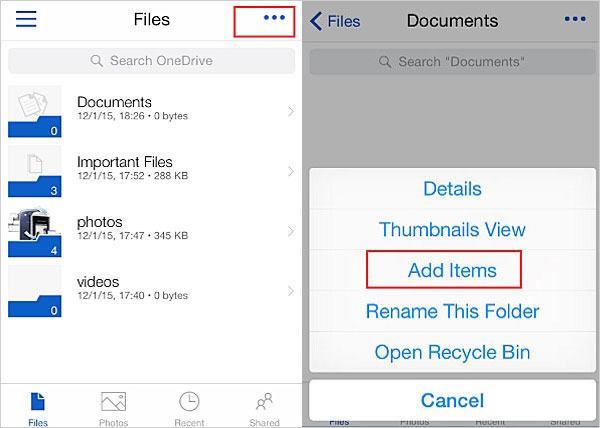
Part 5: Transfer Photos from iPhone to Windows 11 With OneDrive
Utilizing a cloud service like Microsoft's OneDrive presents a convenient method for iPhone to Windows photo transfer. Once configured, this approach enables seamless, automatic wireless synchronization of all your iPhone photos and videos to your Windows 10 system. With this system in place, the hassle of manual file copying or cable connections becomes unnecessary.
- First, download and install the OneDrive app on your iPhone from the App Store, and sign in with the same Microsoft account you use on your Windows 11 PC.
- In the OneDrive app, select the photos you want to transfer and tap "Share" or "More," then choose "Save to OneDrive."
- On your Windows 11 PC, open OneDrive (either through the app or a browser) and log in with the same account. Find the uploaded photos, select the ones you want, and download them to your PC.
- Finally, move the photos to your desired folder on your computer, like the Pictures library.
By following these steps, you can effectively get photos from iPhone to Windows 11 using OneDrive as an intermediary cloud service. This method offers seamless access to your photos across devices without the need for physical connections or manual file transfers.
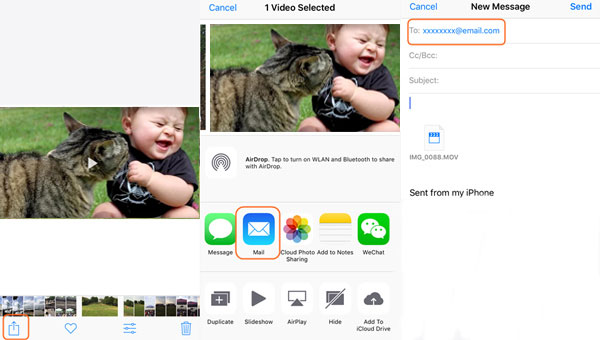
Part 6: Download Photos from iPhone to Windows 11 Using Email
In the event that cloud services or additional app downloads aren't preferable, you still have the option to transfer iPhone photos to a computer through the traditional method: using email.
- Open the Photos app on your iPhone and select the photos you want to download.
- Tap the "Share" icon, then choose "Mail" to attach the photos to an email.
- Send the email to yourself.
- On your Windows 11 computer, open your email and find the message with the photos.
- Download the attachments to your PC and save them to your preferred folder.
Conclusion
This article explores different ways to transfer photos from iPhone to Windows 11 PC, and the best method depends on your needs. While File Explorer is fast, it can be a little tricky for some users. iCloud Photos and OneDrive require an internet connection, and the Photos app, while simple to use, has limited functionality. Email attachments have strict file size requirements.
For smooth and fast transfers, we recommend using MobiKin Assistant for iOS. It works perfectly on both Windows and Mac, and can quickly transfer photos without losing quality, making it a powerful photo management tool.
FAQs on How to Transfer Photos from iPhone to PC in Windows 11
Q1: Can I transfer photos from my iPhone to a Windows PC without using a cable?
Yes! You can use cloud services like iCloud, OneDrive, Google Drive, or Dropbox to transfer your photos wirelessly. Simply upload your photos from the iPhone to the cloud, then download them to your Windows PC. Alternatively, you can email the photos to yourself and download them to your PC.
Q2: Why doesn't my Windows 11 recognize my iPhone photos?
If your photos are in the HEIC format, Windows 11 might not be able to open them unless you install the HEIF Image Extensions. To avoid this, you can change your iPhone settings so that it captures photos in more compatible formats like JPEG or H.264. Here's how:
- Open "Settings" on your iPhone.
- Go to "Camera > Formats".
- Choose "Most Compatible" to make your photos and videos save as JPEG and H.264.
Alternatively, you can use a HEIC converter to convert HEIC images to JPG.
Q3: Can I delete photos from my iPhone after uploading them to the cloud or a PC?
Yes, once your photos are safely uploaded to the cloud or your PC, you can delete them from your iPhone to free up space.
Relative Articles:
How to Transfer Large Videos from iPhone to PC
6 Ways to Transfer Photos from Computer to iPhone Effectively
