3 Proven Ways to Record Screen on iPhone [2025 Updated]
Ever wanted to record your iPhone screen to show off a cool app or highlight a handy feature? You're in the right place! This easy-to-follow guide will walk you through how to quickly record your iPhone screen. No matter which iPhone model you have, we've got you covered.
Before you begin, keep in mind that screen recordings can take up a lot of space, especially if they're long. It's a good idea to free up some storage on your iPhone beforehand.
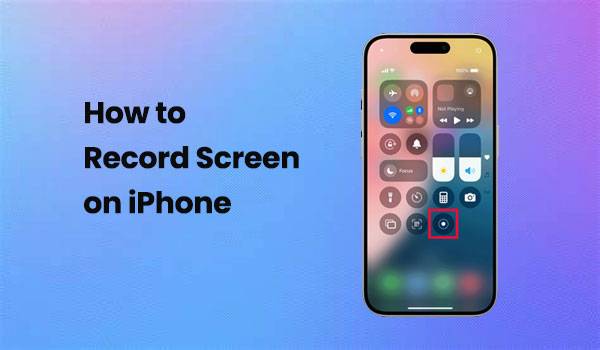
Method 1: Record Screen in iPhone Using Control Center
Screen recording on your iPhone is super easy with the Control Center. If you don't already see the screen recording button (a circle with a dot inside), you'll need to add it first. Here's how:
Step 1: Add the Screen Recording Button to Control Center
- On your iPhone running iOS 18, swipe down from the top-right corner to open the Control Center.
- Tap the "+" button in the top-left corner, then choose "Add a Control".
- Under "Display & Brightness", find "Screen Recording" and tap to add it to your Control Center.
- For iOS 17 or earlier, go to "Settings" > "Control Center", then add "Screen Recording".
Step 2: Start Recording Your Screen
Once the screen recording button is added, you're ready to start. Here's how:
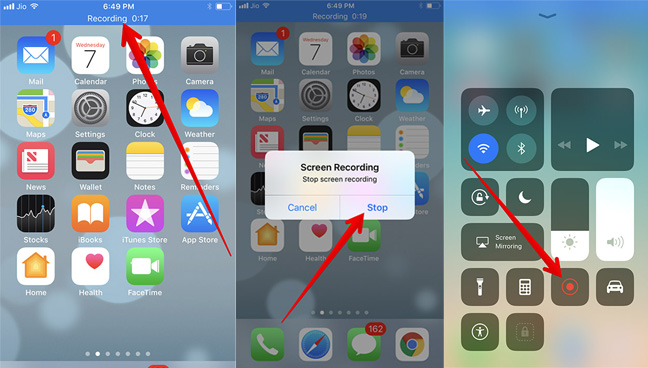
- Open the Control Center on your iPhone and tap the screen recording button.
- Want to record with audio? Tap and hold the screen recording button, turn on the Microphone, and then hit "Start Recording" in the pop-up.
- After a 3-second countdown, your recording will begin.
- To stop, tap the red status bar at the top of your screen, then select "Stop". Alternatively, you can go back to Control Center and tap the red "Record" button to stop the recording.
Step 3: Edit or Share Your Recording
Your screen recording will automatically save to the Photos app, capturing everything, including notifications. To prevent interruptions while recording, you can enable Focus mode.
If you want to edit the video, open the recording in Photos, tap "Edit" at the top-right, and make your changes. To share the recording, tap the "Share" icon in the bottom-left corner of the screen.
And that's it! You've successfully recorded and can now edit or share your screen recording.
Read More:
Method 2: Record Screen on iPhone Using Mac
QuickTime Player has long been a go-to option for Mac users to record their iPhone screens. It's simple to use, doesn't display the red recording button, and delivers clean, professional-looking videos. Plus, it captures high-quality footage, making it perfect for creating tutorials, demos, or presentations.
- First, connect your iPhone or iPad to your Mac with a USB cable.
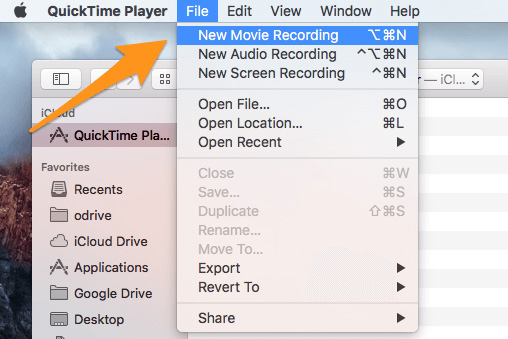
- Open QuickTime Player - the fastest way is by searching for it using Spotlight.
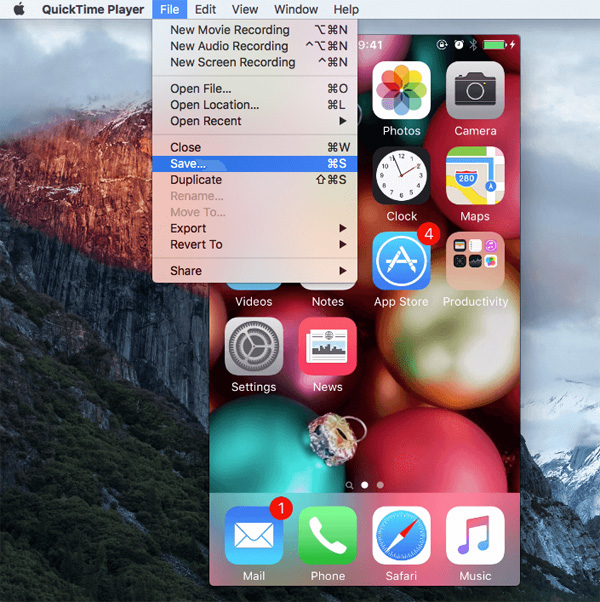
- At the top of your screen, click "File" > "New Movie Recording".
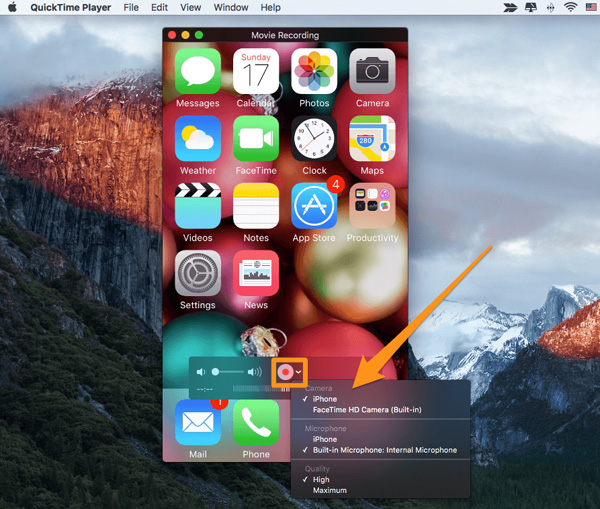
- Next to the record button, click the small arrow and select your iPhone or iPad under "Camera". For "Microphone", choose "Built-in Microphone", and under "Quality", pick "High" if you want better video resolution.
- Once your iPhone screen appears on your Mac, click the "Record" button to start capturing. When you're done, press the red record button again and save the video wherever you like.
Method 3: Record Video on iPhone Screen Using Windows PC
Capturing your iPhone screen on a Windows computer can be a little tricky since QuickTime Player only works on macOS. To do this, you'll need to use a third-party screen mirroring app. If you want a free and easy option, try LonelyScreen, which is a dependable tool that lets you mirror iPhone to PC and then record your iPhone display from your PC.
- Download and install LonelyScreen on your Windows PC.
- Make sure your iPhone and PC are connected to the same WiFi network.
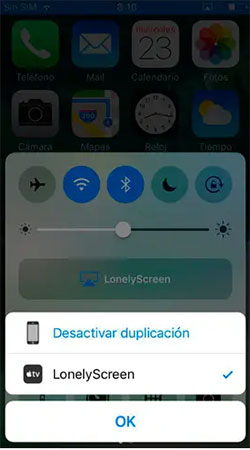
- On your iPhone, open Control Center, tap "Screen Mirroring", and select "LonelyScreen" from the list.
- Your iPhone screen will now appear on your computer. To start recording, use a screen recorder on your PC or click the record option in LonelyScreen.
- When finished, stop the recording and save the video to your preferred folder.
Bonus Tip: Back Up iPhone Screen Videos on Computer
If your iPhone is full of screen recordings, backing them up to your computer is a great way to clear space and keep your favorite videos safe. Whether you make tutorials, record games, or capture creative projects, saving them to a PC or Mac means you'll never lose your work. MobiKin Assistant for iOS makes this task super simple - you can preview, manage, and transfer videos from your iPhone to your computer without ever opening iTunes.
What MobiKin Assistant for iOS Can Do:
- Save iPhone videos such as screen recordings, movies, and TV shows, along with music, photos, messages, contacts, notes, and more.
- Move files between your iPhone and computer in both directions.
- Organize your iOS data right from your desktop - add, delete, or edit as needed.
- Support one-click iTunes backup and restore.
- Safe to use, reliable, and offers a free trial.
- Works perfectly with the latest iPhone models and iOS versions, including iPhone 17/16/15, and iOS 26.


How to Back Up iPhone Screen Recordings with MobiKin Assistant for iOS:
Step 1: Connect Your iPhone
Install and open MobiKin Assistant for iOS on your computer. Plug in your iPhone using a USB cable and tap Trust when the message pops up.

Step 2. Locate Screen Recordings
After your iPhone is detected, you'll see all the file categories. Click Videos or Camera Roll to view your screen recordings. (Videos Disappeared from iPhone/iPad?)
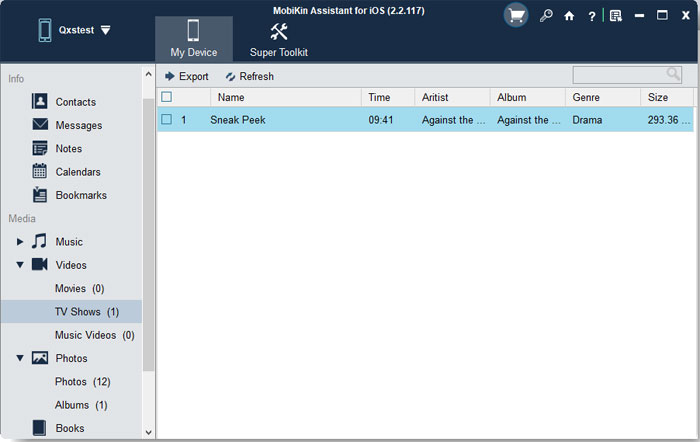
Step 3: Export iPhone Screen Recordings to Computer
Select the recordings you want to back up, hit Export, and choose where to save them on your computer. The transfer will complete in moments, no iTunes, no hassle.
Video Guide:
FAQs about Screen Recording in iPhone
Q1: Can I record my screen on an older iPhone?
Absolutely! Older iPhones also support screen recording. The only difference is how you open Control Center - instead of swiping down from the top-right corner, swipe up from the bottom of the screen.
Q2: Can I record my voice or other sounds while screen recording?
Yes, you can! Just press and hold the Screen Recording icon in Control Center, then tap the microphone button to turn on audio recording before you start.
Q3: Where do I find my screen recordings?
After you stop recording, you'll see a message saying the video has been saved. Open the Photos app and check the "Recents" or "Videos" album - your recording will be there.
Q4: Can I edit the screen recording afterward?
Definitely. You can trim or adjust your recording directly in the Photos app, or use any third-party video editing app from the App Store if you want more features.
Q5: How long can I record my iPhone screen?
There's no fixed time limit - you can record as long as you have enough storage space. Just remember, longer videos will take up more room on your device.
Q6: Can I share my screen recording with others?
Of course! You can send it via email, messages, or upload it straight to your favorite social media apps directly from Photos.
Final Thoughts
And that's how you can easily record your iPhone screen! The built-in screen recorder works great for most users, but if you want more control or extra features, we've also shared some other options worth trying. If you still have any questions, just drop them in the comments below!
Related Articles:
6 Best Ways to Control iPhone from PC [Safe & Easy]
Top 3 Free Online Screen Recorders for iPhone, iPad or iPod touch
