
How to Transfer Movies to iPad without iTunes: 6 Easy Ways
TL;DR:
You can transfer movies to an iPad without iTunes by using a professional transfer tool, built-in Apple features, or cloud services.
- iPad Movie Transfer: Connect your iPad via USB, open the program, go to "Videos" > "Add", select movies, and click "Open" for quick transfers.
- VLC: Enable "Sharing via WiFi" in VLC, enter the IP address in a computer browser, and upload movies directly to the app.
- Finder: Connect iPad to Mac, select the device in Finder, choose "Movies", and sync selected videos.
- AirDrop: Use Mac Finder > "Share" > "AirDrop" to send movies wirelessly.
- iCloud: Upload videos through iCloud Photos, then access them in the iPad Photos app.
- Google Drive: Upload movies to Drive on a computer and download them through the Google Drive app on iPad.
If you want to transfer movies to your iPad but don't want to use iTunes, there are several easier ways to try. Whether you prefer a professional transfer tool, Apple's built-in features, or cloud services, you can find a suitable method based on your device and needs. This guide covers six practical ways to move movies from a computer to an iPad, including iPad Movie Transfer, VLC, Finder, AirDrop, iCloud, and Google Drive, so you can choose the one that works best for you.

- Part 1: Transfer Movies to iPad without iTunes Using iPad Movie Transfer
- Part 2: Put Movies to iPad without iTunes via VLC
- Part 3: Transfer Movies from Mac to iPad without iTunes via Finder
- Part 4: Move Movies to iPad from Mac without iTunes via AirDrop
- Part 5: Sync Movies to iPad without iTunes Using iCloud
- Part 6: Add Movies to iPad without iTunes via Google Drive
Part 1: Transfer Movies to iPad without iTunes Using iPad Movie Transfer
If you want to transfer movies from a computer to an iPad without iTunes, iPad Movie Transfer offers a simple and reliable solution. It lets you move selected movies directly from your PC or Mac to your iPad through a USB connection without complicated syncing steps. The transfer process is fast and easy, and you can preview and choose the movies you need before moving them to your device.
Brief Overview of iPad Movie Transfer:
- Transfer various files between iOS devices, or move data between a computer and iPad/iPhone/iPod.
- Support multiple data types, including movies, videos, music, photos, contacts, SMS, TV shows, ringtones, podcasts, and more.
- Preview and select specific files before starting the transfer.
- Provide a clean and user-friendly experience without tracking user activities.
- Offer versions for both Windows and Mac computers.
- Work with almost all iPad/iPhone/iPod models, including iPad 11/10/9/8/Pro/mini and more.


How to transfer videos from PC/Mac to iPad without iTunes but using iPad Movie Transfer:
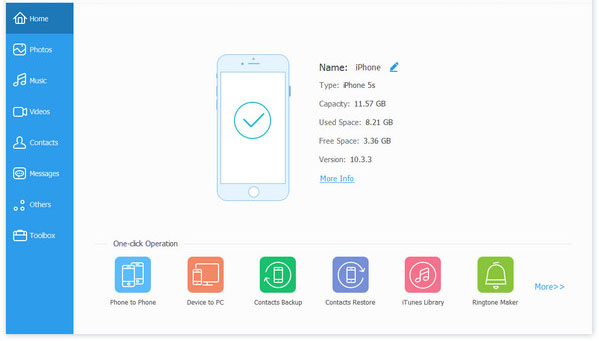
Step 1. Download, install, and launch iPad Movie Transfer on your computer. Then connect your iPad to the computer with a USB cable. The program will automatically detect your device, and the main interface will appear shortly.
Step 2. Click "Videos" from the left panel. Wait a few seconds while the program loads your existing video files. Then click the "Add" button or "+" icon from the top menu and select the movies you want to transfer.
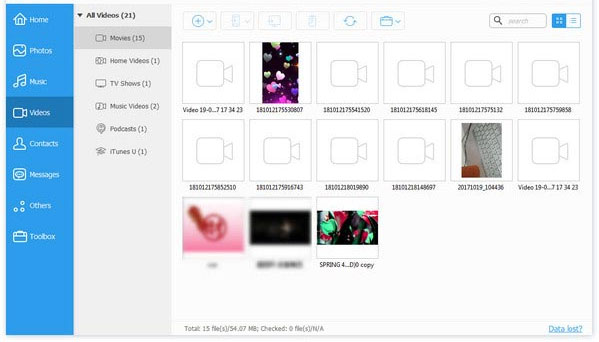
Note: You can also click "Music" or "Photos" from the left sidebar to add songs or pictures to your iPad playlists and albums for better file management.
Step 3. After selecting the movies you want to transfer, click "Open" to start the process. The selected movies will be transferred from your computer to your iPad shortly.
See Also:
Part 2: Put Movies to iPad without iTunes via VLC
VLC is a free and open-source media player that supports various video formats and can also help you transfer movies to an iPad without iTunes. With its Wi-Fi sharing feature, you can upload movies from your computer to the VLC app by entering the provided IP address in a browser. After that, you can watch the transferred movies directly in VLC or save them to your iPad.
How to Add Movies to iPad without iTunes Using VLC:
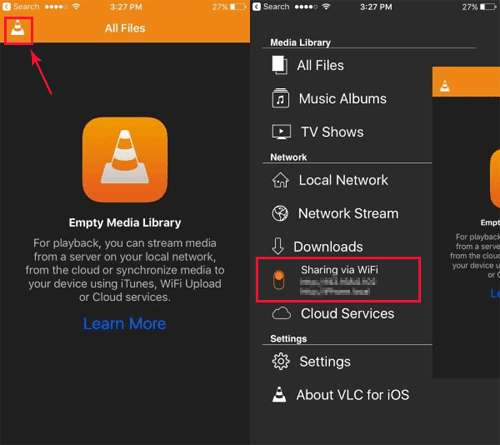
- Install and open the VLC app on your iPad. Tap the icon in the top-left corner, turn on "Sharing via WiFi", and note down the IP address shown on the screen.
- Open a browser on your computer and enter the IP address in the address bar. Then press the "Enter" key to open the VLC upload page.
- Drag and drop the movies into the upload area, or click the "+" icon to select the video files from your computer. The movies will be transferred to the VLC app on your iPad automatically.
- To save movies from VLC to your iPad Camera Roll, open the video file in VLC, tap the share icon, and select "Save [number] Videos" to complete the process.
Accidentally deleted some great videos from your iPad? Don't panic. This guide shows you four easy ways to recover deleted videos from iPad in no time.
Part 3: Transfer Movies from Mac to iPad without iTunes via Finder
If you are using a Mac, Finder provides an official way to sync movies to your iPad without iTunes. Since macOS Catalina, Finder has replaced iTunes for managing iOS devices. By connecting your iPad to a Mac with a USB cable, you can add compatible video files to your device through Finder.
How to Transfer Movies from Mac to iPad without iTunes Using Finder:
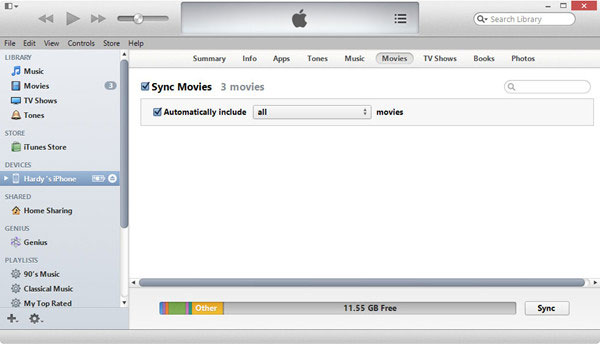
- Connect your iPad to your Mac with a USB cable and open Finder. Select your iPad from the left sidebar.
- Click the "Movies" tab and check the option to sync movies to your iPad.
- Select the movies you want to transfer, then click "Apply" to start syncing.
- Wait for the process to complete. After that, you can open the Movies or TV app on your iPad to watch the transferred videos.
More Related:
Part 4: Move Movies to iPad from Mac without iTunes via AirDrop
AirDrop is a convenient option for sending movies from a Mac to an iPad without using iTunes or cables. It works wirelessly and is especially useful when you only need to transfer a few video files. However, the transfer speed depends on the file size and network conditions, so it may not be the best choice for moving a large movie collection.
How to Transfer Movies from Mac to iPad without iTunes Using AirDrop:
- Turn on AirDrop on both your Mac and iPad. Make sure both devices are connected to Wi-Fi and Bluetooth. (AirDrop Declined?)
- On your Mac, open Finder and locate the movie files you want to send.
- Right-click the selected movie, choose "Share", and select "AirDrop". Then choose your iPad from the available devices.
- Tap "Accept" on your iPad to receive the movie. After the transfer finishes, the video will be saved to the Photos app or the related app on your iPad.

Part 5: Sync Movies to iPad without iTunes Using iCloud
iCloud provides a wireless way to sync movies from your computer to your iPad without using iTunes. By uploading videos to iCloud Photos, you can access them directly from the Photos app on your iPad. However, this method requires enough iCloud storage and may take longer when transferring large video files.
How to Transfer Movies to iPad without iTunes Using iCloud:
- Unlock your iPad and go to "Settings" > [your name] > "iCloud" > "Photos". Then turn on "Sync this iPad" (or "iCloud Photos" depending on your iOS version).
- Install and open iCloud for Windows on your computer. Sign in with the same Apple Account used on your iPad, enable "iCloud Photos", and turn on the option to upload photos and videos from your PC. Then copy your movie files to the specified upload folder.
- Step 3. Wait for the sync process to complete. Then open the Photos app on your iPad to find and watch the uploaded movies.
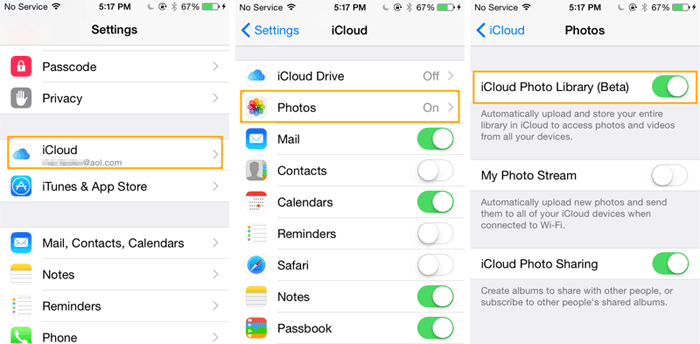
Alternatively, you can visit iCloud.com, sign in with your Apple Account, open "Photos", and click the upload button to add your movie files.

Part 6: Add Movies to iPad without iTunes via Google Drive
Google Drive is another convenient option to move movies to an iPad without using iTunes. It works across different platforms, allowing you to upload movies from a computer and access them on your iPad anytime. This method is easy to use, but the upload and download speed depends on your internet connection and available Google Drive storage.
How to Put Movies on iPad without iTunes Using Google Drive:
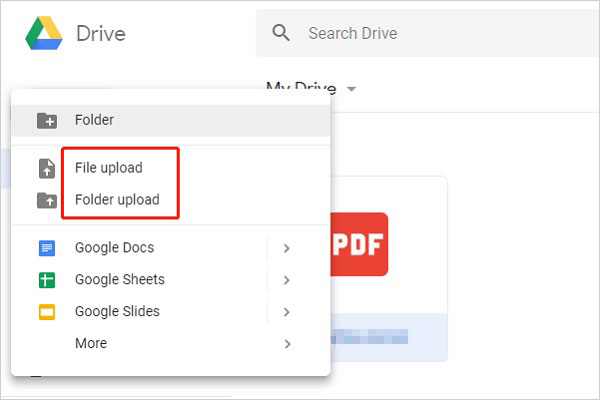
- Open Google Drive in a browser on your computer and sign in to your Google Account. Click the "New" button in the upper-left corner, then choose "File upload" or "Folder upload".
- Select the movie files or folders you want to transfer, and click "Upload" to save them to Google Drive.
- Install and open the Google Drive app on your iPad. Sign in with the same Google Account, find the uploaded movies, and download them to your iPad for offline access.
Roundup
Transferring movies to an iPad without iTunes is easier than many users expect. A dedicated tool like iPad Movie Transfer offers the fastest and most flexible way to move videos, while Finder, AirDrop, VLC, iCloud, and Google Drive provide useful alternatives for different situations. Choose the method that fits your device, file size, and transfer needs to enjoy your favorite movies on your iPad anytime.
Related Articles:
5 Free Ways to Transfer Files from PC to iPad: Complete Guide
How to Transfer Data from One iPad to Another in 2026