4 Ingenious Methods to Format Android Phone without Errors
Formatting an Android phone is an effective way to fix various mobile issues, protect personal data before selling or gifting the device, and even improve performance. For many users, it serves as a quick and reliable solution to common phone problems. Therefore, learning how to format an Android phone is important, and this article provides simple guidance for those unfamiliar with the process.
Part 1. Back Up Android Files Before Formatting the Phone
To format an Android phone means restoring it to its original factory state. In doing so, all downloaded files, saved data, and customized settings on the device will be completely removed. Therefore, if you have stored some important files on your phone, you are strongly advised to move them to external hard drive before performing the formatting process.
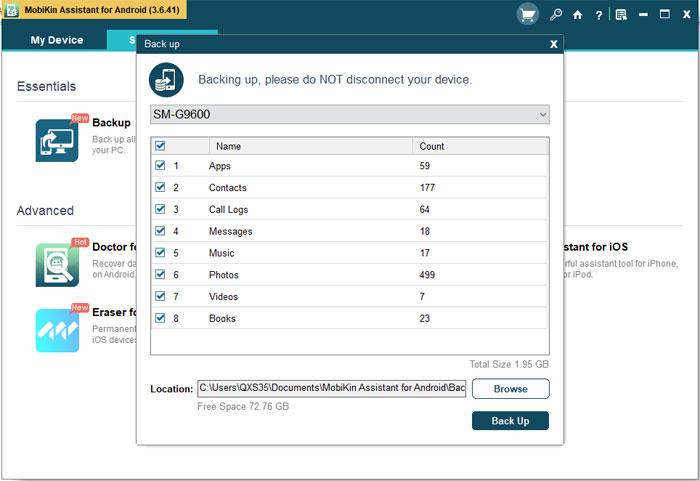
Here, choosing MobiKin Assistant for Android (Windows/Mac) could be the most effective way to complete the backup process. With this program, you are able to transfer the files on Android to the computer within one simple click. Here's the user guide:
- Download and install the software on your computer and then launch it.
- Next, connect your Android device to the PC via Wi-fi or USB cable.
- If you select to use USB here, you need to open USB debugging on your phone, or it won't be able to be detected.
- Click on Super Toolkit at the top menu and select the Backup option on this interface.
- After that, you will get a pop-up window with several categories.
- Just check all of them and elect the path to save the files.
- Finally, you need to tap on Back Up to move these files to the computer.


Part 2. Format Android Phone via Factory Reset (Partial)
A factory data reset is the easiest way to format an Android mobile phone. This performance is pretty simple, and you can go with the details below to have a try. The process would be completed in a short time:
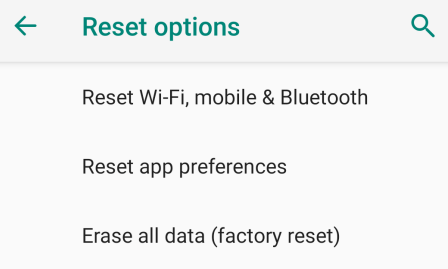
- Open Settings on your Android device.
- Go to System (or General Management, depending on your phone model).
- Tap Reset or Reset options.
- Select Erase all data (factory reset).
- Review the items that will be deleted, then tap Reset phone or Erase everything.
- Enter your PIN, password, or pattern if prompted.
- The device will reboot and automatically format itself, restoring everything to factory defaults.
You May Also Like: Does Factory Reset Delete Everything on Android/iPhone? In-depth Analysis
Part 3. Format the Device in Recovery Mode (For Broken Phones)
This method is often applied to fix Android phone issues, like the device being stuck in a certain interface or the phone being locked, for you forgot the password, and so on. The following is the specific guide:
- Turn off your Android device completely.
- Press and hold the Power + Volume Up buttons together (or Power + Volume Down, depending on your phone model) until the Recovery Mode screen appears.
- Use the Volume buttons to navigate and highlight Wipe data/factory reset.
- Press the Power button to confirm your selection.
- Choose Factory data reset or Yes when asked to confirm.
- Wait for the system to erase all data and complete the reset process.
- Once done, select reboot system now to restart your device with factory settings restored. (What if the recovery mode doesn't work?)

Part 4. Format Android Device via Google Find Hub (Remote)
Google Find Hub is the latest version of Google's remote device management service - Google Find My Device, designed to help users locate, secure, and control their Android phones. One of its key capabilities is the ability to format an Android device remotely, allowing users to erase all data if the phone is lost, stolen, or inaccessible.
With its simple interface and cloud-based control, Google Find Hub provides a convenient way to protect personal information from anywhere. Here's how:
- Open a web browser on your computer or another phone and go to Google Find Hub (the older predecessor to Find My Device).
- Sign in with the same Google account that is logged in on the Android phone you want to format.
- Once your device appears on the screen, click on the Erase or Factory reset device option.
- Confirm the action to remotely erase all data, including apps, settings, files, and accounts.
- Your Android phone will automatically reset to factory settings the next time it connects to the internet.

Part 5. Format Android Phone/Tablet via Manufacturer PC Tools
Manufacturer PC Tools are official software programs provided by Android phone brands, such as Samsung Smart Switch, Xiaomi Mi Assistant, Huawei HiSuite, or OPPO/realme Assistant, to manage and maintain devices via a computer. These tools allow users to format their Android phones, restoring them to factory settings while ensuring compatibility and minimizing the risk of errors during the reset process. Here's the demonstration:
- Download and install the official PC tool for your device brand.
- Open the tool on your computer and connect your Android phone using a USB cable.
- Allow any required permissions on your phone, such as USB debugging or file transfer mode.
- Locate the Backup & Restore, System Repair, or Reset Device option within the tool (varies by manufacturer).
- Choose the Factory Reset, Restore to default, or Reinstall system option.
- Confirm the action to begin the formatting process.
- Wait for the tool to erase the device data and reset the phone to factory settings.
Summary
In conclusion, formatting an Android phone can be done in multiple ways, including Factory Reset, Recovery Mode, Google Find Hub, and Manufacturer PC Tools, each offering a reliable method to restore your device to its original state. But then again, it is crucial to back up your Android phone before formatting to prevent permanent loss of important data, such as contacts, messages, and media.
Related Articles:
How to Back Up SD Card before Formatting? 4 Safe Ways to Try Out
Three Secure Ways to Format iPhone Completely
5 Tactics to Recover Formatted Data from Android Phone with/without Backup
How to Clone an Android Phone to Another with 7 Popular Options?