Android Cloud Backup - Back Up Android to Google Drive, Dropbox, etc
More Android users now back up their data to cloud storage because it is free and convenient. Popular services like Google Drive, Dropbox, OneDrive, and pCloud make this easy. This guide explains how to make Android cloud backup using these platforms.
Before starting the Android cloud backup, you can learn the difference among Dropbox, OneDrive, and Google Drive at first. Then you can choose the one you like and go with the tutorial to backup your phone data.
- Part 1. How to Back Up Android Phone to Dropbox?
- Part 2. How Can I Use OneDrive to Back Up Android Files?
- Part 3. What to Do If I Want to Upload Android Data to Google Drive?
- Part 4. How to Sync Android Data to pCloud?
- Part 5. Can I Sync Android Files to iCloud?
- Part 6: One Click to Back Up Files on Android to PC
Part 1. How to Back Up Android Phone to Dropbox?
Cloud storage is one of the features of Dropbox. With it, Android users are allowed to share and save Microsoft Office documents, text messages, audio, video and image files. In addition, it offers users 2 GB free storage so you can secure your files for free at the beginning. Then how to backup your Android data to Dropbox? Here is the tutorial:
1st Step: Download the Dropbox App from Google Play Store and properly install it on your Android phone.
2nd Step: Turn on the installed application and sign in to Dropbox with your account. If you don't have an account, just select the "SIGN UP FOR DROPBOX" option at the primary interface to create a new account.

3rd Step: Open the Dropbox folder where you'd like to store your files.
4th Step: Click on the "+" button and select the "Upload files" option.
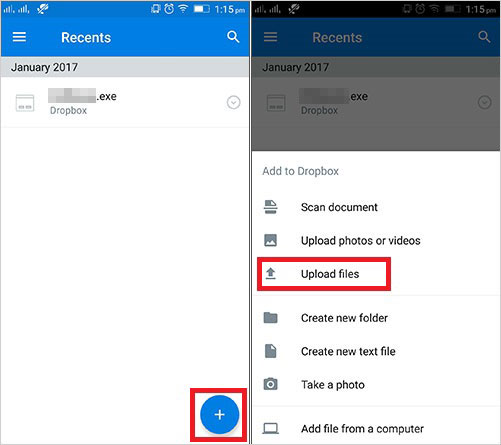
5th Step: Then you can select the wanted files from your device and upload them to Dropbox.
That's how to upload Android files to Dropbox. If you want to know more about the Android to Dropbox transfer, you can click to learn the guide about backing up data with Dropbox.
Part 2. How Can I Use OneDrive to Back Up Android Files?
OneDrive, formerly known as SkyDrive, Windows Live SkyDrive and Windows Live Folders, is a file hosting service and synchronization service operated by Microsoft. It enables users to store files and personal data, share files and sync files across Android, Windows phone, iOS mobile devices, Windows and MacOS computers.
Thus, you can use it to back up your Android files without any hassle. And there is 5GB of free storage space available for you. Let's learn how to backup Android phone to OneDrive now!
1st Step: Download, install and open the OneDrive App on your Android phone.
2nd Step: Sign in to your OneDrive with your account and password.
3rd Step: After that, you can choose a folder where you want to backup the files and click on the "..." icon at the upper right corner.
4th Step: Then a window with different options will pop up on the interface. Just choose "Add Items" and you will get three options: "Create a Folder", "Take a Photo or Video" and Choose Existing".
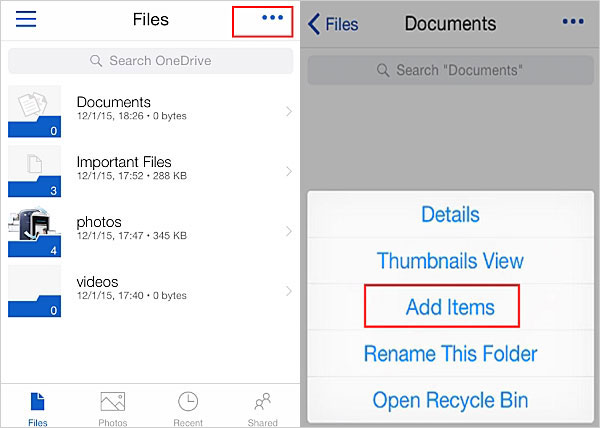
5th Step: Select one of them and tap on "OK" to allow the service to access your phone data.
6th Step: Now you can choose the files you want to back up and hit "Upload" to save them online.
For more details about backing up files to OneDrive, you can go to the page: A complete guide on how to back up files to OneDrive.
Part 3. What to Do If I Want to Upload Android Data to Google Drive?
With Google Drive, you are able to store files on the server, synchronize files across devices and share files. It offers applications with offline capabilities for Windows and Mac computers, Android and iOS smartphones and tablets. And it is worth mentioning that its free storage space is up to 15GB. That means you are allowed to upload a large number of files to the service. Amazing, right? Just take action to perform the backup.
1st Step: Turn on Google Drive on your Android phone and log in with your account.
2nd Step: Tap on the "+" icon at the lower right corner and choose "Upload" from the listed options.

3rd Step: Choose and mark the files you want to upload and click the "Done" button to start the backup.
There are some other ways to backup your Android data to Google Drive. If you are interested in them, you can click to learn the complete guide.
Part 4. How to Sync Android Data to pCloud?
Keeping your Android data backed up is essential for preventing unexpected loss and ensuring easy access across devices. As a OneDrive substitute, pCloud offers a simple and secure way to sync important files, photos, and documents to the cloud. The following steps will show you how to sync your Android data to pCloud quickly and efficiently. Here's how it works:
1st Step: Install pCloud App - Download and install the pCloud app from Google Play, then sign in or create an account.
2nd Step: Enable Automatic Upload - Open the app, go to Settings, and turn on Automatic Upload for photos, videos, or other files.
3rd Step: Select Data to Sync - Choose the folders or file types you want to back up, such as documents, media, or downloads.
4th Step: Start and Monitor Sync - Connect to Wi-Fi, start syncing, and check the progress in the app to ensure all data is uploaded successfully.
Part 5. Can I Sync Android Files to iCloud?
It is also possible that you decide to switch from an Android to an iPhone and wish to sync Android files to iCloud for backup. That is it possible? Maybe it is a little difficult and complex, but you are still able to achieve this goal.
To complete that, you need to first sync and move your files to Google and then download them to your computer. After that, you can import the files to your iCloud. Here you should know that you can only sync the contacts by using this method. For the detailed steps, you can go to the page - How to sync Android to iCloud.
Part 6. One Click to Back Up Files on Android to PC
Computer is also an ideal location to save and back up Android files. Compared with cloud storage servers, the free storage space of computer is much larger - as long as there is available space on your computer, you can make a backup for free. So here you can choose to backup your Android data to your computer as well.
If you tend to back up the files on Android to computer, you can make use of a professional third-party software called MobiKin Assistant for Android (Windows/Mac). This tool enables you to back up different kinds of files on your Android phone with one click, which would greatly simplify the Android to PC backup process.
You can download and install the trial version of the software on your computer by clicking the icon below and go with the steps to make a backup.


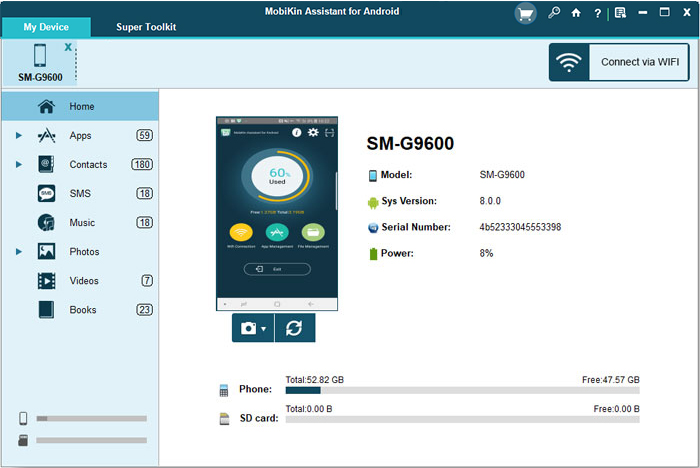
1st Step: Launch the program on your computer and you will get the following interface.
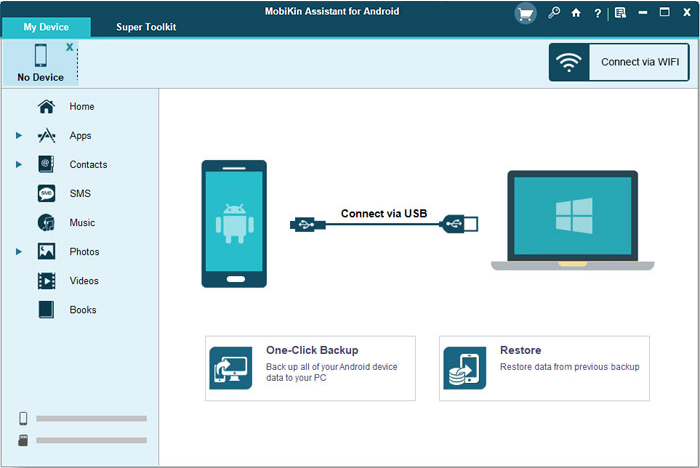
2nd Step: On the primary interface, you can select to build a connection between your Android phone and computer via USB cable or Wi-Fi. Then you should go with the onscreen prompts to make the connected device be recognized.
3rd Step: When the program successfully recognizes your mobile phone, the parameters of the device and files on it will be displayed on the interface. Just select "Super Toolkit" from the top menu.
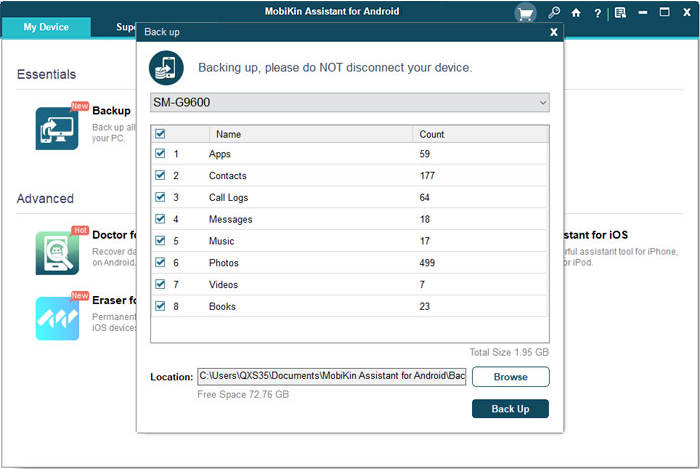
4th Step: Then you can go on to choose "Backup" and tick off the folders that you want to backup. Finally, you can simply click on "Back Up" to save your phone data.
Learn how to use this software visually:
The Bottom Line
These are all the details about how to backup Android phone to the cloud storage. Except for that, you can also turn to Android to PC backup when the free storage space of the cloud is used up. Now just choose one tutorial from above and follow the steps to backup your Android phone.
Related Articles:
[Fixed] OneDrive Won't Sync? 16 Verified Tips in 2026
Helpful Tips to Share Photos in Dropbox on Android? [Must-read]
Top 4 Means to Move Photos/Pictures from Google Drive to Google Photos