How to Back Up Photos on Android Device? 7 Tried-and-true Ways
"I have been helping a friend to take photos for years but leaves them on the phone and then loses them when the phone malfunctions. I am trying to help her get into a habit of backing things up." -- from Reddit
Do you enjoy capturing special moments on your smartphone, whether it's a Samsung, Google, Huawei, Xiaomi, or another brand? If so, chances are you've built up a large collection of photos on your Android device over time.
So, it is advisable to protect your Android photos by implementing an Android photo backup, thereby avoiding any unforeseen loss. This leads to the inquiry: What are the most efficient methods to back up all my photos on Android? Below are 7 strategies for your consideration.

- Way 1: Back Up Photos in Android with Google Photos
- Way 2: Back Up Photos on Android to PC via Android Backup & Restore [Specialized]
- Way 3: Back Up Images on Android to PC via Assistant for Android
- Way 4: Back Up Photo App for Android Using OneDrive
- Way 5: Back Up Image of Android Phone to PC by Copy & Paste
- Way 6: Back Up Pictures on Android with Dropbox
- Way 7: Back Up Android Photos to SD Card
Click the video below to learn this topic visually.
Way 1: Back Up Photos in Android with Google Photos
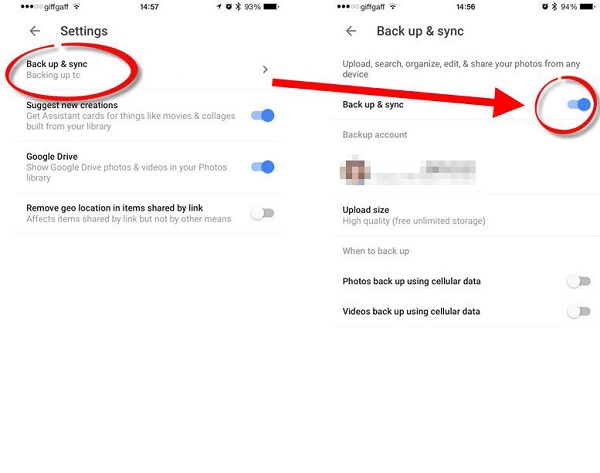
The widely-used method for backups is Google Photos. Here's how to back up photos on Android: (Note that backup time depends on your internet speed and file size. If storage is low, pausing the backup may impact apps like Google Drive that rely on it.)
- Begin by launching Google Photos and logging in with your Google account.
- Navigate to the top right corner and select the Menu icon, then choose "Settings > Back up & sync."
- Toggle the "Back up & sync" option on or off.
- Ensure you've adjusted settings such as your Google account, upload size, backup of device folders, mobile data or Wi-Fi preferences, and roaming options.
- Proceed by selecting the photos icon.
- After the backup, check at the top to confirm whether all the photos have been successfully backed up or if they are still in the pending stage.
Note: Alternatively, you can directly run a backup of your phone using Google Drive, another Google service. To do it, install and sign in to the Google Drive app. Tap the + icon, then select Upload > Photos and videos. Choose the images you want to upload.
Demerits:
- Limited free storage (15GB shared across all Google services).
- Compression for free storage can reduce photo quality.
- Requires an internet connection for backup and access.
Way 2: Back Up Photos on Android to PC via Android Backup & Restore [Specialized]
With ample storage and enhanced security, many prefer computers for mobile data backup. Transferring Android photos to a computer is a reliable option, easily done with third-party software.
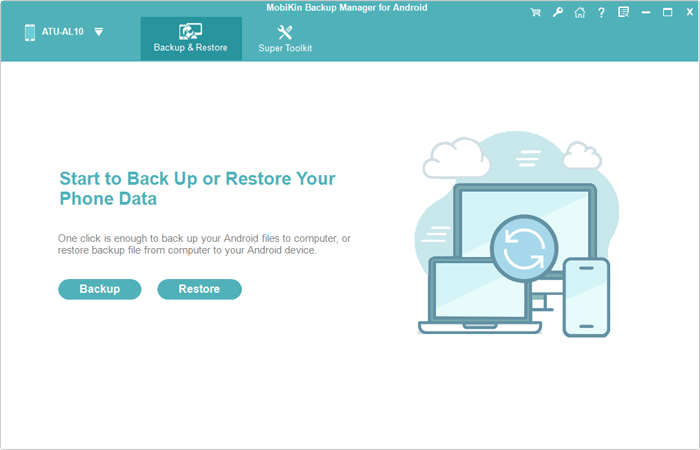
MobiKin Backup Manager for Android, known as Android Backup and Restore, simplifies this process, allowing you to back up or restore data between Android and PC/Mac effortlessly—a lifesaver for recovering lost data.
Main features of Android Backup & Restore:
- In addition to photos, it can also back up contacts, messages, call logs, videos, music, documents, apps, and more on a computer.
- Directly restore the backups from PC/Mac to any Android device with simple steps.
- It allows you to connect Android phone via a USB connection or WiFi connection.
- With a user-friendly interface, the backup process is hassle-free.
- Supports almost all Android devices, including Samsung, TECNO, Infinix, Motorola, Sony, vivo, Huawei, OnePlus, Google, Xiaomi, OPPO, etc.
- It also comes with a Mac version.


How to back up pictures on Android by using Android backup & restore?
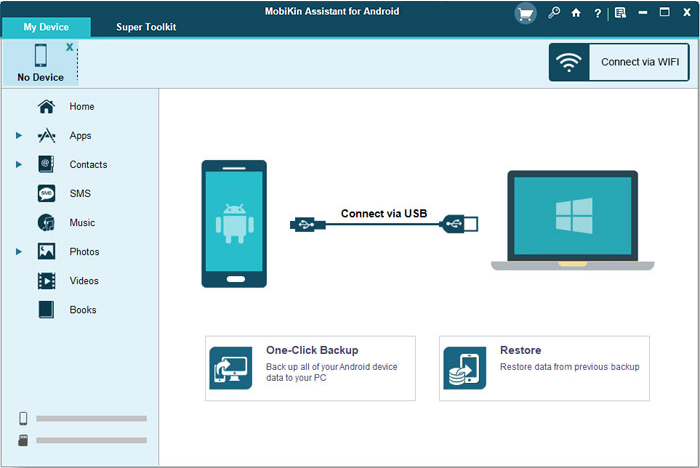
Step 1: Connect Android to a computer
Download and install this Android backup and restore program on your computer. Launch it and connect your phone to the same computer via USB. Please note that you should enable USB debugging on your device so that the program can detect your phone.
Step 2: Select the photos to back up
Once you get your Android device successfully connected, click "Backup" from the main interface, and you will see different data types displayed.
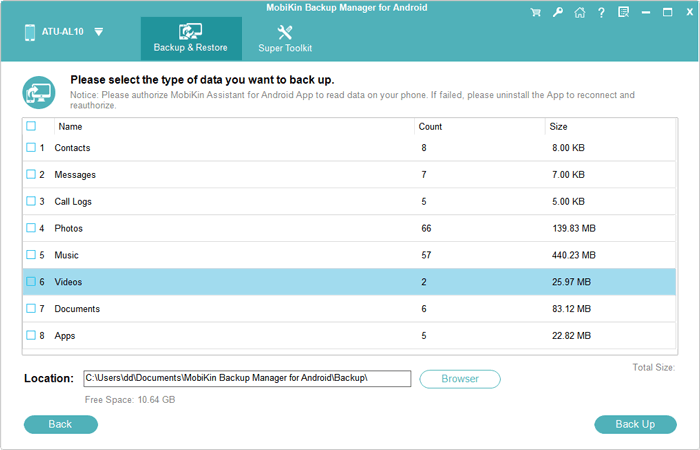
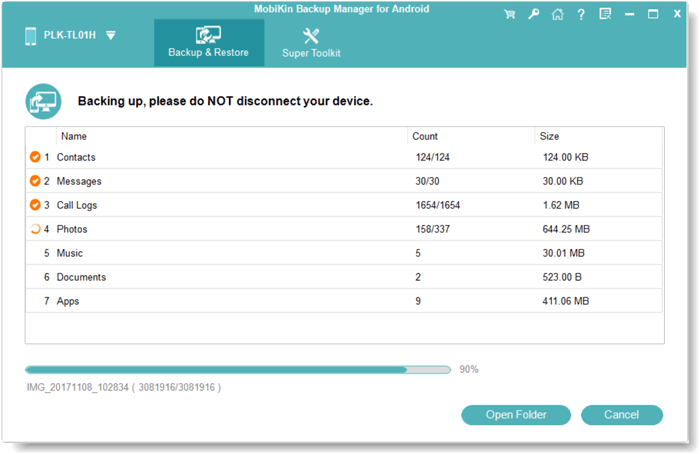
Step 3: Start the backup
Tick off the file types that you wish to back up, click "Browser" to specify a location for saving these output photos, and then click "Back Up" to begin the Android photos backup process.
Video Guide:
Demerits:
- Requires a computer for backup and restore.
- Some features may be limited in the free version.
- Only allows for bulk backup and restore.
Way 3: Back Up Images on Android to PC via Assistant for Android
MobiKin Assistant for Android (Win & Mac) offers versatile Android backup options, allowing selective or complete backups. Beyond backups, it serves as a powerful management tool for contacts, messages, videos, photos, call logs, and more. You can add, delete, edit data, and even send or receive texts directly from your computer. Here's how to selectively back up Android pictures using MobiKin Assistant for Android:
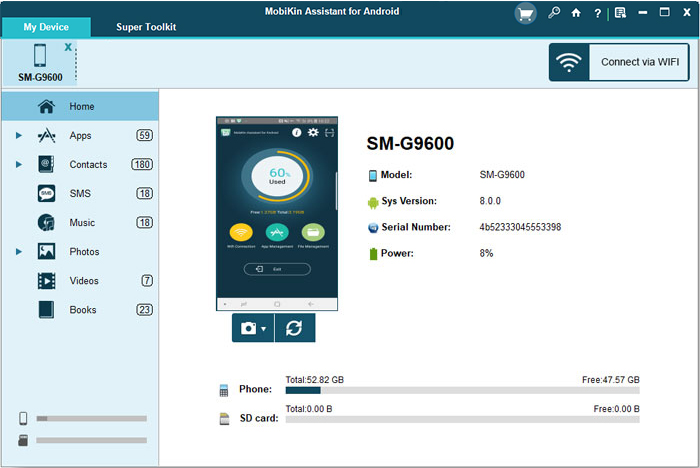
Step 1. Launch the software and then connect your device to the computer via a USB cable or Wi-Fi. If you choose to connect via Wi-Fi, you need to download the App version on your device and go with the prompts to build a Wi-Fi connection.
Step 2. After the connection, the program will detect the connected Android phone automatically and then you will get the following interface:
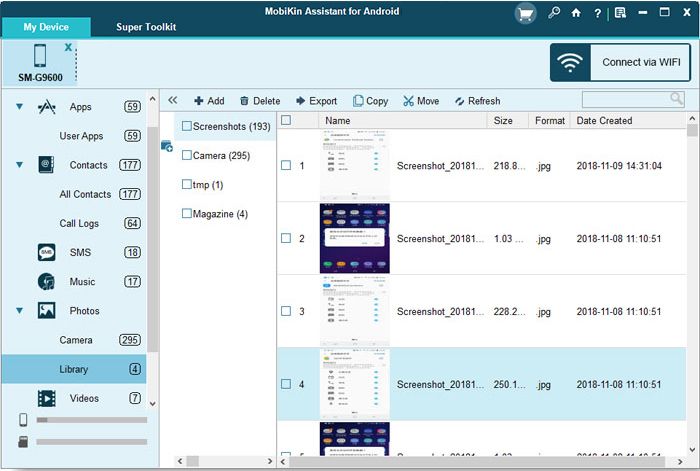
Step 3. Choose "Photos" on the left side menu. Preview and choose the photos you want to back up. Finally, click "Export" from the top menu and then select a location to save the exported photos for data management or preservation.
Video Tutorial:
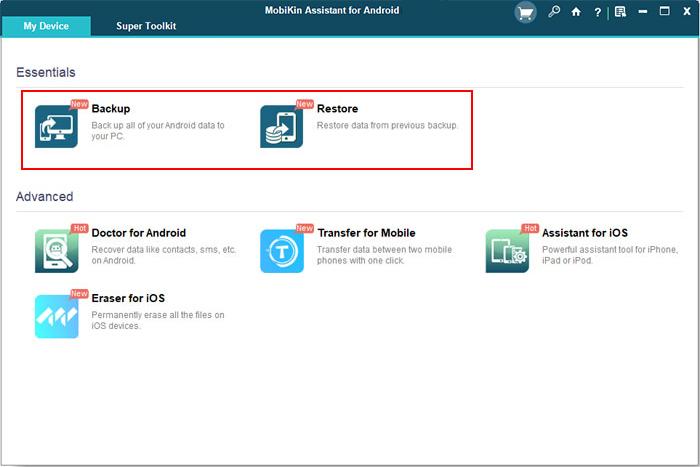
The program also allows you to transfer Android photos to a computer in one click. If you wish to copy all pictures from your Android phone to your PC, you can click the "Super Toolkit" to enter the 1-click backup & restore window.
Demerits:
- Needs installation on a computer.
- Limited functionality in the free version.
- Backup speed can vary depending on the file size and system performance.
Way 4: Back Up Photo App for Android Using OneDrive
OneDrive is a versatile cloud storage service by Microsoft, offering secure and accessible storage for your files across devices. Its Photo Backup feature for Android simplifies safeguarding your pictures, ensuring they're stored in the cloud and accessible anytime. Here's how:
- Download and install the OneDrive app from the Google Play Store.
- Open the app and sign in with your Microsoft account.
- Tap your profile icon or account image in the app.
- Go to Settings > Camera upload.
- Toggle on "Camera upload" to back up photos automatically.
- Tap Back up device folders under Camera upload settings.
- Choose additional folders like screenshots or social media folders to back up.
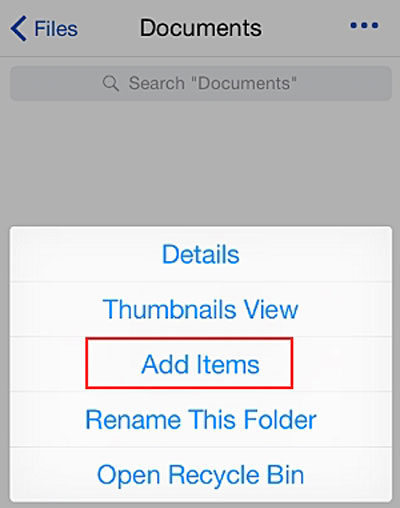
Optionally, follow these steps to maintain a backup: Download and install the OneDrive app, then create an account. Open the app and tap the three-dot icon on the top bar. Select Add items from the menu. Choose the photos to back up to OneDrive.
Demerits:
- Limited free storage (5GB); more space requires a subscription.
- Can use up mobile data if not set to Wi-Fi-only uploads.
- The backup may be slow.
You May Also Like: 10 Best OneDrive Alternatives You Should Never Miss [Rewarding]
Way 5: Back Up Image of Android Phone to PC by Copy & Paste
By using this way, you do not need to download and install any third-party software on both your computer and Android phone. However, it only allows you to transfer images, songs, videos, and the copying process will be time-consuming. Now, let's see how to copy and paste the Android photos to your computer:
- Connect your Android phone to a computer with USB and then turn on USB debugging on your device.
- Swipe down the phone screen and then tap on "Transfer files" in the notification bar.
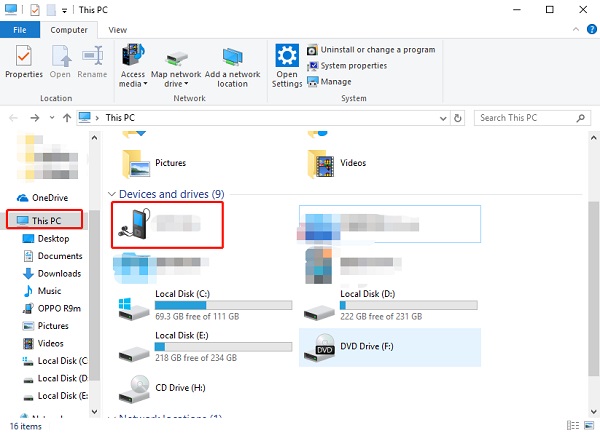
- Double-click on "This PC" on your computer and then tap on your mobile phone.
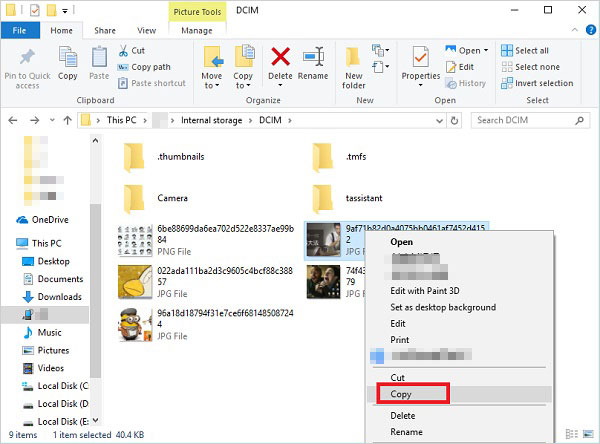
- Now just find out the folder or images that you want to transfer and then right-click the mouse to "Copy" them.
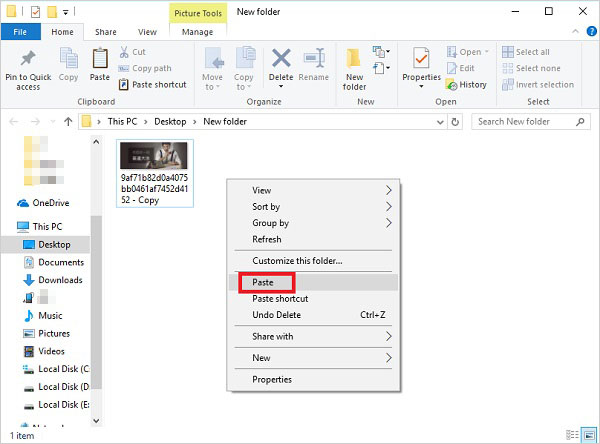
- Go to the folder that you want to save the selected photos and right-click the mouse to "Paste" them.
Demerits:
- Manual process and not automated.
- Requires a computer or external storage for transferring files.
- Easy to forget or miss photos during transfer.
Way 6: Back Up Pictures on Android with Dropbox
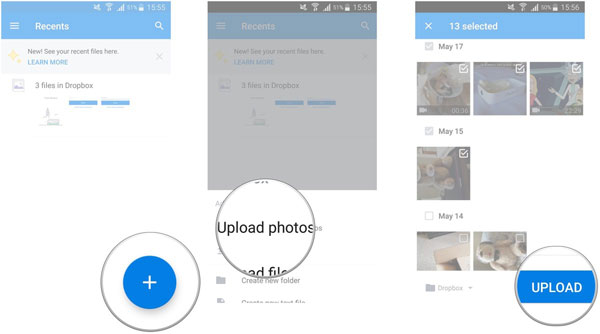
Dropbox includes a camera upload feature in its settings, allowing you to effortlessly back up and save pics directly to the Dropbox folder. Consequently, your pictures will be automatically stored in the cloud. Here are the steps to enable Camera Upload on an Android device so as to save pictures on Android:
- If you don't have the Dropbox app installed on your Android device, download and install it from the Google Play Store.
- Open the Dropbox app and sign in with your existing Dropbox account or create a new one if you don't have an account yet.
- In the Dropbox app, tap the "Files" tab at the bottom of the screen. Then, tap on "Photos" to access your device's photo gallery.
- Choose the photos you want to back up. You can select multiple photos by tapping on them. Alternatively, you can use the "Select" option to choose multiple photos at once.
- Once you've selected the photos, tap the "Upload" or "Save" button.
- Select the location within your Dropbox account where you want to store the photos. You can create a new folder or choose an existing one.
- The selected photos will start uploading to your Dropbox account.
- Once the upload is complete, you can verify the success by navigating to the chosen location in your Dropbox account.
Demerits:
- Limited free storage (2GB), requiring a paid plan for more space.
- Upload speed depends on the Internet connection.
- May not automatically back up all photos unless manually selected.
Way 7: Back Up Android Photos to SD Card
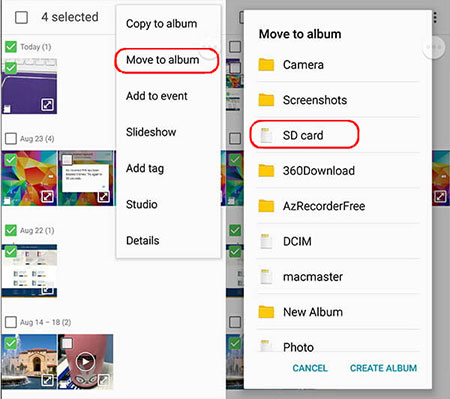
An SD card (Secure Digital card) is a portable storage device used to expand your Android phone's storage capacity locally. It's ideal for storing large amounts of data like photos, videos, and music. To back up your images to an SD card:
- Ensure the SD card is properly inserted into your Android device.
- Go to the Gallery or Photos app on your Android device.
- Tap and hold to select the photos you want to back up or use the Select All option for bulk selection.
- Tap the three-dot menu and select Move or Copy (depending on your device).
- Choose the SD Card as the destination.
- Select the folder or create a new one to store the photos.
- Tap Move or Copy to finish the process.
Demerits:
- A physical device, which can be lost or damaged.
- Limited storage capacity compared to cloud services.
- Requires manual file management and transfer, which can be tedious.
Final Words
The techniques outlined earlier represent the prevalent and widely adopted approaches for Android photo backup. Undoubtedly, there exist alternative methods to achieve the backup of Android photos. Nonetheless, among these options, employing MobiKin Android Backup & Restore stands out as the most effective, making it a straightforward and error-free experience.
Related Articles:
How to Recover Deleted Photos on Android with or without Backup? 8 Ways
How to Transfer Photos from Android to Android? 8 Flexible Approaches
6 Methods to Delete Photos from Android Phone Temporarily or Permanently
Top 4 Means to Move Photos/Pictures from Google Drive to Google Photos