Top 7 Ways to Transfer Photos from PC/Computer to Android Devices
If you want to transfer important images from your computer to your phone as wallpapers or for sharing, iPhone users can make it with iTunes. Android users, however, may need an alternative. In today's tutorial, we'll cover 7 proven methods to transfer photos from PC to Android devices, whether you're relying on Windows or macOS platforms.
- Way 1: How to Transfer Photos from PC to Android Phone in One Click [Instant]
- Way 2: How to Transfer Photos from PC to Android via USB Cable Only [Less Flexible]
- Way 3: How to Transfer Photos from Computer to Android via Google Photos
- Way 4: How to Transfer Pictures from PC to Android via Nearby Share for Windows
- Way 5: How to Transfer Photos from PC to Android Tablet/Phone by Bluetooth
- Way 6: How to Transfer Photos from Computer to Android Phone over Email
- Way 7: How to Transfer Pics from Computer to Android via Phone Link App
Check out the video below to learn this topic visually.
Way 1: How to Transfer Photos from PC to Android Phone in One Click [Instant]
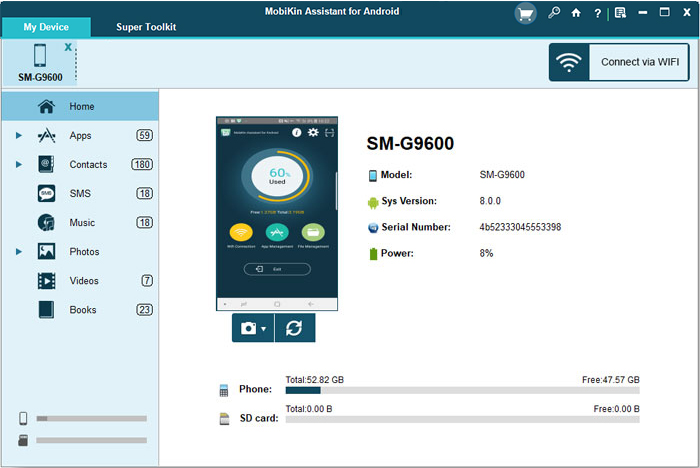
Imagine transferring photos from your PC/Mac to your Android phone with just one click. MobiKin Assistant for Android (For both Windows and Mac) makes it possible. It organizes photos like Screenshots, Camera, tmp, and Magazine by Name, Size, Format, and Date Created, allowing easy preview and selection for transfer.
Main features of MobiKin Assistant for Android:
- Transfer photos from computer to Android after easy preview and selection.
- Flexibly transfer files from Android to PC/computer without trouble.
- Work for such files as contacts, SMS, call logs, movies, videos, books, and more.
- Manage Android phones/tablets on a computer straightforwardly.
- Back up and restore Android files in one click.
- Compatible with a whole range of Android phones and tablets, covering Samsung, Motorola, Google, T-Mobile, BLU, Alcatel, TCL, OnePlus, Wiko, Nokia, Boost, Dell, SONIM, Kyocera, Sony, CAT, etc.
- Free trial available and privacy-friendly.


Want to import photos from computer to Android easily via Assistant for Android? Adhere to the following guide:
Step 1. Start by downloading and installing the Assistant for Android on your computer. Open the utility and connect your device to the computer via USB. Then, ensure you have enabled USB debugging on your Android phone for proper identification.
Step 2. After the recognition, choose "Photos" from the left menu and click "Add" from the top. You can then browse your computer and locate the pics you wish to import to the connected phone.
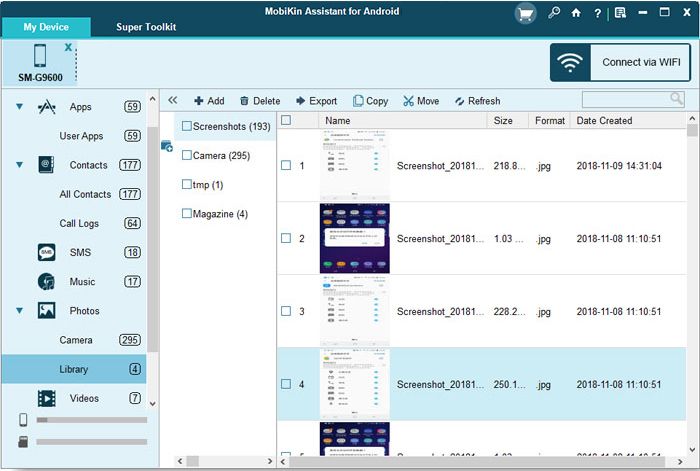
Step 3. Select what you want from your machine and click "Open". This will trigger the picture migration from your computer to your phone.
Video Guide:
My Personal Take:
- Can transfer multiple photos at once.
- Allows backup, restore, and management of Android data.
- Works offline via USB connection.
- The USB connection ensures quick data transfer.
- Requires purchase for full functionality.
Way 2: How to Transfer Photos from PC to Android via USB Cable Only [Less Flexible]
Use your Android phone's original cable for straightforward file transmission via File Explorer. Configure the transfer mode for direct access and allocate time to select specific photos before initiating the transfer. Here's the specific guidance:
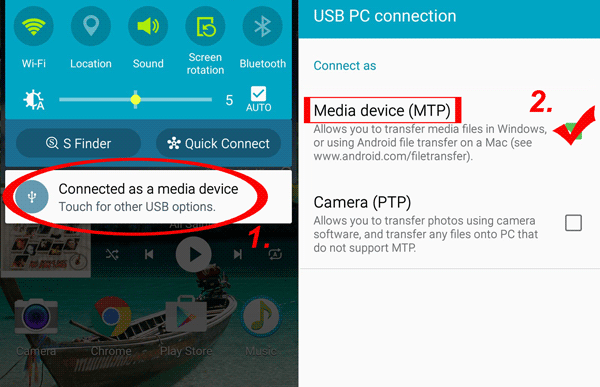
- Connect your phone to your PC using a USB cable.
- Navigate to the Notifications panel and choose "Connected as a media device" > "Media device" (MTP).
- When prompted, select "OK" to enable USB debugging on your device.
- Open "File Explorer" and go to "This PC"/"My Computer".
- Access your computer's pictures folder.
- Choose the specific images you intend to transfer before initiating the copy process.
- Locate your phone's icon and enter its DCIM folder.
- Right-click with the mouse and opt for "Paste" to complete the transfer.
My Personal Take:
- No additional software is required.
- Drag and drop photos via a USB connection.
- No backup or syncing options.
- Require installing Android drivers for proper recognition.
Way 3: How to Transfer Photos from Computer to Android via Google Photos
Upload media to Google Photos on your PC, then sync to your Android via "Back up & sync." Free up space by deleting unnecessary photos. Now, let's explore wireless transfer using Google Photos.
- Access the Google Photos website on a computer.
- Log in to your Google Account if needed.
- Click "UPLOAD" at the top-right and choose a picture folder from the left side of "File Explorer".
- Select desired photos and click "CONTINUE" to upload the images to your Google Photos account.
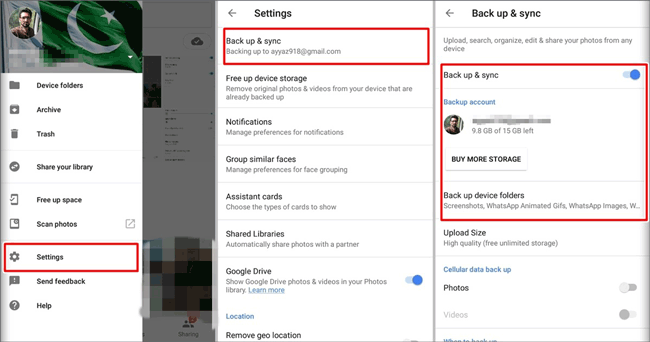
- On your phone, open Google Photos and tap the three bars at the top-left.
- Go to "Settings" and enable "Back up & sync" to download Google Photos to your phone.
Optionally, you can use Google Drive to effortlessly sync photos from your computer to Android:
- Download Google Drive on your computer or use the web browser version.
- Select "New > File Upload or Folder Upload" and choose the photos or folder.
- Install Google Drive on your Android device.
- Sign in with the same Gmail address.
- Access the uploaded files on your Android.
- Choose Save to device.
- Allow Google Drive access to your storage when prompted.
My Personal Take:
- Access photos from any device with the internet.
- Photos uploaded to Google Photos are instantly available on Android.
- Works on Windows, macOS, Android, and iOS.
- Slow transfer speeds with poor connectivity.
- High-quality uploads may reduce photo resolution.
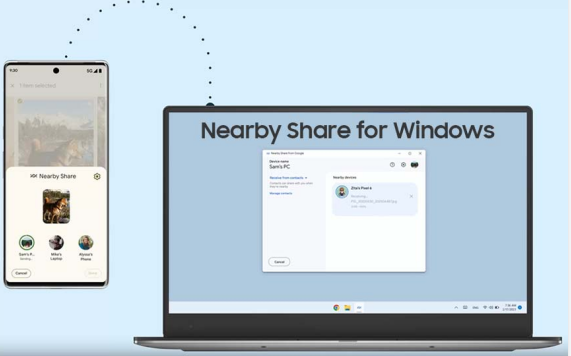
Way 4: How to Transfer Pictures from PC to Android via Nearby Share for Windows
Nearby Share for Windows enables secure wireless file sharing between Windows 11/10 and Android. Control discoverability, set permissions, and transfer files easily by dragging them into the app. Here's how to use Nearby Share for Windows:
- Download and install Nearby Share on your Windows device.
- Open the app, sign in, and choose your device name under "Visible to others as".
- Specify sharing preferences under "Receiving" and select "Done".
- On your computer, open Nearby Share for Windows, go to "Settings", and set your device visibility to "Everyone, Contacts, Your devices, or No one".
- In the app, select the file to share, drag it into the window, and choose the recipient device.
- Confirm the PIN if prompted and select "Share". Once the receiver confirms, the file is sent.
- If your Android device detects sharing nearby, select "Turn on" to be detectable.
- If details about the sender appear, choose "Accept" or "Decline".
- Review the request, verify the PIN if provided, and pick "Accept" to save the file to your "Downloads" folder.
Note: If Quick Share for Windows fails to transfer pictures, try these measures: 1. Ensure both devices are on the same network. 2. Make sure both versions are up-to-date. 3. Reboot both PC and Android. 4. Clear Quick Share cache on your PC. 5. Try smaller or different file types.
My Personal Take:
- Uses Wi-Fi Direct for quick transfers.
- Simple interface for sharing files.
- Optimized for Samsung devices.
- Needs installation on both PC and Android.
Way 5: How to Transfer Photos from PC to Android Tablet/Phone by Bluetooth
Bluetooth is a cable-free option for transferring a few pictures seamlessly across different operating systems. However, its slower transfer speeds make it less ideal for larger file transfers.
How to transfer photos from PC to Android without USB via Bluetooth?
- Right-click the desktop Bluetooth icon or search for Bluetooth in the Search window.
- Select "Add Bluetooth or other device."
- In the "Add a device" options, choose Bluetooth.
- Turn on Bluetooth on your device and make it discoverable.
- Click the Android device once located by Windows.
- After clicking, Windows will provide a pairing code.
- Confirm the code on your mobile device by selecting "Yes".
- Navigate to the photos folder, select the photos, and right-click to open the drop-down menu.
- Choose "Share" and select the paired Android device.
- Windows will begin copying the file to the Android device.
- On the Android device, accept the transfer when prompted.

My Personal Take:
- No cables or internet is needed.
- Works on almost all devices.
- Simple pairing and transfer process.
- Not ideal for large photo collections.
- Devices need to be close to each other.
- Can be unreliable or finicky.
Way 6: How to Transfer Photos from Computer to Android Phone over Email
Email is a common method to share photos between a phone and a computer. Attach the pics to an email and download them on the PC. Keep in mind that this is suitable for a limited number of photos, as email attachments are typically capped at 20 or 25 MB.
How to transfer photos from computer to Android free using Email?
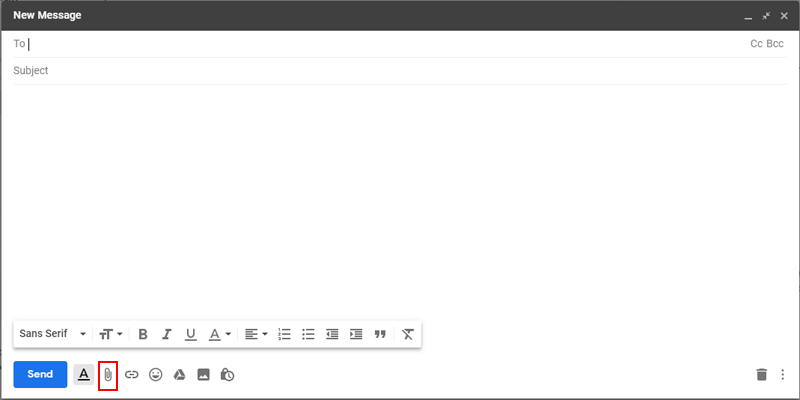
- Sign in to your email account on your computer and compose a new email.
- Click "Attach files" or "Attachment" and choose the photos you want to transfer.
- You can enter a recipient's address or save it as a draft.
- Log in to the same email account on Android to find the pictures in the sent email or draft bin.
- Open the Gmail folder on your device to download the attachment.
My Personal Take:
- Uses existing email accounts.
- Works on any device with email access.
- Email attachments are typically limited to 25MB.
- Requires manual effort for multiple photos.
Way 7: How to Transfer Pics from Computer to Android via Phone Link App
Only locally saved files can be shared directly through Phone Link. For cloud-stored files, only links to their locations will be shared. To share files between your PC and mobile device via Phone Link and Link to Windows, you need:
- A PC running Windows 10 (May 2019 update or later) or Windows 11.
- An Android device running Android 9.0 or later.
- Link to Windows app version 1.24032.518.0 or later on your Android device.
- Phone Link version 1.24032.156.0 or later on your PC.
How do I transfer photos from PC to Android with the Phone Link app?
- Choose the file you want to share on your PC.
- Right-click the file and select "Share".
- In the share pop-up window, locate and select "Phone Link" from the app section.
- The file-sharing process will begin on your mobile device connected via Phone Link.
- Make sure Windows notifications for Phone Link are enabled to track the sharing progress in real time.
- Once the file is shared, a Windows notification will confirm the transfer.
- Your mobile device will also show a notification from Link to Windows.
- Tap the notification to open the default file manager and view the received file.
- All shared files will be saved in "Downloads > Sent from your PC".
My Personal Take:
- Designed for Windows and Android connectivity.
- Allows notifications, calls, and messaging on PC.
- Works best with Samsung and select Android devices.
- Needs installation and pairing.
- Requires Wi-Fi or mobile data for wireless transfers.
Final Words
After reading this article, you might be wondering whether to transfer photos from your computer to an Android device using a USB connection or wirelessly. From personal experience, using a USB connection has two major advantages: it provides faster, more stable transfers and ensures better privacy protection. For this purpose, try MobiKin Assistant for Android. If you have any questions, feel free to share them in the comments section below!
Related Articles:
7 Worry-free Options to Transfer Photos from Android to iPhone 16?
How to Transfer Photos from Android to Android? 8 Flexible Approaches
5 Methods to Move Photos from Google Photos to Gallery [Android/iOS]
6 Easy Means to Recover Permanently Deleted Photos on Android Phone