[Full Guide] Fix Photos Not Importing from iPhone to Mac
Encountering challenges of "photos not importing from iPhone to Mac" can be frustrating, disrupting the seamless transfer of cherished memories. Whether it's due to software glitches, compatibility issues, or other unforeseen complications, resolving this problem efficiently is crucial.
In the following guide, we'll explore a range of solutions, from traditional troubleshooting methods to alternative tools like MobiKin Assistant for iOS Mac, offering a comprehensive approach to overcome the hurdles associated with photos won't import from iPhone to Mac. Discover effective strategies tailored to ensure a smooth and trouble-free photo transfer experience.

Part 1: Why Can't I Import Photos from iPhone to Mac?
Why won't my photos import to my Mac? The inability to import iPhone photos to a Mac typically arises from three potential reasons.
- Simultaneous Transfer of Numerous Photos: Importing a large number of photos from your iPhone to your Mac, such as 1500 photos at once, can potentially cause the Photos app to become unresponsive during the import process.
- Activation of Optimize iPhone Storage: Enabling the Optimize iPhone Storage option in iCloud Photos may lead to the non-import of photos. This occurs when full-resolution photos and videos are automatically replaced with smaller versions due to low storage on your iPhone. It is essential to download full-resolution photos before attempting the transfer. (How to optimize iPhone storage?)
- Unrecognized Photo Format: An issue commonly encountered during photo transfers is the presence of an unrecognized file format. It is crucial to ensure that you are transferring files in a compatible format accepted by the receiving device to prevent transfer failures.
- Connectivity Challenges: Another potential explanation is a lack of recognition by your Mac for the connected iPhone. Issues such as a faulty cable or system malfunction can contribute to connectivity problems during the transfer process.
Part 2. How to Fix Photos Not Importing from iPhone to Mac
Solution 1: Restart iPhone and Mac
Rebooting your devices is often the most effective solution for addressing glitches. If you encounter difficulties that Mac not importing photos from iPhone using the Photos app, consider restarting both devices before attempting the import process again.
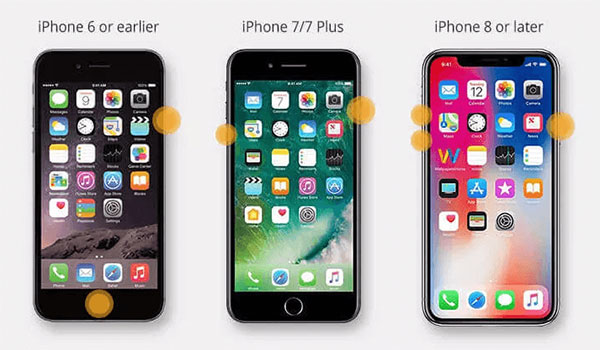
How to Restart an iPhone:
- For iPhone X, 11, 12, 13, 14, 15, 16, or 17 models: Press and hold either volume button and the side button to access the power-off slider. Slide to power off, then press and hold the side button until the Apple logo appears to restart.
- For iPhone 6, 7, 8, or SE (2nd or 3rd generation): Press and hold the side button to reveal the power-off slider. Slide to power off, then press and hold the side button for the restart.
- For iPhone SE (1st generation), 5, or earlier: Press and hold the top button to display the power-off slider. Slide to power off, then press and hold the top button until the Apple logo appears for the restart.
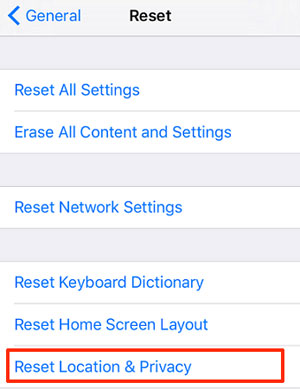
Solution 2: Reset iPhone Location & Privacy
In the event that you've established trust between your iPhone and Mac, yet encounter issues with iPhone photos not importing to Mac, consider resetting Location & Privacy using the following steps. It's crucial to note that if you haven't previously trusted your Mac on your iPhone, ensure you select "Trust" when prompted.
- Unlock your iPhone and navigate to "Settings" > "General" > "Reset" > "Reset Location & Privacy." Confirm the action by clicking "Reset Settings."
- Reconnect your iPhone to your Mac and click "Trust" when the "Trust the Mac" alert appears on your phone screen.
- Attempt to import photos from your iPhone to your Mac once again.
Solution 3: Turn off iCloud Photo Library
As mentioned earlier, the issue of being unable to import pictures from iPhone to Mac may arise if the "Optimize iPhone Storage" option in iCloud is enabled. To resolve this, you'll need to disable it.
To turn off iCloud Photo Library, follow these steps:
- Unlock your iPhone and go to iPhone Settings. Click on your profile.
- Tap iCloud > Photos > Turn off iCloud Photos.
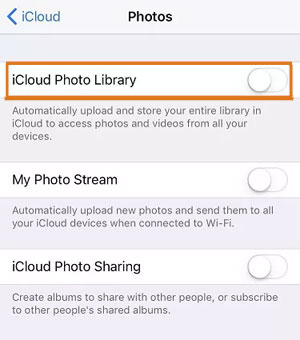
Note: If you prefer not to turn it off, an alternative is to enable "iCloud Photo Library" from "System Preferences" > "iCloud" on your Mac. This allows iPhone photos to synchronize with your Mac via iCloud, eliminating the need for manual uploading of iPhone photos.
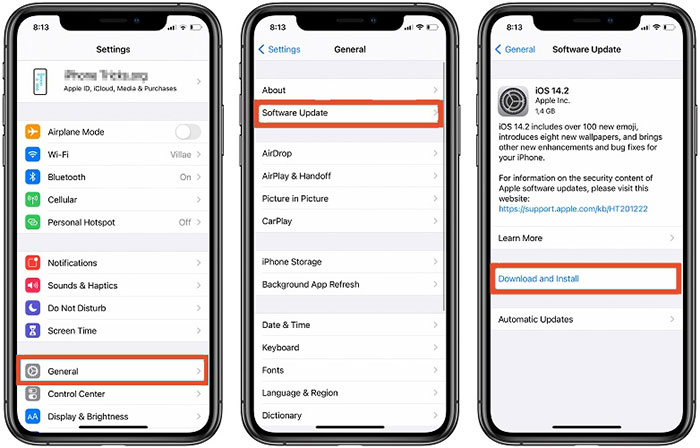
Solution 4: Check for Updates on iPhone and Mac
Please note that if the software on your Mac or iPhone's operating system is too old, it may also cause the problem that you can't import photos from iPhone to Mac. So, if iPhoto won't import photos from iPhone, you can check if there is software that needs to be updated on iPhone and Mac (this method is also effective for Windows users, you can check how to solve can't import photos from iPhone to PC).
iOS Update:
- Access "Settings" on your iPhone and navigate to "General" > "Software Update".
- If there's an available update, select "Download and Install".
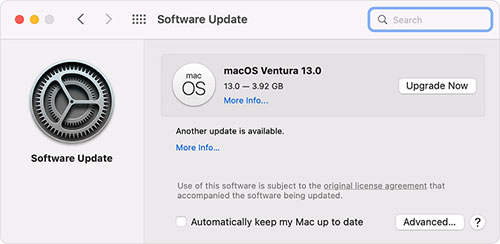
Mac System Update:
- For macOS updates, go to the Apple menu > "System Preferences". Click "General" on the left side of the System Preferences window, then select "Software Update" on the right.
- Alternatively, access Apple menu > "System Preferences" and click "Software Update".
Solution 5: Don't import all iPhone photos at once
Instead of importing all your iPhone photos to your Mac at once, you can try to import a small portion of your photos at once. This is because it has been observed that the Photos application on a Mac can more easily handle file import tasks in such a way.
Solution 6: Repair iPhone Library
If ensuring the system and settings are in order doesn't resolve the issue, you can attempt to repair your phone library, which can impact the process of transferring photos from iPhone to Mac. Here's how to do it:
- Close Photos on your Mac. Launch Photos again and simultaneously press the Command + Option keys.
- When the Repair Library window appears, select "Repair" to initiate the process.

Solution 7: Repair Home Folder Permissions
To address this issue, many users have found success by correcting Home Folder permissions on their Macs. Follow these steps, keeping in mind the location of your Mac's desktop and other data:
- Activate Recovery Mode by pressing Command + R on the Mac keyboard.
- Select Terminal from the utility menu. Press Return and input "repairHomePermission."
- Enter the password for the desired admin account and click Next. Wait for the process to complete, then press Exit.
- Restart your Mac in normal mode.

Solution 8: Check on the Disk Manager
When encountering difficulties importing photos from iPhone to Mac, consider initiating the Disk Manager on your Mac and selecting the "Check Disk" function. This process allows you to assess the proper functioning of your Mac's Disk Manager.
Check If You Need:
- 3 Best Ways to Backup and Restore iPhone (#3 Is Excellent)
- How to Share Music on iPhone? (4 Simple Ways Included)
Part 3. Alternative Ways to Import Photos from iPhone to Mac Smoothly
If you find the above 8 methods cumbersome or less effective, we'd like to provide you with two alternative ways to transfer pictures from iPhone to Mac.
Alternative 1: Transfer Photos from iPhone to Mac with a Third-Party Tool (Recommended)
If you encounter difficulties using Photos/iPhoto on your Mac for importing photos from your iPhone, consider opting for a more robust solution to effortlessly and swiftly copy iPhone photos to your Mac. MobiKin Assistant for iOS (Mac) is a professional tool designed for seamless data transfer between iOS devices and Mac. It not only facilitates easy photo transfers but also comes equipped with data management features, enabling you to delete, edit, or add items on your iPhone/iPad/iPod directly from your Mac.
Key Features:
- Transfer all types of photos (camera roll, photo library, photo stream, photo videos, etc.) from iPhone to Mac;
- Transfer contacts, messages, notes, calendars, bookmarks, music, movie, books, photos, etc. from iPhone to Mac, and vice versa;
- All models of iPhone are supported, including iPhone 17/Air/17 Pro/17 Pro Max/16/15/14/13/12/11/X/8/7/6/5/4, etc.;
- Instead of syncing all data, you are allowed to preview and select what you really want to transfer;
- Assistant for iOS is developed by an Apple-trusted developer, no data loss or info leakage problem would happen.


Read on to see how to import photos from iPhone to Mac by using Assistant for iOS Mac.
Step 1. Connect Your iPhone to Mac
Once you have downloaded and installed Assistant for iOS on your Mac, launch it and then connect your iPhone to this Mac with USB cable. Click "Trust" button to let your iPhone trust this computer, then you'll see the interface below on your Mac.

Step 2. Select the photos you want to transfer
All file types will be displayed on the left side menu. Just select "Photos" tab and view the photos available under the category. Also, you can choose the album carrying the photos you wish to transfer to Mac.
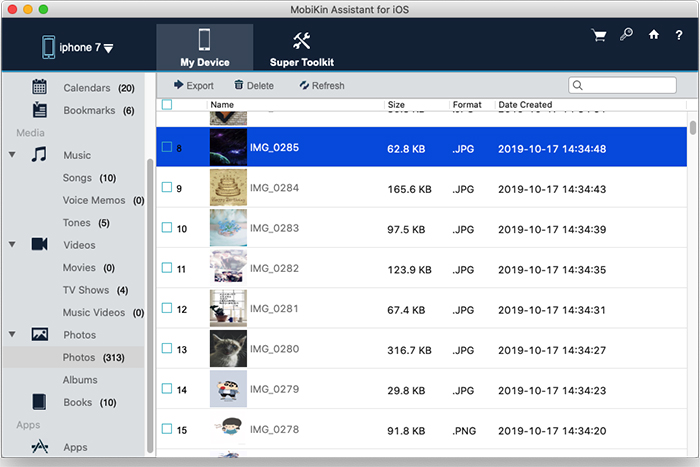
Step 3. How to transfer photos from iPhone to Mac
Select the photos you would like to transfer, hit the "Export" button on the top menu and choose a target folder on the pop up window. After selecting a location on your Mac, the exporting process will be initiated instantly.
Video tutorial: how to import photos from iPhone to Mac with Assistant for iOS:
Alternative 2: How to Wirelessly Import Photos from iPhone to Mac (via Airdrop or Mail)
Another efficient method to address connection or stuck issues is to wirelessly transfer your iPhone photos to your Mac using methods like Airdrop and Mail.
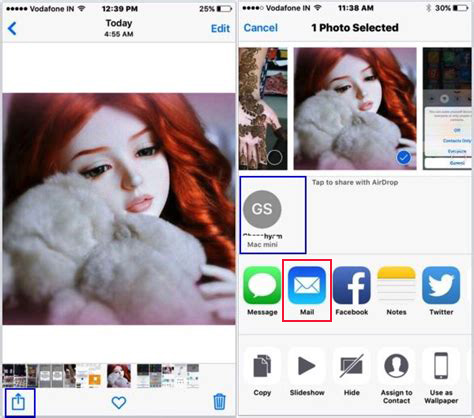
- Navigate to Settings > enable Bluetooth on your iPhone by tapping on it. (Alternatively, access it through the Control Center.)
- Open the Photos app and select the photos you wish to import to your Mac.
- Click the Share button at the bottom left and choose either Airdrop or Mail.
- Select your Mac as the destination for transferring photos. If your Mac doesn't appear, verify the Bluetooth settings.
- Wait for the photos to be imported from your iPhone to your Mac wirelessly.
The Bottom Line
These are the solutions for addressing the issue of importing photos from iPhone to Mac. We hope the provided fixes prove helpful to you. In comparison to standard solutions, MobiKin Assistant for iOS (Mac) stands out as a more efficient method, especially when dealing with a large volume of photos. It minimizes the likelihood of encountering challenging problems during the transfer process. Why not give it a try for a smoother and more seamless transfer experience?
Related Articles
[2025 Updated] How to Transfer Messages from iPhone to Mac?
[Total Guide] How to Add New Contacts to iPhone Easily in 2025?
How to Backup Text Messages on iPhone Effectively?
How to Transfer Voice Memos from iPhone to PC
