[Stepwise Guide] Do I Need to Back Up My iPhone? How to Back It Up?
TL;DR:
Do you need to back up your iPhone? This article explains everything you need to know, including:
- Why iPhone backup is important for protecting your photos, messages, contacts, and other data.
- How to back up your iPhone using iTunes, iCloud or a computer.
- How to restore a backup to your iPhone when you get a new device or lose data.
- FAQs about common iPhone backup questions and issues.
Over time, your iPhone stores a large amount of important data, including photos, messages, contacts, and app data. This is why many users start to wonder, “Do I need to back up my iPhone?”
A backup acts as a safety net that protects your data from unexpected situations such as system crashes, accidental deletion, or even device loss. Whether you are updating to a new iOS version, switching to a new iPhone, or simply want to keep your memories safe, making a backup is always a smart choice.
So when should you back up your iPhone, and what are the best ways to do it? This article will walk you through everything you need to know.
Part 1: Do I Need to Back up My iPhone?
You should back up your iPhone regularly, but there are a few situations where it's especially important:
- Before you update iOS: System updates can sometimes cause all sorts of unexpected problems, so backing up your iPhone before updating can keep your data safe in case something goes wrong.
- When you buy a new iPhone: Do I need to back up my iPhone before getting a new one? Sure! Backing up the content on your old iPhone allows you to easily move everything to your new device.
- Before repair or troubleshooting: If you're sending your iPhone in for repair or planning a reset, backing up can help you avoid losing any important information.
- When you're running out of space: If you need to delete some data to free up storage space, backing up your data to other storage beforehand allows you to safely delete content from your iPhone without losing it.
- Just in case: Regular backups (such as weekly or monthly) mean your latest photos, messages, and apps are safe if your phone is accidentally lost or damaged.
Part 2: How to Back up Your iPhone?
Backing up iPhone to iTunes, iCloud and computer are the three most popular backup methods. Next, we will explain these three iPhone backup methods one by one.
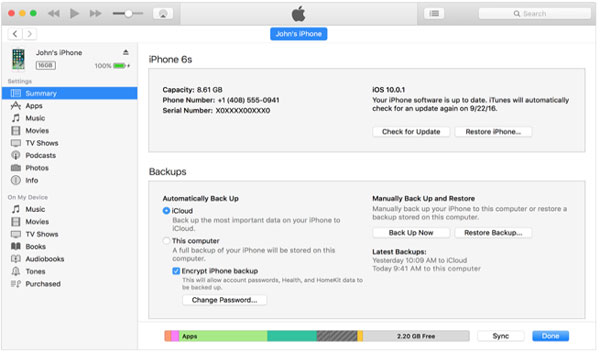
Way 1: Back up Your iPhone to iTunes
- To back up your iPhone using iTunes, start by opening iTunes on your PC or Mac and connect your iPhone with the Lightning-to-USB cable. When iTunes detects your iPhone, click "Continue" to allow access.
- Unlock your iPhone and tap "Trust This Computer" when prompted.
- In iTunes, go to the "Summary" pane in the left sidebar, then scroll to the "Backups" section.
- Check "Encrypt iPhone Backup" if you'd like an encrypted backup for added security, and enter a password.
- iTunes will automatically start backing up your iPhone. Once the process finishes, you can disconnect your iPhone.
- Next time, just click "Back Up Now" while your iPhone is connected. (What Does iTunes Backup Include?)
Way 2: Back up Your iPhone to iCloud
How to manually back up your iPhone to iCloud:
Using iCloud is an easy option if you need to do a one-time backup of your iPhone—perfect if you're setting up a new device or preparing for an iOS update and don't need daily backups. Manual backups update your data immediately, even if automatic backups are enabled.
- Connect your iPhone to Wi-Fi and open Settings on your iPhone.
- Tap your name at the top, go to "iCloud", and select "iCloud Backup."
- Tap "Back Up Now" to start the backup.
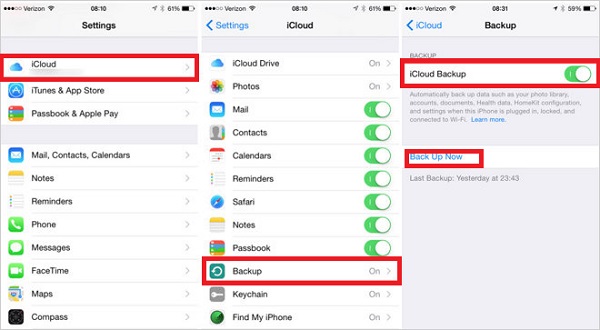
This process may take several minutes, depending on how much data you have, so stay connected to Wi-Fi until it's finished. Afterwards, you'll see the date and time of the last successful backup under "Back Up Now." (How Often Does iCloud Back up on iPhone?)
How to set up automatic iCloud backups:
For regular, automatic backups, set iCloud to sync your data and purchases regularly so everything is up to date.
- Go to Settings > [your name] > iCloud > iCloud Backup.
- Enable Back Up This iPhone.
For automatic backups to work, your iPhone needs to be connected to Wi-Fi, plugged into a power source, and locked. This usually happens automatically when you charge your phone, such as overnight. After each automatic backup, the iCloud backup screen will show the time and date of the last successful backup.
Way 3: Back up Your iPhone to Computer
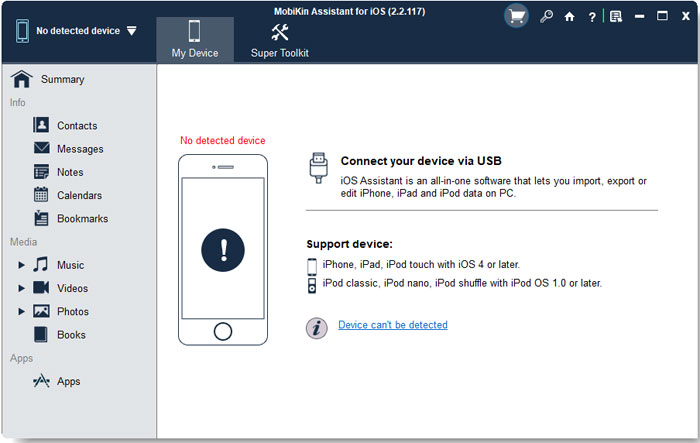
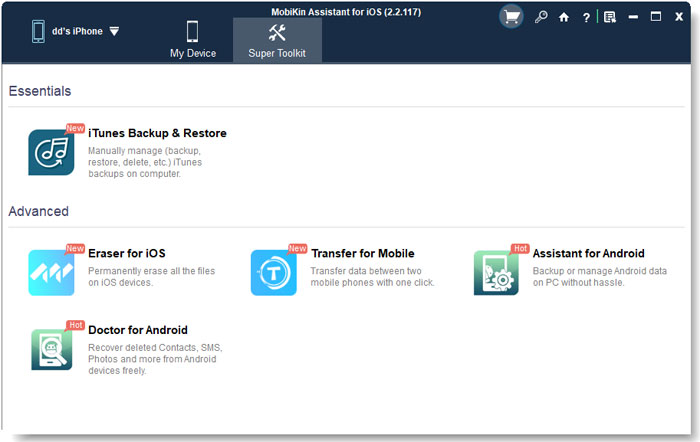
A great way to back up your iPhone data is by using MobiKin Assistant for iOS, a powerful and easy-to-use tool for managing and transferring iOS data on a computer. Compared with iCloud or iTunes, it offers more flexibility and control over your files.
It lets you back up photos, messages, contacts, music, and app data in just a few clicks, without complicated steps or the risk of data loss. More than just a backup tool, MobiKin Assistant for iOS also helps you manage iPhone data more efficiently and keep everything organized.
Why go with Assistant on iOS?
- Full or Selective Backup: Back up everything or choose specific content from a specific iPhone.
- Supports 10+ data types: Back up contacts, photos, videos, music, messages, notes, and more.
- Preview option: View and select only the data you need before backing up.
- Flexible transfer: Transfer data from iPhone to computer, and vice versa.
- Restore backup to device: Restore data from backup to any iOS device, either completely or selectively.
- Fully compatible with the most recent versions of iOS 27/26/18/17, and iPhone 17/16/15/14/13/12/11/X, etc.


How to back up iPhone data with Assistant for iOS:
Step 1: Connect your iPhone to your PC via a USB cable and launch Assistant for iOS on this computer. After your iPhone has been identified, press "Trust" on your smartphone to approve the connection.
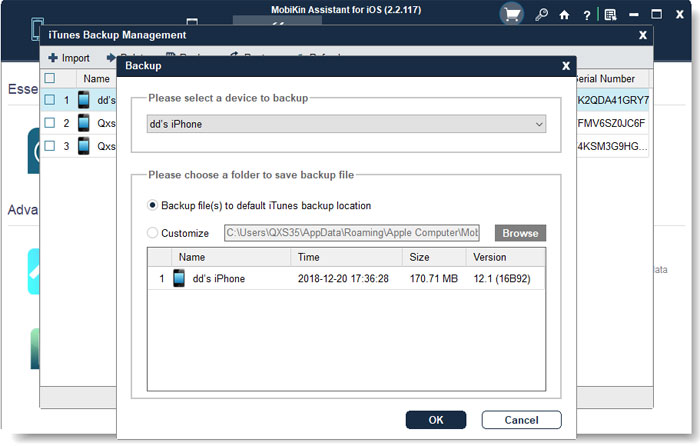
Step 2. Go to click "Super Toolkit" on the top menu, and choose "iTunes Backup & Restore". Then, a pop-up window will show you all iOS devices that you can back up.
Step 3. Choose the device you want to back up, select where you wish to store the backup files and then click "Backup" to begin the backup process. Don't disconnect your iOS device during the backup process.
Video Guide:
Part 3: How to Restore Backup to Your iPhone?
Way 1: Restore from an iTunes Backup
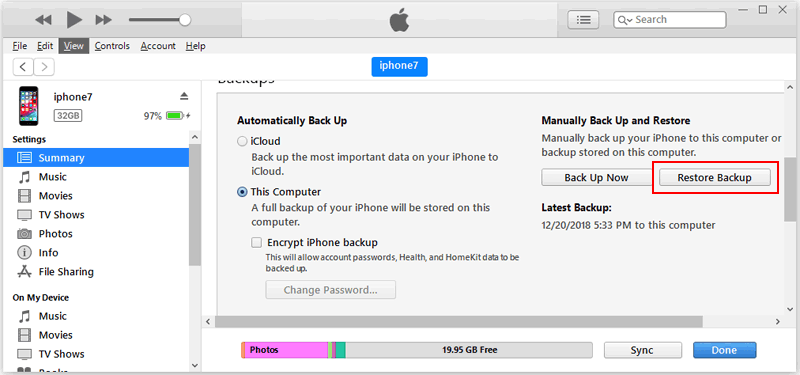
- To restore an iTunes backup, start by connecting your iPhone to your computer using the Lightning cable and opening iTunes.
- Once your iPhone is connected, click the small phone icon in the toolbar, and find the "Backups" section under the "Summary" tab.
- Click the "Restore Backup" button to begin restoring the backup from your computer to your iPhone.
- iTunes will show you a list of backups to choose from, with the most recent one selected by default. Older backups will have the date in their names for easy identification.
- Click "Restore" to start the process, and make sure not to disconnect your iPhone until the restoration is finished.
Way 2: Restore from an iCloud Backup
Once you've confirmed that you have a recent backup on iCloud, here's how to reset your iPhone and restore it from iCloud:
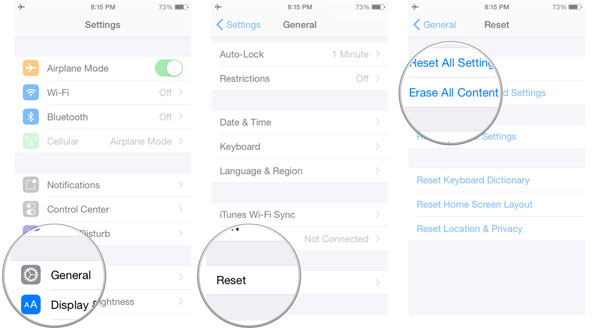
- Open "Settings" and go to "General > Reset".
- Select "Erase All Content and Settings".
- Follow the setup steps until you reach the "Apps & Data" screen.
- Choose "Restore from iCloud Backup".
- Sign in to your iCloud account.
- Tap "Choose Backup" and pick the backup you want from the list.
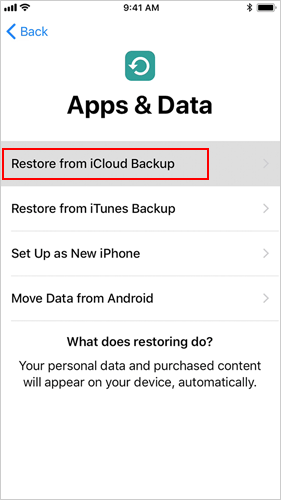
Your iPhone will then restore from the selected iCloud backup.
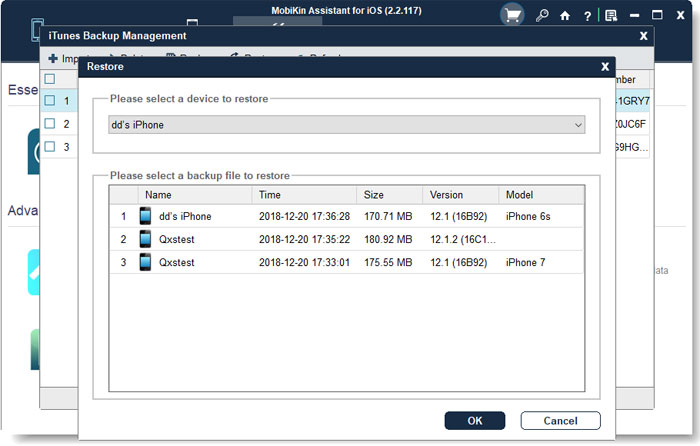
Way 3: Restore iPhone from a Computer Backup with Assistant for iOS
As long as you have backed up your iPhone using Assistant for iOS, you can follow the steps below to restore data from the backup to your iOS device.
- Connect your iPhone to your PC via a USB cable and launch Assistant for iOS on this computer.
- Go to click "Super Toolkit" on the top menu, and choose "iTunes Backup & Restore".
- Click "Restore" button and you can choose an iTunes backup for restoring to your iDevice.
Part 4: FAQs about iPhone Backup
Q1: How often should I back up my iPhone?
You should back up your iPhone at least once a week to keep your data safe. If you turn on automatic iCloud backups, your phone will back up daily when it's connected to Wi-Fi, charging, and locked.
Q2: What's the difference between iCloud and iTunes/Finder backups?
iCloud backups are stored online and automatically over Wi-Fi, so no computer is required. However, iTunes/Finder backups are saved directly to your computer and can include more data if you choose to encrypt them. Both of these help keep your data safe.
Q3: How can I check if my last iCloud backup was successful?
To check if your last iCloud backup was successful, go to "Settings" on your iPhone and tap [your name] > "iCloud" > "iCloud Backup." Here you'll see the date and time of your last backup, indicating whether it completed successfully.
Q4: Can I back up specific data instead of everything?
No, iCloud and iTunes usually automatically back up most of the data on your iPhone without you having to select specific items. However, iCloud does allow you to toggle backup of certain apps (like Photos or Messages) in "Settings" under "iCloud". For more control, consider using a third-party tool like MobiKin Assistant for iOS.
Q5: Does the backup include everything on my iPhone?
No. iTunes and iCloud backups include most of your iPhone's data, such as photos, contacts, and app data, but some items are not backed up. Face ID/Touch ID settings, Apple Pay information, and content already stored in iCloud (such as iCloud Photos) are not included.
Concluding Remarks
Should I back up my iPhone? I'm sure you know the answer by now. Backing up your iPhone is an important step to ensure data security, especially when we have so much valuable information stored on our devices. Whether you choose iCloud, iTunes, or a third-party tool like MobiKin Assistant for iOS, regular backups mean that no matter what happens (such as losing your phone or software failure), your important data will not be at risk because you can easily restore it when needed.
Related Articles:
How to Fix Music Won't Play on iPhone/iPad: 6 Solutions
[Full Guide] How to Back up iPhone to External Hard Drive on Windows & Mac?
4 Marvelous Ways to Delete Messages from iCloud Storage [Quick Guide]
