[Guide] How to Transfer Voice Memos from iPhone to Computer?
With today's fast and diverse technology, you can record voice memos with just a few clicks on your iPhone. However, when more and more voice memos are stored in your iPhone, you find that they take up too much storage space, causing you to be unable to store other important files. What's more, the voice memos stored in iPhone are not completely safe, as they may be lost due to various reasons, such as accidental deletion, system upgrade, virus attack, iPhone bricking, etc.
All in all, the best way to solve the problem is to transfer voice memos from iPhone to computer, so that we can back up the voice memos on the computer to avoid data loss issue.
- Way 1: How to Transfer Voice Memos from iPhone to Computer with Assistant for iOS
- Way 2: How to Transfer Voice recordings from iPhone to Computer with iTunes
- Way 3: How to Add Voice Memos from iPhone to Computer via Email
- Way 4: How to Import Voice Memos from iPhone to Computer with iCloud
- Way 5: How to Put Voice Memos from iPhone to Computer via Airdrop
Way 1: Transfer Voice Memos from iPhone to Computer with Assistant for iOS
If you are looking for the fastest and most direct way to transfer voice memos from iPhone to computer, MobiKin Assistant for iOS, the best iPhone data manager, should be your first choice. You can use it to move voice memos, as well as other types of data, from iPhone to PC or Mac without any hassle. No matter how many voice memos you need to move, the transfer process will be completed within minutes. Here's more information about this tool.
Core Features of Assistant for iOS:
- Transfer files between an iPhone/iPad/iPod and a computer.
- Back up and restore your iOS device whenever you want.
- Manage and edit your iOS data on computer directly.
- Except for voice memos, you can also transfer photos, videos, music, contacts, messages, books, and so on.
- It supports almost all iOS devices, including iPhone 15/14/13/12/11/X/8/7/6/5, and all generations of iPad and iPod touch.
- It supports both Windows and Mac.


OK, let's read the following guide demonstrating how to transfer voice notes from iPhone to computer.
Step 1: Launch Assistant for iOS
To perform the transferring process, firstly you need to download, install and open the Assistant for iOS on your computer. Connect your iPhone to the computer through a USB cable. Wait for a little while, the program will detect your iPhone successfully.

Step 2: Preview and select the voice memos you want
Next, click "Music" > "Voice Memos" displayed on the left column and the program will start to scan your iPhone. All voice memos on your iPhone will soon be found and listed. You can get a preview of all voice memos on your iPhone via the program.
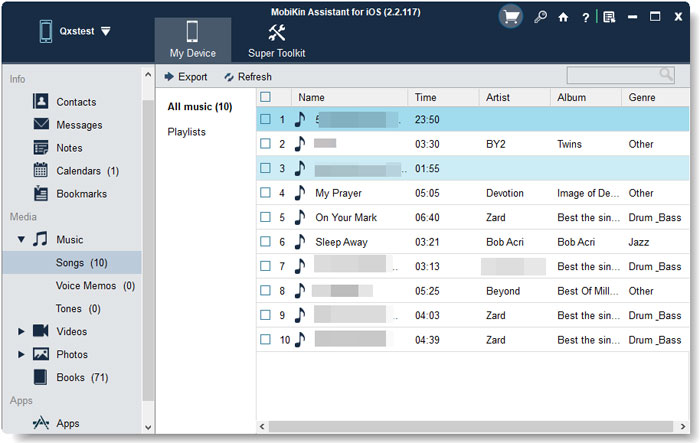
Step 3: Move voice memos from iPhone to PC
Choose the voice memos you need and hit on the "Export" button from the top menu. Then, you can export and save the iPhone voice memos to computer in a batch.
That's the whole process of transferring iPhone voice memos to computer, very easy, right? If you're a Mac user, you can get the Mac version and follow the same steps on your Mac computer.
Video guide:
You May Be Interested in:
- How to Transfer Music from iPhone to Mac (iMac, MacBook Pro/Air)?
- 8 Best Music Managers for iPhone to Color Your Music Life
Way 2: How to Transfer Voice recordings from iPhone to Computer with iTunes
If you prefer to use iTunes to transfer data, you can also use it to sync your iPhone's voice memos to your computer. how do you transfer voice memos from iphone to computer with iTunes? Just follow the guide below to do it.
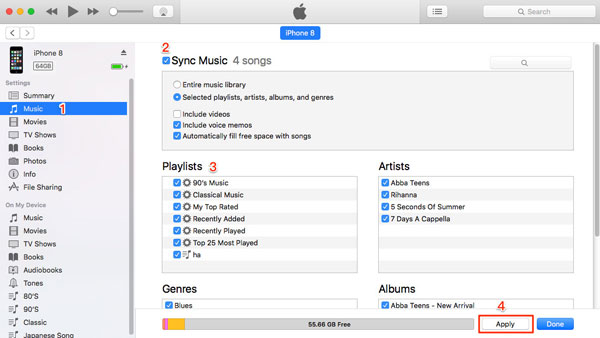
- Run iTunes and connect your iPhone to the computer with a USB cable.
- Click the iPhone icon from the left sidebar.
- Choose "Music" from the sidebar.
- Mark the "Sync Music" checkbox and don't forget to tick the "Include voice memos" checkbox.
- Finally click on the "Apply" option.
When the voice memos syncing is completed, you can find all your voice memos on your computer. The following are the paths where you can find the voice memos on your computer.
- Windows – C:\Users\<username>\Music\iTunes\iTunes Media\Voice Memos
- Mac – /Users/<username>/Music/iTunes/iTunes Media/Voice Memos
Now, you can listen to the voice memos or share them with others as you wish.
See Also:
- Tips to Retrieve Deleted Voice Memos on iPhone
- 4 Effective Ways to Transfer Music from Mac to Android
Way 3: How to Add Voice Memos from iPhone to Computer via Email
You can send the voice memos you want to transfer to yourself as an attachment to an email, then open the email on your computer and download the memo to your computer. This method is very clever. Now let's take a look at how to get recordings from iphone to computer via email:
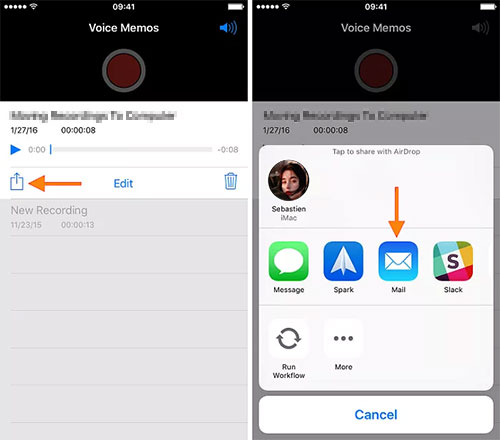
- Open the Voice Memos app from your iPhone.
- Select the voice memo you want to transfer, click the three-dot icon, and then select the sharing option.
- Select the Mail option on the newly appeared iOS sharing menu to transfer the voice memos to your computer via email.
- Enter your own email address in the To field and click "Send".
- Go to your computer and log into your own email. In your inbox, you should be able to find the email you just sent to yourself. Now you just need to download the attached file to take voice memos off iPhone.
Note that this method is more suitable for transmitting a small amount of voice memos. Because the mailbox has strict restrictions on the specifications of attachments.
Way 4: How to Import Voice Memos from iPhone to Computer with iCloud
iCloud's sync feature allows you to access your voice memos on various devices after syncing them. First, let's take a look at how to enable Voice Memos sync with iCloud on iPhone:
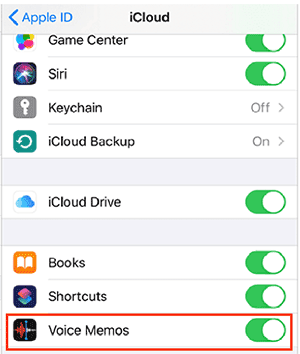
- Open the Settings app on your iPhone.
- Click your name and select iCloud.
- Make sure the switch next to Voice Memos is turned on.
Above, all your iPhone voice memos will be synced with iCloud. Next, we can start restore voice memos from iCloud to your computer.
Transfer voice memos from iCloud to Mac
The built-in Voice Memos app on Mac syncs seamlessly with iCloud. Therefore, you can follow the steps below to pull voice memos off iPhone to your Mac directly:
- Open the Voice Memos app on your Mac.
- At this point, if prompted to request iCloud synchronization, select Enable to allow your Mac to sync iPhone voice memos from iCloud.
- Once completed, you can find all voice memos under "All Recordings".

Transfer voice memos from iCloud to Windows
For Windows users, transferring voice memos requires additional steps. You need to install iCloud software for Windows to access synced voice memos and download them to your PC:
- Open the Voice Memos app on your iPhone.
- Click "All Recordings" and select the audio you want.
- Click the three-dot icon in the upper right corner and select "Save to file."
- Select iCloud Drive and specify a folder to save the audio. Of course you can also create a new folder.
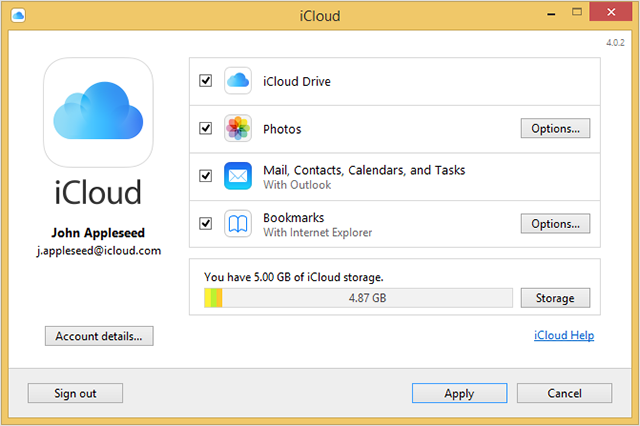
- Install and run iCloud for Windows on your PC, then log in using your Apple login credentials.
- In the pop-up window, select the iCloud Drive checkbox > click "Apply" and wait for the iCloud Drive data to be synchronized with your computer.
- Once synchronization is complete, you can navigate to "This PC" and click "iCloud Drive" in the left sidebar to access the folder containing the transferred voice memos.
Way 5: How to Put Voice Memos from iPhone to Computer via Airdrop
How can you transfer voice memo from iPhone to computer without a USB? If you are using a Mac computer, you can use the AirDrop function developed by Apple to wirelessly transfer voice memos between Mac and iPhone. Before you get started, you'll want to make sure your iPhone and Mac are nearby and that WiFi and Bluetooth are enabled on both devices. You can follow these steps to download audio recordings from iPhone to Mac:
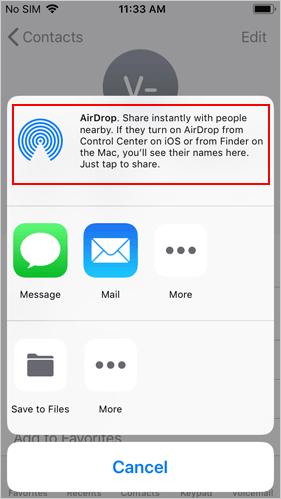
- Open the Voice Memos app on your iPhone and select the voice memo you want to send to your Mac. Click on the three dots icon and select the sharing method as "AirDrop".
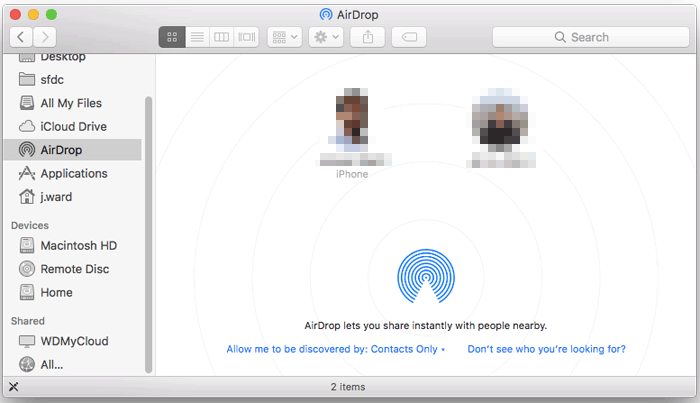
- Open Finder on your Mac, click on the AirDrop option in the left sidebar, and then go to the right screen to turn on Bluetooth.
- You should now see your Mac in the Share menu on your iPhone. Click it, and your selected voice memo will be AirDropped to your Mac.
- Go to the "Downloads" folder on your Mac, where you will find the received voice memos.
The Bottom Line
As you see, we have many different ways to transfer voice memos from iPhone to computer. But if you are looking for the simplest and most instant way, then MobiKin Assistant for iOS is the most suitable choice. Move all your notes in just a few clicks. Its intuitive interface and preview-based selective recovery make transferring voice memos a pleasant experience. If your voice memos contain important information, why not create a secure backup of your memos now and be able to restore them if something goes wrong? Download Assistant for iOS for free now and give it a try.
Related Articles
Transfer Music from iPod touch/nano/shuffle to Mac/Computer
Tips to Transfer Contacts from iPhone to Computer
How to Transfer Music from iPhone to Computer
6 Ways to Transfer Photos from Computer to iPhone Effectively
5 Ways to Transfer Music to iPhone from Computer without iTunes
