8 Solutions When You Can't Transfer Photos from iPhone to PC
Struggling with the frustration of being unable to transfer photos from your iPhone to your PC? It's a common issue that many users encounter, but fear not – solutions are at hand. In this guide, we delve into the reasons behind the "can't transfer photos from iPhone to PC" problem and offer practical, user-friendly solutions.
From checking USB connections to exploring alternative transfer methods and software solutions, we aim to empower you with the knowledge to effortlessly move your cherished memories from your iPhone to your PC. Say goodbye to the photo transfer woes and embrace a smoother, more seamless experience.
Part 1. Why Can't I Transfer Photos from iPhone to PC
Before delving into solutions for the "can't transfer photos from iPhone to PC" issue, let's explore some potential reasons behind this problem:
Reason 1: Connection Issues
A common cause might be a connection problem between your iPhone and PC. Several factors could contribute to this:
- A faulty USB cable.
- Malfunctioning USB port on your PC.
- Inability of the Windows PC to update the iPhone's drivers.
Reason 2: "iCloud Photo Library" Enabled
Enabling the "Optimize iPhone Storage" feature may hinder photo transfers. This setting stores smaller image previews on the iPhone while keeping the full-resolution images in iCloud. To address this, disable the option by navigating to iCloud > Photos on your iPhone.
Reason 3: Bulk Photo Transfer
Transferring a large number of photos at once can lead to delays. The more photos you attempt to move, the longer the transfer might take. Additionally, the method of transfer can impact the speed. Bluetooth, for example, is a slower and more cumbersome option for transferring numerous photos. (How to AirDrop multiple photos?)
Reason 4: Update Problems
Incomplete system updates on either your PC or iPhone could result in functionality issues. Updates are crucial for resolving security vulnerabilities and improving overall performance, such as enhancing Bluetooth functionality. Ensure both devices are up to date to mitigate potential transfer problems.
After learning why can't I import photos from iPhone to PC, now, let's move on to potential solutions for these issues.
Can't Miss:
Part 2. How to Fix "Can't Transfer Photos from iPhone to PC"
I've curated a list of the top 8 solutions for the common problem of "photos won't import from iPhone". The prioritization is based on user feedback and the high success rate of each solution.
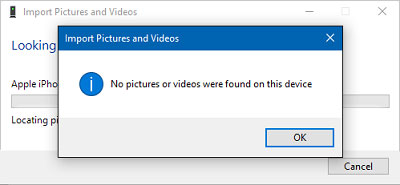
Solution 1: Check the USB Connection
If encountering the issue that you can't import photos from iPhone to Windows 10/11, start by inspecting the USB cable for any signs of damage or dust to ensure proper functionality. It is recommended to use the official Apple USB cable whenever possible. While certain third-party cables may enable your PC to recognize the iPhone and display photos, they might only facilitate charging without allowing file transfers.
Therefore, if you have another spare USB cable, you can try again to confirm whether the problem is caused by the USB cable.
Solution 2: Let iPhone Trust Your Computer
Upon connecting your iPhone to your computer using a functional USB cable, ensure that your iPhone is unlocked. Subsequently, a notification will appear on the iPhone's home screen, prompting you to confirm whether you trust this computer. Click on "Trust" to establish the connection.

After establishing trust between your iPhone and the computer, proceed by selecting "Import photos and videos" to open the Windows Photos app. Alternatively, navigate to "Computer," then "Portable Devices," right-click on your iPhone, access the DICM folder, and choose the specific photos you wish to transfer.
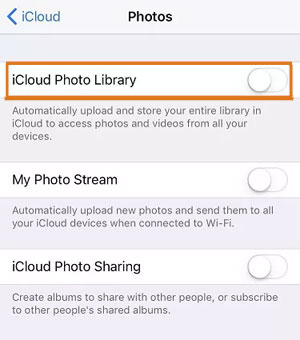
Solution 3: Disable iCloud Photos Library
To address the iCloud Library-related issue discussed earlier, follow these steps to turn off iCloud Library:
- Open your device's Settings.
- Navigate to iCloud.
- Access the Photos section.
- Disable the iCloud Library option.
Solution 4: Not Import Too Many Photos At One Time
When transferring photos to your PC, avoid overwhelming the process by importing a large number of images at once. Instead of attempting to transfer a massive batch of, for instance, 20,000 photos simultaneously, divide them into more manageable sections. Importing photos in smaller, reasonable-sized sections can help alleviate the problem of "not all photos importing from iPhone to PC".
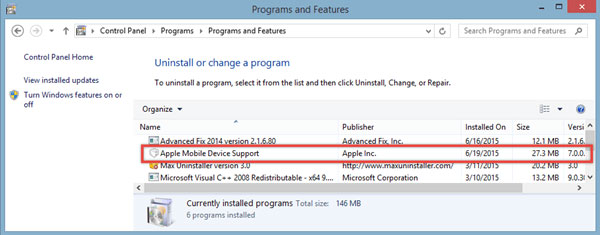
Solution 5: Check Apple Mobile Device Support Is Installed or Not
It's crucial to verify the presence of Apple Mobile Device Support on your computer for successful iPhone-to-PC file transfers. This component must be installed to enable the process. Typically, Apple Mobile Device Support is automatically installed alongside iTunes. To check for its presence, follow the steps below:
- Press the Windows key to access the "Control Panel."
- Navigate to the "Programs and Features" option within the panel.
- The installed software list will be displayed. You can use the search box to look for "Apple" and check for the presence of Apple Mobile Device Support. If it's not found, consider reinstalling iTunes as it might be the reason for Windows Photos not recognizing your iPhone and the inability to import photos to your PC.
Solution 6: Check Software Update for iOS and iTunes
Outdated versions of iOS or iTunes can contribute to the "iPhone photos not downloading to PC" issue. To ensure smooth transfers, take a moment to verify and update both your iOS device and iTunes. Follow these steps to check and update the versions:
Check and Update iOS to the Latest Version:
- Navigate to Settings > General > Software Update on your iOS device.
- If an update is available, you'll see the "Download and Install" option; click to initiate the iOS update.
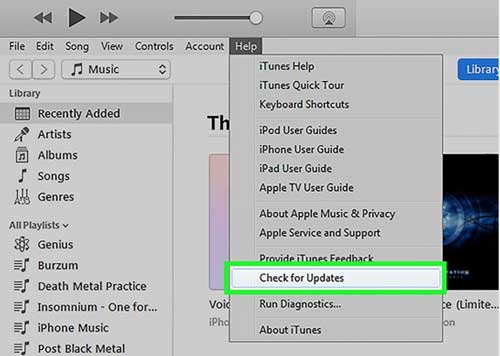
Check and Update iTunes to the Latest Version:
- For Windows: Launch iTunes and click on Help. For Mac: Launch iTunes and click on iTunes at the top of the screen.
- Select "Check for Updates" from the options.
- If a new version is available, you'll be prompted to download iTunes. Click on "Download iTunes" to acquire the latest version.
Note: Ensure your device has sufficient battery (preferably not less than 50%) and is connected to a stable internet source (WiFi or mobile data) as updating software can take some time.
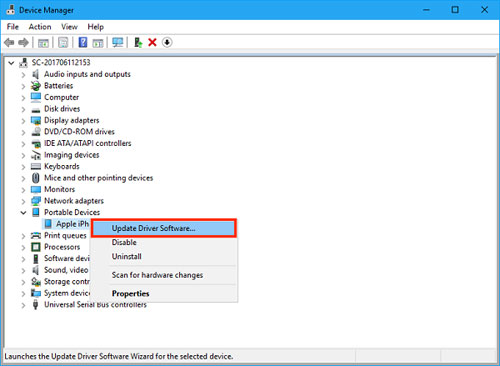
Solution 7: Verify the iTunes Apple Mobile Device USB Driver is installed
- Press Windows Key + X to open the Win + X menu.
- Select "Device Manager" from the list.
- In Device Manager, find "Universal Serial Bus controllers" and click the plus sign to expand the list.
- Locate "Apple Mobile Device USB Driver" in the expanded list.
- If there's a down arrow, enable the driver.
- If there's a "!" or "?", uninstall the driver and then reinstall it.
Note: Apple Mobile Device Support or Apple Mobile Device Service is a component of iTunes and cannot be installed independently. To reinstall Apple Mobile Device Service, you need to remove iTunes and its related components first, and then reinstall iTunes again.
Solution 8: Enable Apple Mobile Device Service (AMDS) on PC
Ensuring that the Apple Mobile Device Service is active is essential for seamless access to your iPhone data on a Windows PC. Follow these steps to check and restart the service if needed. This step can be particularly helpful when your iPhone isn't connecting to iTunes:
- Press the Windows key + R to open the Run window.
- Type services.msc and click OK.
- In the Services window, scroll down to locate Apple Mobile Device Service and check its status. If it's currently running, right-click on the option, select Stop, and then restart it. If it's not running, right-click on the option, choose Properties, set the Startup type to Automatic, click Start, and then click OK.
- Restart your PC and attempt to import photos from your iPhone to PC once again.

Guess you like:
Part 3. Alternative Ways to Transfer Photos from iPhone to PC
Way 1: One-Click to Import Photos from iPhone to PC
MobiKin Assistant for iOS simplifies the process of transferring iPhone photos to your PC or Mac. With just one click, you can swiftly export all your photos, even handling large files (tested up to 50 GB in under 30 minutes). This user-friendly tool ensures a seamless transfer while maintaining photo quality. You can preview photos before transferring and customize the output format to suit your preferences. Let's explore how to effortlessly import photos from your iPhone to a PC with MobiKin Assistant for iOS.
Why recommend MobiKin Assistant for iOS first?
- Import all or selective photos from iPhone to PC without iTunes.
- Transfer 10+ types of data, including Photos, Video, Song, eBook, Contacts, Text Messages, Notes, Safari Bookmarks, Voice Memo, Podcast, Ringtone, Playlist, etc. between iPhone/iPad/iPod touch and computer.
- Supports to backup and restore data between iPhone, iPad or iPod and iTunes directly.
- Compatible with almost all models of iPhone, iPad and iPod, including the latest iPhone 17/Air/17 Pro/17 Pro Max.
Click the button below to install MobiKin Assistant for iOS on your computer. Follow the guide to effortlessly transfer photos from your iPhone to PC without using iTunes.


Step by step tutorial to transfer photos from iPhone to PC using Assistant for iOS
Step 1: Launch Assistant for iOS and connect your iPhone to the computer using a USB cable. Wait for the software to detect your connected iPhone, and you'll see an interface as shown below.

Step 2: All iPhone data is neatly categorized on the left-side menu. Select the "Photos" category, and your iPhone photos will be scanned and displayed. Now, preview and choose the photos you wish to transfer.
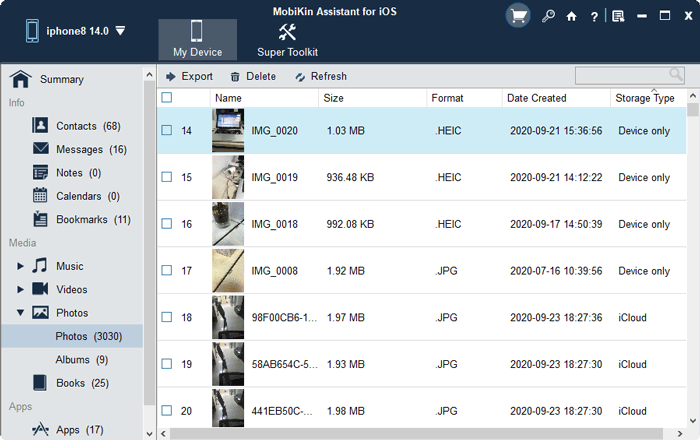
Step 3: After selecting the desired photos, click the "Export" button in the top menu. Pick a location on your computer, and initiate the transfer of photos from your iPhone to PC.
Video guide: how to transfer photos from iPhone to computer?
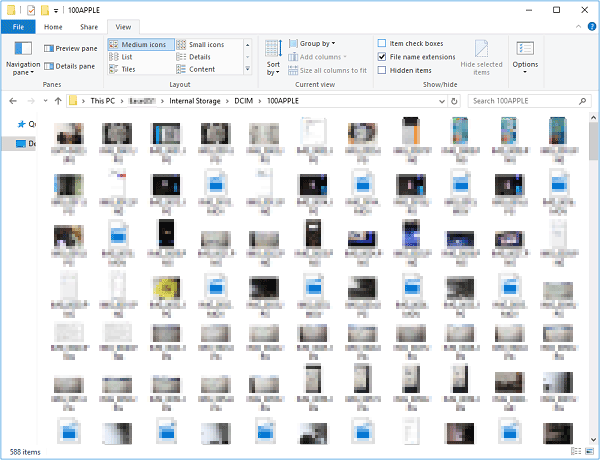
Way 2: Transfer Photos from iPhone to PC via Windows File Explorer
This method is straightforward and commonly used for transferring photos from iPhone to a computer.
- Connect your iPhone to the computer using a USB cable. Unlock your iPhone and trust the computer if prompted.
- Open "File Explorer" on your Windows PC. Locate and click on your iPhone under the "Devices and Drives" section.
- Navigate to the "Internal Storage" or "DCIM" folder on your iPhone.
- Open the folder containing the photos you want to transfer.
- Select the desired photos or press "Ctrl + A" to select all. Right-click on the selected photos and choose "Copy" or "Cut" from the context menu.
- Go to the destination folder on your PC where you want to save the photos.
- Right-click in the destination folder and choose "Paste" to transfer the photos from your iPhone to the PC.
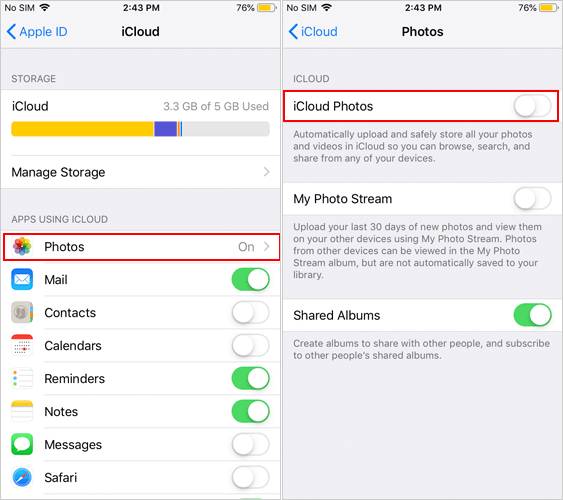
Way 3: Use iCloud to Transfer Photos from iPhone to PC
Utilizing iCloud, an Apple service, provides a wireless and cable-free method to transfer photos from your iPhone to your computer. This free app streamlines the photo transfer process.
Note: Apple offers 5GB of free iCloud storage; additional storage may require a subscription. Follow these steps to download photos from your iPhone to your computer using iCloud:
- On your iPhone, navigate to "Settings," tap your name at the top for Apple ID settings.
- Tap "iCloud" and then select "Photos."
- Enable "iCloud Photos" to sync your photos with iCloud.
To download synced photos to your PC, follow either of these methods:
Download via iCloud Website:
- On your PC, open a web browser and visit www.icloud.com.
- Sign in using your Apple ID and password.
- Click on the "Photos" icon.
- Select the desired photos, individually or using "Select All."
- Click the download icon (cloud with a downward arrow) to initiate the download. The chosen photos will be saved to your PC.
Download via iCloud App (optional):
- Download and install the iCloud app on your computer.
- Launch iCloud, sign in to your Apple ID.
- Click "Options" next to "Photos" and select "Download new photos and videos to my PC."
- Click "Done" and then "Apply."
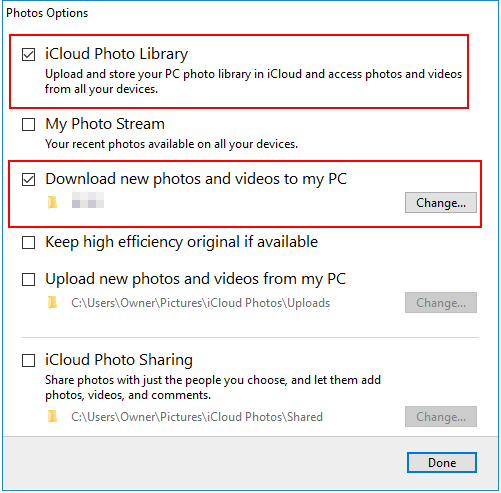
Your iCloud photos will be automatically downloaded to your computer using this method.
The Bottom Line
These comprise the top 8 solutions and 3 alternatives to resolve the trouble importing photos from iPhone to PC. Notably, MobiKin Assistant for iOS stands out as the optimal choice, ensuring a rapid and reliable photo transfer process.
Related Articles
How to Back Up iPhone before Upgrading to iOS 26: Tips the Experts Swear by
Transfer Music from iPod touch to Mac
3 Best Ways to Backup and Restore iPhone (#3 Is Excellent)
How to Backup Text Messages on iPhone Effectively?
How to Transfer Voice Memos from iPhone to PC
