12 Proven Methods to Unbrick Android Devices in Seconds
"HELP PLEASE, my phone is bricked and my PC doesn't recognize it in fastboot mode or adb, it doesn't even appear in the device manager, I've tried everything, and I don't know what to do". -- from Reddit
Android, being an open-source platform, offers a wide range of customization options. However, despite its versatility and power, there are times when the system may fail to function properly. For instance, your Android device might get stuck on the boot screen, leading to a bricked phone or tablet.
But don't lose hope just yet! In this tutorial, we'll walk you through some simple yet effective methods to unbrick your Android device and get it working again.
Watch the video below to learn this topic visually.
Part 1: Causes of Bricked Android Phone/Tablets
A "bricked phone" is usually unresponsive, unable to power on, and doesn't function normally. If your phone still responds in any way (even if it's just stuck on a logo or recovery), it's soft-bricked - and that's a good thing because it's fixable with software.
Before we check out the possible fixes, let's see some main causes responsible for this phenomenon:
- Failed system update on Android.
- Flashed Wrong ROM/Firmware – Incompatible file damages system.
- Interrupted Flashing – Power loss or error during flashing.
- Bad Mods (Xposed, Magisk, etc.) – Incompatible tweaks cause boot issues.
- Failed Rooting – Incorrect method corrupts boot files.
- Deleted System Files – Removed critical files using root access.
- Wrong Kernel/Recovery – Not built for your device.
- Died During Update – Battery died mid-system update.
Well, what to do if you brick your Android device? OK, we will let you know the 11 solutions in the following.
You May Wonder:
Part 2: How to Fix Bricked Android Devices in 11 Quick Fixes
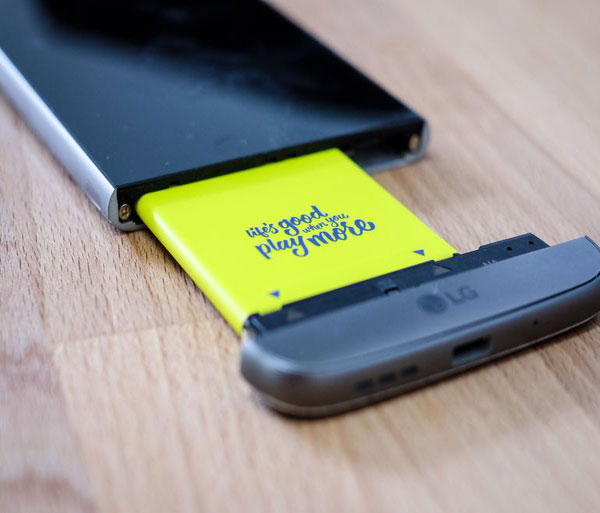
Fix 1: Reinsert the Battery
If your phone is frozen and unresponsive, you can try a forced reboot. The simplest method is to remove the battery, and then reinsert it. After putting the battery back, press and hold the "Power" button to restart your device.
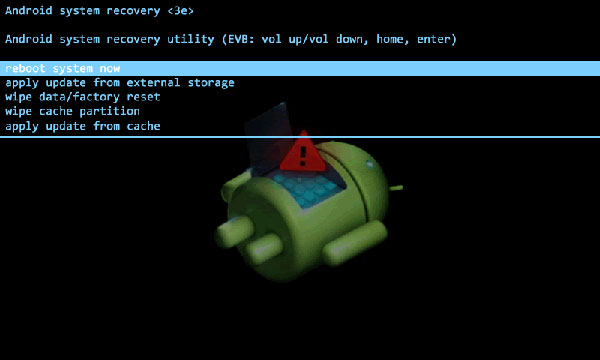
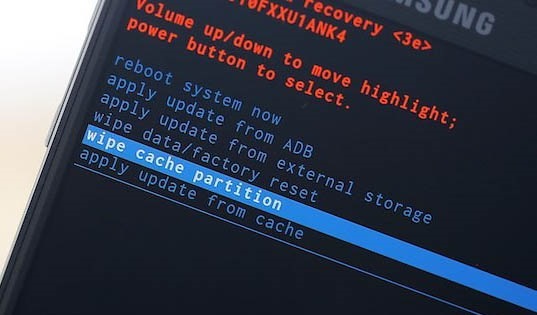
Fix 2: Put Your Phone into Recovery Mode
Recovery Mode can fix many soft brick issues by allowing you to wipe the cache or factory reset. It usually can't fix hard bricks where the device won't turn on at all. Here's a general guide:
- When your device turns off, press "Volume Up + Power" to boot in recovery mode.
- Use the "Volume" buttons to navigate the menu and highlight "reboot system now".
- Press "Power" to select the highlighted option.
- Wait to see if your Android device reboots as normal.
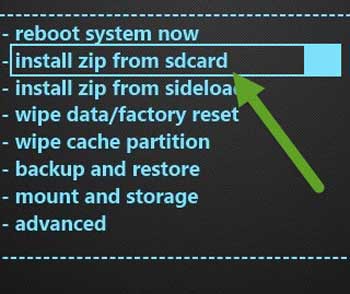
Fix 3: Re-flash a Custom ROM
If your phone boots directly into "ClockworkMod," the ROM you flashed is likely causing the problem. In this case, simply re-flash a custom ROM on your device using the following steps:
- Download the appropriate ROM (in a ZIP file) to an SD card.
- Insert the SD card into your Android device.
- Select "Install zip from sdcard".
- Choose the ZIP file containing the ROM.
- Select "reboot system now". (Learn more about how to flash ROM on your device?)
Fix 4: Wipe Cache Partition
Clearing the cache partition in recovery mode can help resolve issues when a bricked Android phone won’t turn on. There are different ways to do this, but the most common method is:
- Hold down the "Power and Volume Down" buttons at the same time until you get a recovery menu.
- Next, use the "Volume" key to find out and select the "Advanced and Wipe Dalvik Cache" option.
- Then go back to the main screen and pick "wipe cache partition".
- After that, select "wipe data"/"factory reset" to remove the settings and data on the phone.
- When the reset finishes, your device will reboot automatically.
Know More:
Fix 5: Remove the "xposed modules"
Installing Xposed modules can sometimes cause your Android phone to become soft-bricked. You can unbrick your Android tablet using a PC by removing these modules.
- Install and run "Xposed Uninstaller" on your computer.
- Connect your phone to this computer via USB.
- Get your phone into recovery mode and open the command prompt on the PC.
- Proceed to insert the command line where the "abd" will be installed and take the "abd push" method to move the "Xposed Uninstaller" to your phone's SD card.
- After the file is duplicated, you should flash it through the recovery mode.
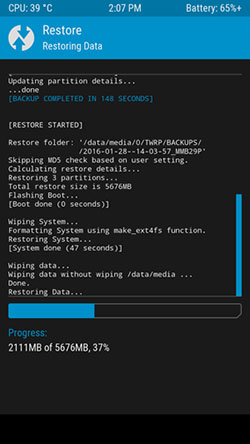
Fix 6: Restore a Nandroid Backup
A Nandroid backup is a complete snapshot of your Android device's NAND flash memory. If you can access recovery mode, you can use this backup to fix a bricked Android phone.
- Activate your device's recovery mode, as we've just mentioned in "Fix 5".
- Locate and click the "Restore" option.
- Choose the backup from the phone's internal storage and wait until it's restored.
- Once it is completed, you should restart your phone to check if it's still bricked.
Fix 7: Perform a Hard Reboot
If your Android phone/tablet turns on and immediately freezes up, try a hard reboot by holding the "Power + Home" buttons. This might differ among Android devices.
Fix 8: Flash a Factory Image
Flashing a factory image can fully restore your phone but wipes all data and unroots it. It's often better to try a stock ROM first, which many brands (like OnePlus) offer. Factory images are flashed via a PC using tools like Fastboot or Odin (for Samsung). Instructions vary by device, and some firmware may only be available from unofficial sources like XDA-Developers.
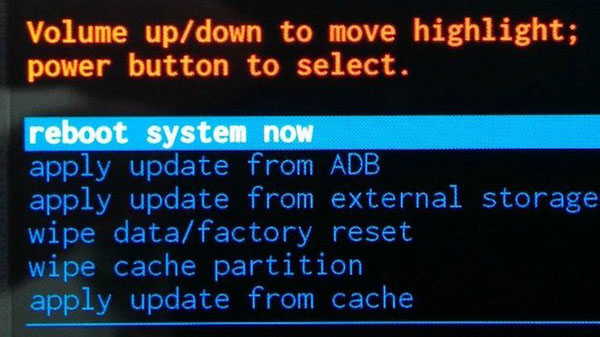
Fix 9: Factory Reset Your Phone
A factory reset can help undo changes that cause your device to become bricked. However, this process will erase all downloaded apps and personal data. Here's how to factory reset a bricked Android phone:
- Boot your device into recovery mode.
- Select "wipe data"/"factory reset".
- Confirm the action and wait.
- When the process is finished, you will return to the recovery mode main menu.
- Select "reboot system now".
- If successful, the system will boot up as normal.
Fix 10: Contact the Manufacturer or Phone Carrier
If your Android device is still under warranty, you can contact the manufacturer for support. However, be aware that rooting the device or installing custom firmware may void the warranty. Alternatively, you can reach out to your service provider for help with unbricking the device and possibly recovering your data.
Fix 11: Replace the Screen
If your Android device powers on but the screen stays black, it may not be bricked - the issue could be with the display itself. In that case, consider taking it to a repair shop or replacing the screen on your own.
Part 3: How to Unbrick Android Phone via Professional Tool
As can be seen from the above, some quick fixes may fix the bricked phone and erase the data in the meantime. So, most Android users would like to find a tool that can unbrick the phone and recover the lost files. Well, just give Broken Android Data Extraction a shot.
This could be the best unbricking Android phone software. And it can fix many Android system issues, covering Android device black screens, system crashes, phone frozen, phone drowning, virus attacks, etc.
Key features of Broken Android Data Extraction:
- Unbrick Android phones/tablets with simple clicks.
- Recover data from bricked/broken phone's internal memory and SD card.
- Restore various data types, such as contacts, SMS, call logs, photos, music, WhatsApp, videos, documents, etc.
- Enable you to preview the files and extract them to a computer easily.
- Currently, it runs smoothly on most Samsung phones/tablets.
- It values your privacy.

How to recover a bricked Android device via Broken Android Data Extraction?
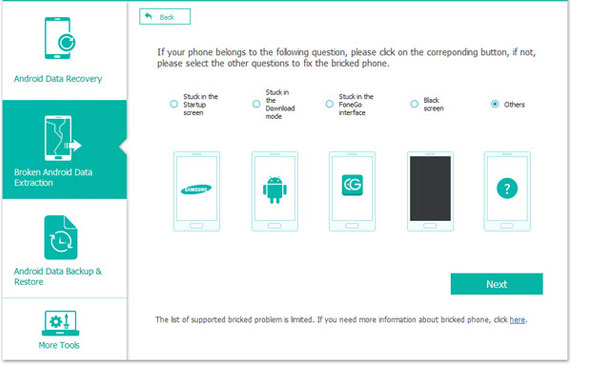
Step 1. Install Software - Launch the program and pick "Broken Android Phone Data Extraction" from the left. Click "Start" if you can use your Android phone. If not, click the "Fix Device" button.
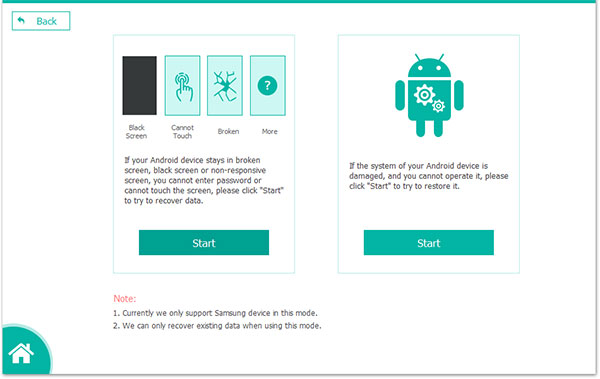
When you select "Fix Device", you can choose the main issue you are encountering when your phone is bricked. Then click "Next".
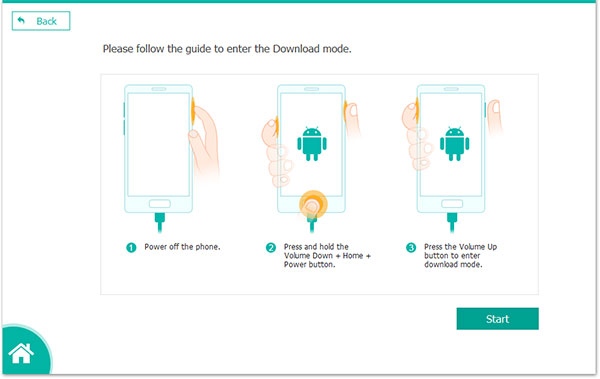
Step 2. Enter Mode - Choose the device name and model of the Android phone. Click "Confirm" and follow the guide to let your phone enter the "Download mode". Power off the phone > press and hold "Volume Down", "Home", and "Power" > press "Volume Up" to enter "Download mode".
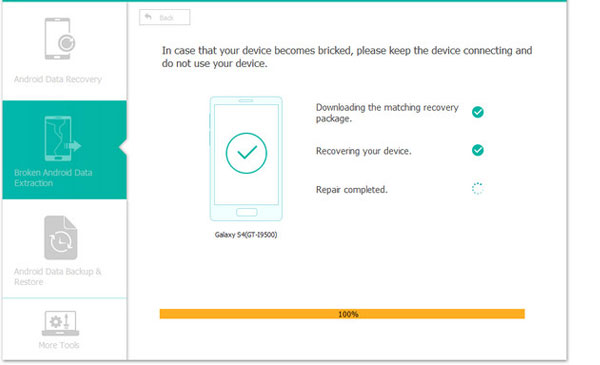
Step 3. Scan & Repair - Connect your Android device to this computer, and the program will download the recovery package before starting to scan your device automatically.
Step 4. Recover Data - After repair, you can use it to recover the device data. To do it, choose the "Android Data Recovery" section. This tool will list all recoverable files according to the data types you choose. Check the files to preview, pick the ones you want to recover, and click "Recover".
Summary - Helpful Tips to Avoid Bricking an Android Phone
Today, we covered how to fix bricked Android in many ways. And whichever approach you choose, hopefully, you can both resolve the matter and recover the lost data on your device.
Finally, here are some useful tips to avoid bricking an Android phone, especially helpful for those who want just to install a custom ROM on a device.
- Always confirm that ROMs, kernels, or firmware files match your exact device model.
- Follow official or trusted guides to unlock the bootloader before flashing anything.
- Ensure your phone has at least 50–60% battery before starting any flashing process.
- Stick to reliable flashing tools (e.g., Odin, Fastboot, SP Flash Tool) from official or reputable sources.
- Back up your data and even your current ROM/Nandroid before making major changes.
- Don't disconnect or power off the phone during flashing or updates.
- Follow the exact flashing steps (e.g., bootloader > radio > system) if required by your device.
- Avoid deleting or changing essential files unless you're experienced and know what you're doing.
- Only install Magisk/Xposed modules from trusted developers.
- Check forums like XDA before flashing anything new - others may have already tested it on your model.
Related Articles:
How to Fix Android Phone Won't Turn on? 16 Practical Solutions
How to Fix iPhone Gets Bricked after iOS 18 Update
Need to Sell Broken Phones for Cash? Concerns, Platforms, & Instructions
How to Switch Android Phones without Trouble? 6 Ways & Some Helpful Tips