[6 Methods] How to Transfer Files from iPhone to Mac?
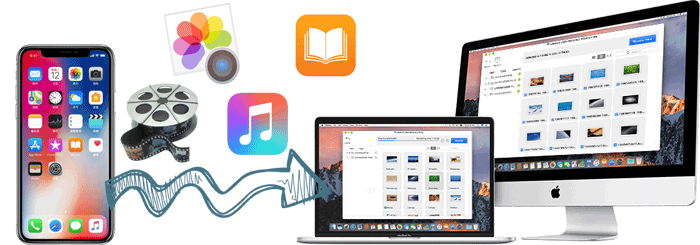
Many people have the same problem that don't know how to transfer files from iPhone to Mac so that they can keep a backup of their iPhone data on Mac. In this article, we are going to show you six methods you can move files of various types from your iOS devices. You can choose the method that suits you based on your situation.
- To transfer data from iPhone to Mac with cable: Use Assistant for iOS, or Finder.
- To transfer data from iPhone to Mac wirelessly: Apply AirDrop, Email, iCloud, or Google Drive.
I hope you find a suitable method to help you transfer files from your iPhone to your Mac or MacBook smoothly.
- Part 1: Transfer Files from iPhone to Mac with Assistant for iOS (Recommended)
- Part 2: Transfer Data from iPhone to Mac via AirDrop
- Part 3: Transfer Data from iPhone to Mac Using Cable (Finder)
- Part 4: Copy Files from iPhone to Mac with iCloud
- Part 5: Transfer Files from iPhone to Mac Using Google Drive
- Part 6: Move Files from iPhone to Mac with Email
Part 1: Transfer Files from iPhone to Mac with Assistant for iOS
Supported Files: Contacts, Messages, Notes, Calendars, Bookmarks, Music, Videos, Photos, Books and Apps.
If you want to transfer contacts from iPhone to Mac, as well as other media files like photos and videos, you can use Mobikin Assistant for iOS, a reliable iOS data transfer and manager software to transfer files between iPhone/iPad and Mac/PC with one click. Assistant for iOS works well with all iOS devices and iOS data types. What's more, it offers one-click backup and restore ability that enables you to back up your iPhone to computer, and restore data from backup to your phone without resetting you device. If you are wondering how to transfer files from iPhone to Mac without iTunes, this option is suitable for you.
Key Features of Assistant for iOS:
- One click to transfer and backup your whole iPhone data on Mac/MacBook;
- Transfer iPhone contacts, text messages, music, movie, books, playlist, etc. to Mac easily;
- All models of iPhone are supported by this program well, including iPhone 15/14/13/12/11/X/8/7/6, and etc.;
- Support to restore the backup file back to your iPhone without any data loss.
- It also comes with Windows version: MobiKin Assistant for iOS.


Steps to Transfer Files from iPhone to Mac/MacBook with Assistant for iOS (Mac):
Step 1:Connect your iPhone to Mac
After the downloading and installing of Mobikin Assistant for iOS are completed, launch the program. Using a USB cable to link your iPhone to this Mac. Once connected successfully, the main interface of the program should be displayed as below.
* Remember to tap on "Trust" on your iPhone to make your iPhone be recognized by the program.

Step 2: Select your target files
Different types of your files now should be shown as different category in the folder on the left side. Select your target files in these folder where your files are arranged detailedly or search your files by typing their name in the searching box to locate the data.
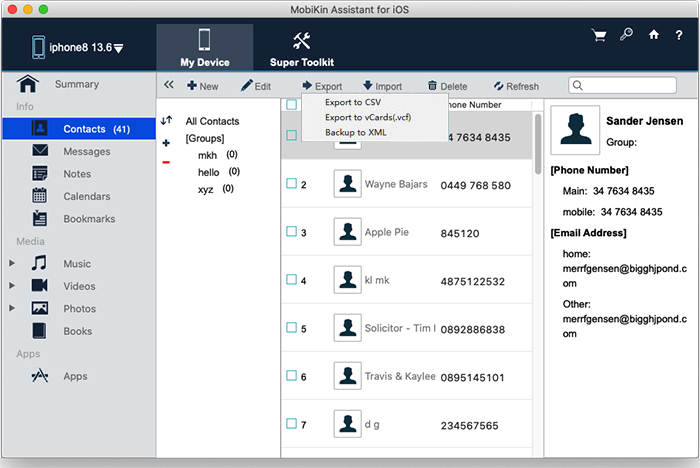
Step 3: Transfer iPhone data to Mac now
After selecting all the data you want to transfer, click on "Export" on the top menu to transfer them to the Mac. Please wait until the process is finished. The cost of time would depend on the number and sizes of files you selected. Eventually, enjoy to use your files that was transferred from your iPhone to Mac.
Video Guide:
Part 2: Transfer Data from iPhone to Mac via AirDrop
Supported Files: Photos, Videos, Websites, Locations, and More
Using AirDrop might be a good choice for you if you want to transfer files like photos, videos, contacts, websites and more from your iPhone to Mac wirelessly. AirDrop instantly creates an connection between two devices and allows easy content sharing. Below are the steps to transfer files from iPhone to Mac via Airdrop:
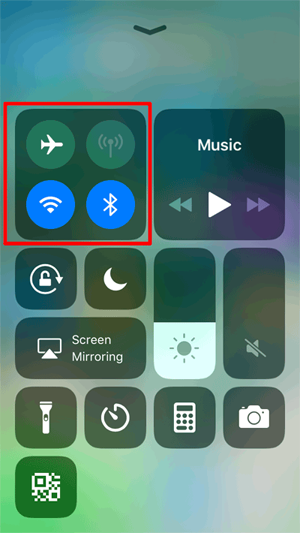
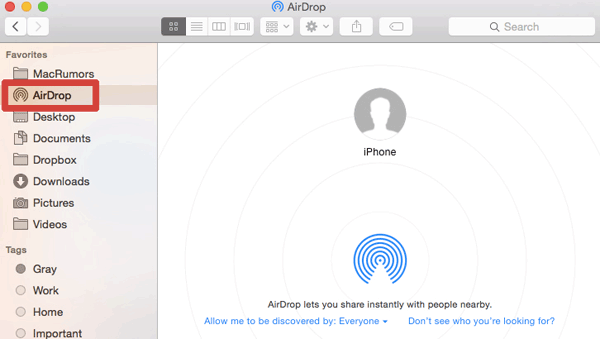
Step 1: Turn on AirDrop on your iPhone and Mac
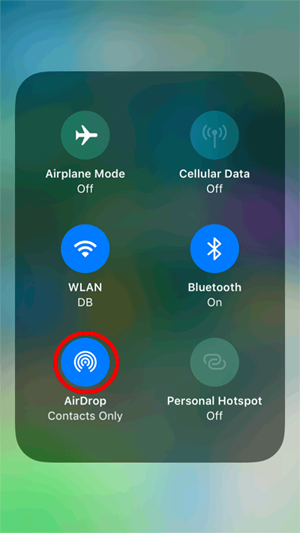
- Turn on AirDrop on your iPhone: Swipe up from the bottom of your iPhone screen to open Control Center and tap on "AirDrop". You can see the "AirDrop" button by a long press on the upper left module as the following.
- Turn on AirDrop on your Mac: Using Finder to search your AirDrop program on your Mac. Remember to turn on your Bluetooth and Wi-Fi to turn on AirDrop on your Mac.
Step 2: Transfer files from iPhone to Mac via AirDrop
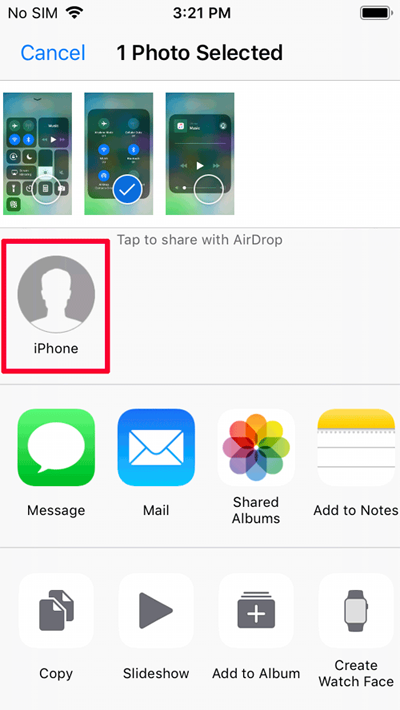
Here we set the transfer of photos as an example.
- Open the Photos app on your iPhone.
- Select the photos you want to transfer from your iPhone to your Mac.
- Click the share button on the bottom left and click the name of your Mac in the AirDrop section. The photos would be transferred in a while.
Notes:
1. You also need to set your iPhone and Mac to be discovered either as "Contacts Only" or "Everyone". Just make sure that your both devices could be detected by each other.
2. Your devices need to be awake for AirDrop to be active, so that you can finish the transfer from iPhone to Mac successfully.
3. However, it may take too much time to transfer files from iPhone to Mac with AirDrop. And AirDrop can't transfer all types of files. Sometimes even AirDrop doesn't work. Therefore, we sincerely recommend you to use Mobikin Assistant for iOS which you can find in Part 1.
Part 3: Transfer Data from iPhone to Mac Using Cable (Finder)
Supported Files: Photos, Videos, Music, Documents, Downloads and More
You can transfer files between your iPhone and Mac using a USB cable, which is not only faster but also more reliable than other methods. Here's how to do it:
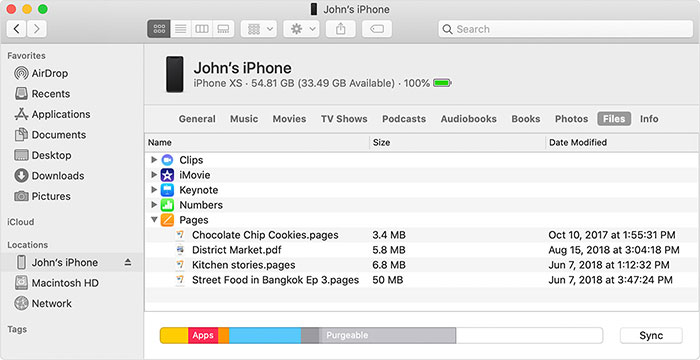
- Connect your iPhone to your Mac using the charging cable.
- Open Finder on your Mac.
- Select your iPhone under Locations in the Finder sidebar.
- Click on "Files" in the Finder window for your iPhone.
- Expand an app folder by clicking the arrow next to it to view its files and folders. Drag and drop the desired file or folder to a location in your Mac's sidebar.
- Once you're finished, eject your iPhone.
Part 4: Copy Files from iPhone to Mac with iCloud
Supported Files: Photos, Videos, Music, Documents, Notes and More
iCloud is a software pre-built into every Apple device. It allows your files such as photos, files, notes and more can be up to date and is available wherever you are. Everyone gets 5GB of free iCloud storage to start. With the iCloud services, you can transfer files from your iPhone to Mac over Wi-Fi.
Before you start to move files from iPhone to Mac with iCloud, you need to update your iPhone and Mac to the latest iOS and macOS. Beside, make sure that the Apple ID you sign in to iCloud on your iPhone and Mac must be the same. (What does iCloud back up?)
Read on the following steps to learn about how to move files from iPhone to Mac with iCloud.
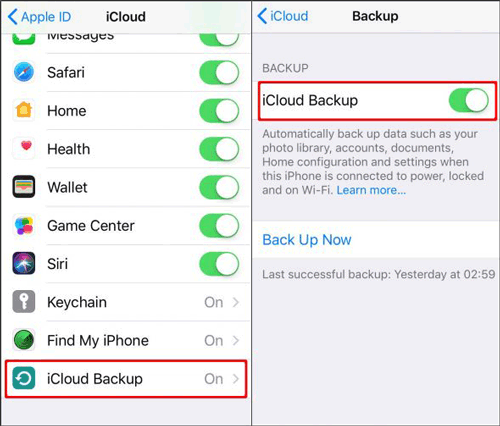
Step 1: Enable iCloud Backup on iPhone
On your iPhone, go to Settings > [Your Name] > iCloud > iCloud Backup, and then toggle the switch to turn it on.
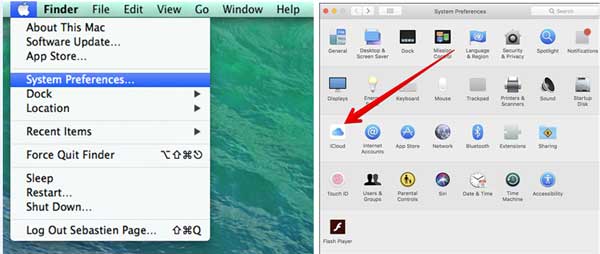
Step 2: Set Up iCloud on Mac
On your Mac, open System Preferences > Apple ID > iCloud. Ensure iCloud Drive is enabled and check the boxes for Desktop & Documents Folders. Click Done to apply the settings.
Part 5: Transfer Files from iPhone to Mac Using Google Drive
Supported Files: Photos, Videos, Word Documents, Excel Files, PPTs, Text Files, Zip Files, Audio Files...
If you are running out of space on iCloud Drive, you can use Google Drive to transfer data from iPhone to Mac. Here is a detailed step-by-step guide. Before you begin, make sure you are signed in with the same Google account on both devices.
- Open the Google Drive app and tap the + button.
- Select "Upload file" from the menu.
- To upload files from the Files app, tap "Browse". For photos or videos from the Photos library, tap "Photos & Videos".
- In the "Browse" tab, tap "On My iPhone".
- Choose the file you want to upload to Google Drive.
- Open Google Drive in any browser on your Mac.
- Locate the uploaded file, click the three vertical dots (kebab menu) next to it.
- Select "Download" from the drop-down menu.
- Choose a folder and click "Save" to store the file in your desired location on your Mac.
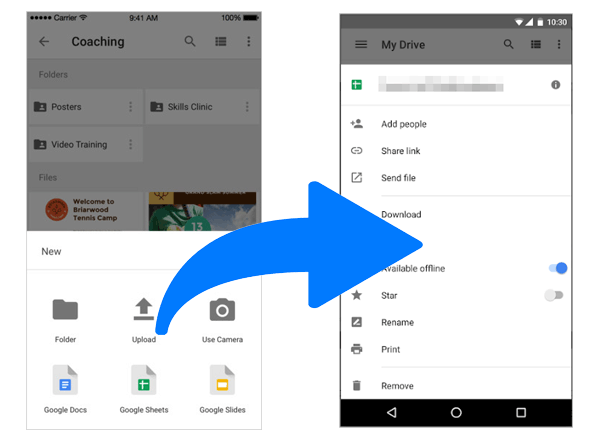
You've now successfully transferred a file from your iPhone to your Mac using Google Drive.
Part 6: Move Files from iPhone to Mac with Email
Supported Files: Photos, Videos, Documents...
Using Email to import and download files on different devices would be helpful and needs no software or USB cable. However, this method needs good Internet connection to transfer files. That's why we usually send small files via Email. Here are the steps to move files from iPhone to Mac with Email. (How to send long/large videos on iPhone?)
- Login your Email account on your iPhone.
- Select the files you want to move to and send it to yourself (the same Email account address). Then, log out your Email account.
- Login the same Email account on your mac. Download the files you just sent.

Summary:
As you can see from this article, we actually have a lot of ways to transfer files from iPhone to Mac. After saving to Mac, all of these files and data can be used at any time. You'd better do this backup regularly to keep your phone data safe. If you lose the files, it may be difficult to find them again. Among all these methods, we highly recommend Assistant for iOS (Mac). Because of its flexibility and zero-limit, we can easily transfer files from iPhone to iMac/Mac. Have you used any other good methods? Welcome to share with us in the comments section.
Relative Articles:
Easy Ways to Transfer Files from Lenovo to iPhone
Top 4 Ways to Transfer Files from Android to Mac
Switching from Samsung to iPhone in Different Ways
Top 3 Ways to Transfer Music from iPhone to Computer for Free
