11 Effective Tactics to Troubleshoot 0xE80000A Error on iTunes
When connecting your iPhone to a PC or Mac to access iTunes, it fails to recognize your device, exhibiting, "iTunes could not connect to this iPhone. An unknown error occurred (0xE80000A)". Then this tool refuses to play music, let alone manage your iPhone smoothly. Don't worry! Please keep reading to know why that occurs and how to fix the 0xE80000A error on iTunes, coupled with other possible iTunes-related bugs.

Part 1: Why Does iTunes Error 0xE80000A Occur?
There are some underlying reasons that may give rise to "iTunes could not connect to this iPhone: 0xE80000A". And here are the main factors:
- A damaged USB cable or port.
- An incomplete installation of iTunes.
- Outdated iTunes version/Windows/macOS.
- Your iPhone is locked. (How to unlock iPhone free?)
- Incompatible iPhone drivers.
- Conflict antivirus programs.
- Wrong settings on iTunes.
- System file corruption on your PC/Mac.
- Any other software and hardware error.
People Also Like:
- Tired of iTunes? Here're Top 11 Alternatives to iTunes for Windows
- Top 4 Solutions to Fix iPhone Unavailable without Data Loss
Part 2: Fix 0xE80000A Error on iTunes with 11 Solutions
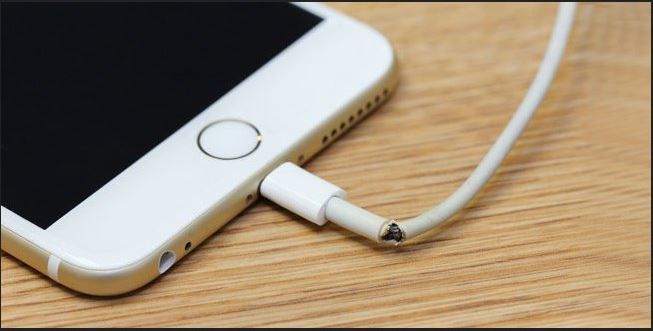
Solution 1: Change USB Port/Cable & Restart Computer
Ensure the original Lightning cable for your iPhone isn't frayed, twisted, or broken, and there is no exception in the port. Then try another cord or port and restart your computer, if necessary.
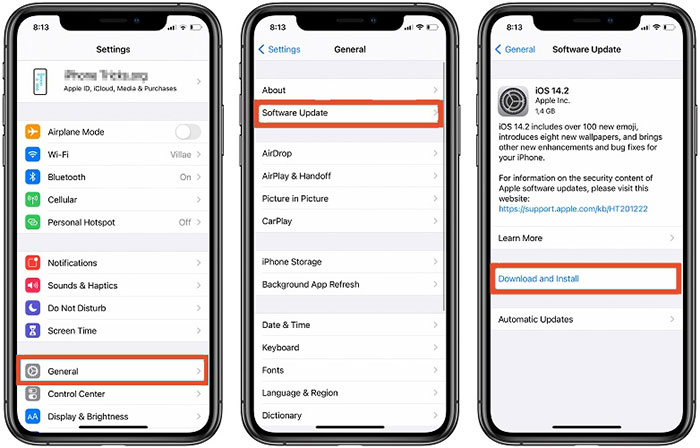
Solution 2: Update iTunes/iOS/Windows
* Update iTunes to fix error iTunes 0xE80000A:
- Type apple software update into the "Start" menu.
- Press "Enter" and install the update if it is available.
* Update iOS:
- Run the iPhone "Settings" app.
- Proceed to "General" > "Software Update".
- Touch "Download and Install" if there's a new update.
* Update Windows:
- Enter check for updates into the "Start" menu.
- Tap "Open" > "Check for Updates".
- Install any updates if a new one is available.
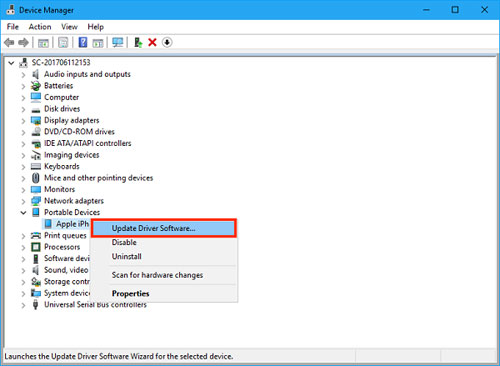
Solution 3: Update iPhone Drivers
- Open "Device Manager" from the "Start" menu on your computer.
- Expand "Portable Devices" and right-click on your iPhone.
- Pick "Update Driver Software".
- Next, click "Search automatically for updated driver software".
- Your PC will install the updated drivers for your iPhone to troubleshoot iTunes error 0xE80000A.
Solution 4: Disable Antivirus
To keep iTunes from being marked as a threat by any security program, please temporarily quit or offload the antivirus and firewall before reconnecting your iPhone to the computer again.
You Might Also Need:
- 6 Best iTunes Backup Extractors in 2025
- Tips & Tricks to Troubleshoot iPhone Typing on Its Own Effectively
Solution 5: Restart Apple Mobile Device Service
- On your PC, click "Windows key + R".
- Type services.msc > tap on "OK".
- Scroll down to locate "AppleChargerSrv".
- Right-click "Apple Mobile Devices Service".
- Press "Properties" and change it to "Automatic" if it is flagged as "Manual".
- Click "Start" > "OK".

Solution 6: Stop iTunes Related Process
If there is something wrong with extensions like AppleMobileDeviceService.exe and iTunesHelper.exe, iTunes could not connect to this iPhone accidentally. At this point, stop iTunes related process:
- Press the "Ctrl+Shift+Esc" keys simultaneously to access the Task Manager.
- Get into the "Processes" tab to locate "AppleMobileDeviceService.exe", "PodService.exe", or "iTunesHelper.exe", and click "End task".
- Once down, unplug your iPhone from the computer, replug it, and run iTunes again.
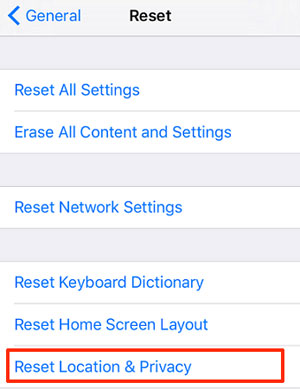
Solution 7: Reset Location & Privacy Settings
Incorrect location and privacy settings also invite error oxe800000a. These settings sensitize the permissions that were granted to this iPhone at a time when you linked it to your computer. To reset it, you should:
- Head to your iPhone's "Settings" > "General" > "Transfer or Reset iPhone".
- Touch "Reset" > select "Reset Location & Privacy".
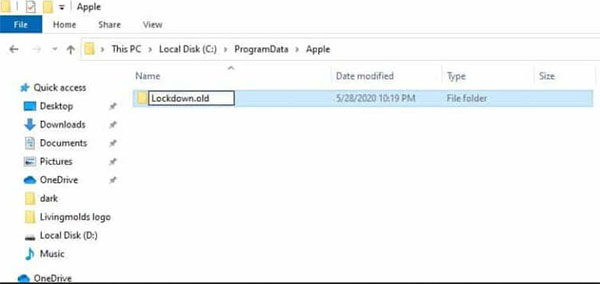
Solution 8: Reset Lockdown Folder
- Press the "Windows" and the "R" keys to run Windows Run Box.
- Enter %ProgramData% and tap "OK".
- Double-click the "Apple" folder from the File Explorer screen.
- Right-click the "Lockdown" folder and hit "Rename" to rename it to "Lockdown.old".
- Relaunch iTunes and attach your iPhone to the computer again.
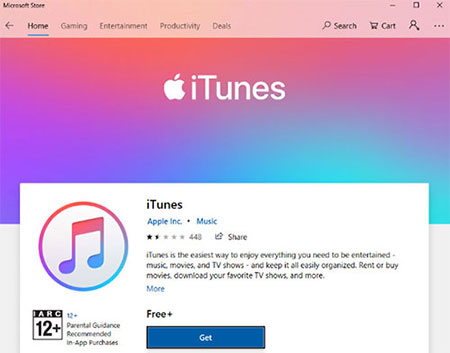
Solution 9: Reinstall iTunes
- Right-click the "Start" menu and go for "Apps and Features".
- Choose "iTunes" > "Uninstall".
- Clear up all the related files after uninstalling iTunes by going to "Common Files" and double-clicking the "Apple" folder.
- Reinstall iTunes from Microsoft Store other than the Apple website.
Solution 10: Repair iTunes to Default Settings
- Press "Windows key + I" to open Windows Settings.
- Click "Apps" from Windows Settings.
- Locate iTunes and click "Modify".
- Select "Repair" on the iTunes installer and tap "Next".
- Follow the on-screen guide to proceed with the repair to eliminate the "iTunes cannot connect to iPhone" error.
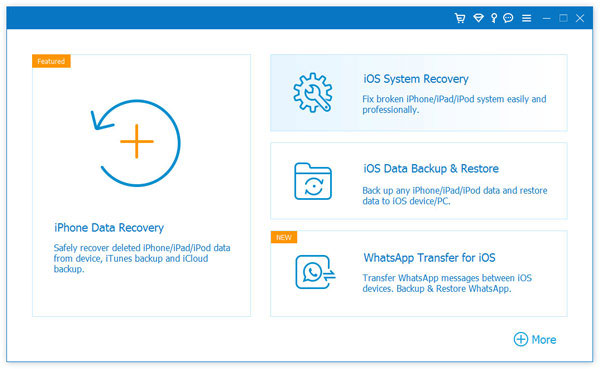
Part 3: Use a Professional Program to Repair Error iTunes/iPhone 0xE80000A
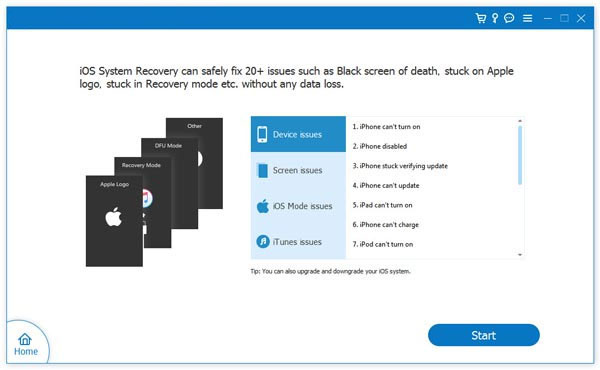
Apple users are often not surprised by various unknown errors on iTunes with weird codes. Generally, some would not like to waste time troubleshooting and trying out quick fixes that might not work out since professional 3rd-party software like iOS System Recovery is readily available. Amazingly, this all-rounder can securely fix 50+ iOS mode/device/screen/iTunes problems with just simple clicks.
Key highlights of iOS System Recovery:
- Fix 0xE80000A error on iTunes/iPhone without damaging iOS data.
- Troubleshoot a broad range of iOS issues, covering the iTunes error 9, iPhone stuck on the loading screen, iPhone/iTunes keeps crashing, iPhone clicking on its own, iPhone stuck on boot loop, etc.
- Come equipped with two repair modes to fix various iPhone/iTunes issues.
- Upgrade and downgrade iOS to the supported version.
- Easy to use, smooth connection, and 100% work.
- Apply to almost all iDevices, including 17/Air/17 Pro/17 Pro Max/16/15/14/13/12/11/X/8/7, iPod touch, iPad, etc.
- It won't let out your privacy.


Easy steps to fix 0xE80000A error on iTunes with iOS System Recovery:
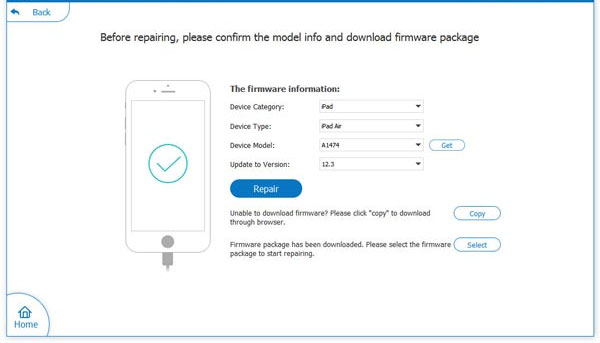
Step 1. Launch iOS System Recovery on your computer after the free download and installation. Next, go for "More Tools", followed by "iOS System Recovery" on its primary interface.
Step 2. Connect your iPhone to the computer through a USB cable. Then, click "Start" and pay close attention to the on-screen prompts.
Step 3. Check your iPhone model and tap "Repair" to download and install the suited firmware. Once completed, the program will start to fix the 0xE80000A error iTunes without losing data.
Last Words
Speaking of which, do you bear to let your niggles persist? Actually, there are at least dozens of iTunes error codes, and any minor details may make iTunes out of order. However, if you have an all-around player like iOS System Recovery, you can deal with various changes with the same conditions. It makes you feel comfortable whenever using iTunes and won't harm your iOS content all along.
Related Articles:
Unable to Check for Update on iPhone/iPad? Check 7 Solutions Here
9 Fixes to iTunes Could Not Back Up iPhone Because an Error Occurred
What If Your iPhone Won't Restore? Try the 9 Proven Methods Here!
iTunes Backup to Android Transfer: How to Sync iTunes Backup to Android?
Is It Possible to Mirror iPhone to PC without Software? [SOLVED]
