How to Restore Photos from iCloud Easily? (iPhone & iPad Supported)
While iCloud facilitates seamless file sharing among iPhone/iPad users, ensuring the security of their digital content, unexpected surprises may occur. Despite Apple's efforts to enhance iCloud's performance, restoring iPhone settings and data from iCloud backups sometimes results in missing photos. In such instances, the need arises to find a solution for restoring photos from iCloud backup and reintegrating them onto the iPhone.
In this article, we will provide 5 practical ways to recover photos from iCloud. Of course, the premise is that you have backed up your iPhone/iPad photos to iCloud in advance.

- Part 1: How to Restore Photos from iCloud Recently Deleted Folder
- Part 2: How to Retrieve Photos from iCloud Photo Library to PC/Mac
- Part 3: How to Recover Photos from iCloud Drive
- Part 4: How to Recover Photos from iCloud Backup to iPhone [Full Restore]
- Part 5: How to Restore Only Photos from iCloud Backup without Reset [No Data Loss]
- Part 6: FAQs about iCloud Photo Recovery
Part 1: How to Restore Photos from iCloud Recently Deleted Folder
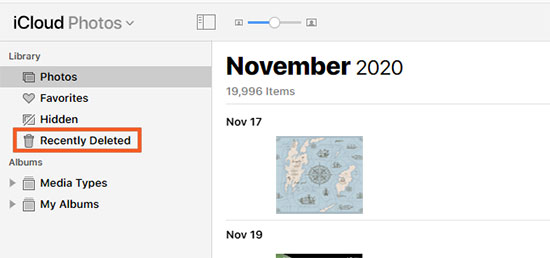
Does iCloud save deleted photos? If you enable the photo synchronization function in the iCloud settings, the photos on your iOS device will be automatically uploaded to the iCloud server. If you delete photos on your iPhone, they will be automatically moved to the "Recently Deleted" album and saved for 30 days. Therefore, if you recently deleted photos from your iCloud account, don't worry, you still have a chance to retrieve them from the "Recently Deleted" folder.
How to get my photos back from iCloud recently deleted folder?
- Visit www.icloud.com and log in to your iCloud account.
- Select "Photos" on the iCloud page.
- You will see a folder called "Recently Deleted" on the left, click on it.
- All photos deleted in the last 30 days are saved in this folder. Preview and find out the photos you want to recover.
- Mark the photos you want back and finally click the "Recover" button.
You May Be Interested in:
- iPod Won't Sync with iTunes? 10 Easy Solutions to Fix It!
- What if iPhone Won't Restore? Here Are the Full List of Fixes
Part 2: How to Retrieve Photos from iCloud Photo Library to PC/Mac
How to get photos back from iCloud Photo Library? Well, if you have enabled iCloud Photo Library on your iPhone and used iCloud for Windows before, then you can download photos from iCloud Photo Library to your PC or Mac. Below are the steps you need to take to get old photos from iCloud.
#1 Download Photos from iCloud Photo Library to PC
- Download iCloud for Windows on your computer if you haven't installed the program.
- Open iCloud for Windows on your Windows computer.
- Click the Options beside Photos to view your photo settings.
- Choose "iCloud Photo Library".
- Tick off the option "Download new photos and videos to my PC".
- Click "Done" > "Apply".

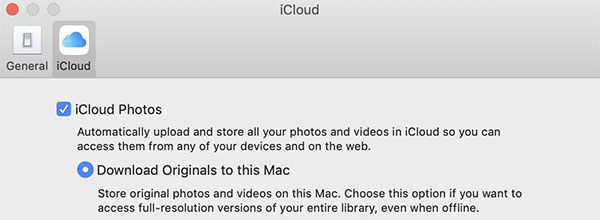
#2 Download Photos from iCloud Photo Library to Mac
- Open Photos app on your Mac.
- Go to the top menu to choose Photos > Preference > iCloud, and sign into with your Apple ID.
- Enable "Download Originals to this Mac".
- Close preferences as long as the update is finished.
- Choose "Photos" in the sub-menu.
- Press Command (or Command + A) to select the photos you need.
- Go back to the top menu to choose File > Export.
- Choose "Export Items" or "Export Unmodified Original For Items" according to your needs.
- Specify a location on the Mac to save these photos.
Part 3: How to Recover Photos from iCloud Drive
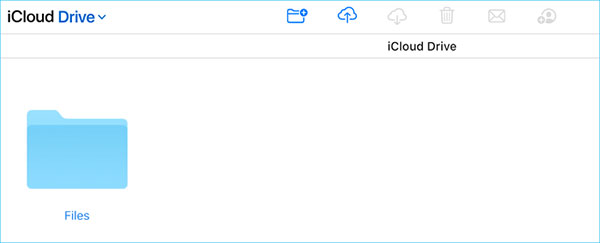
You can also find old photos on iCloud Drive if you have ever upload your photos to iCloud Drive before deleting. You need to go to visit the iCloud.com to download these photos to your computer.
- Go to the icloud.com and sign into with your Apple ID.
- Click the iCloud Drive.
- Select the photos you want to recover.
- Click the "Download" icon at the top to save the selected photos to your computer.
You May Be Interested in:
- How to Recover Deleted Photos from iPhone or iTunes Backups
- How to Access iPhone Files on Windows/Mac (Way 1 Is Versatile)
Part 4: How to Recover Photos from iCloud Backup to iPhone [Full Restore]
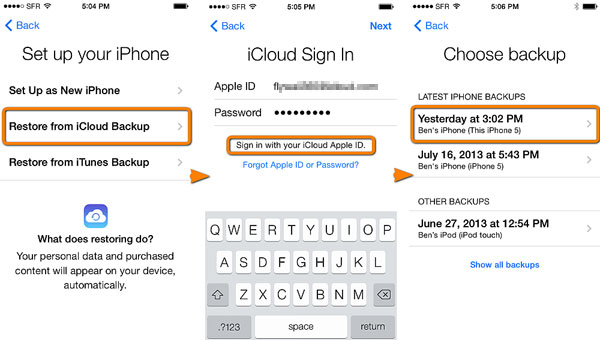
Another way to retrieve photos from iCloud is restoring data from iCloud backup. This restoring process is very simple, but one thing you need to know is that this process needs to erase all the content and settings on the device, and then restore the backup files in iCloud to the device. In addition, it restores the entire iOS system, so it does not allow you to selectively restore photos from iCloud.
- Go to the iPhone Settings > Restore > Erase All Content and Settings, and then wait for the iPhone to restart.
- During the iPhone setup process, choose "Restore from iCloud Backup" on the "Apps & Data" interface.
- Log into your Apple ID and choose the iCloud backup you want to be restored.
- Wait for the restoring process to complete.
Part 5: How to Restore Only Photos from iCloud Backup without Reset [No Data Loss]
In most cases, retrieving photos from an iCloud backup involves restoring your iOS device with the entire backup file. This process replaces the contents and settings on your iPhone, iPad, or iPod touch with the data from the iCloud backup. how do i retrieve photos from icloud without reset? Certainly! A third-party iCloud data recovery tool, such as MobiKin Doctor for iOS, allows you to selectively recover pictures from iCloud backup without any data loss.
Basic features of Doctor for iOS:
- Efficiently restore photos from iCloud/iTunes backup without the need to reset your iPhone.
- Capable of directly recovering data from your iPhone or iPad, even if you haven't created a backup previously.
- Comprehensive recovery options extend beyond photos and videos to include contacts, reminders, notes, calendars, and more.
- Preview functionality allows you to inspect data before recovery, enabling selective retrieval of specific files.
- Compatible with all iOS devices and versions, including the latest iPhone 15/14/13 and iOS 17.
- Ensures a safe and user-friendly experience, boasting a high recovery rate for your peace of mind.


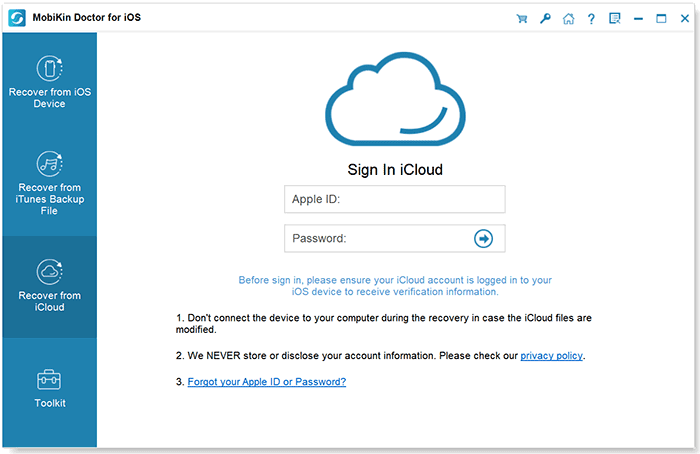
Step 1. Run iCloud photo recovery tool
Follow the prompt onscreen guide to finish the installation process of the iCloud recovery software - MobiKin Doctor for iOS, then launch it directly. Select the "Recover from iCloud" option and log in to your iCloud account.
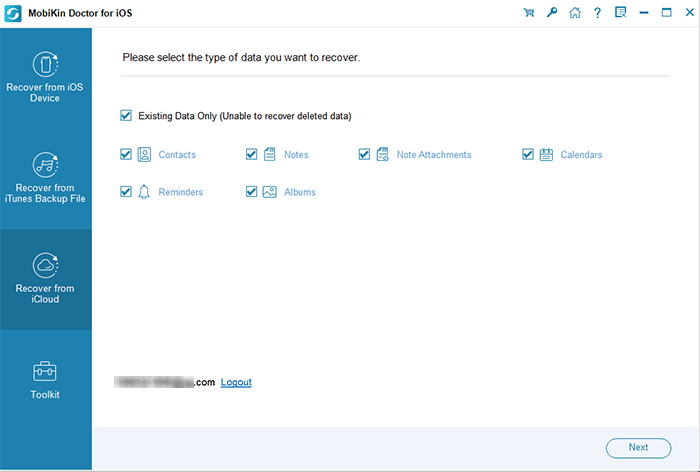
Step 2. Scan iCloud backup file
After login, you'll see all your iCloud backups are listed in the program. Choose "Photos", and click "Next" to let the software scan your iCloud backup file.
Step 3. Select the photos you want to recover
When the scanning is finished, you can preview the detailed contents and tick your needed pictures.

Step 4. Start to recover old photos from iCloud
After selecting all the photos you want to recover, you can click "Recover to Computer" to recover photos from iCloud to your computer.
Part 6: FAQs about iCloud Photo Recovery
Q1: How to recover photos without a backup?
You can try iPhone Data Recovery, which can recover deleted photos directly from your iOS device, even if you haven't created any backups. For detailed instructions, you can go to the page: How to recover photos from iPhone without backup?
Q2: How do I check if my photos were backed up to iCloud before deletion?
To check your iCloud backups on your iPhone:
- For iOS 10.3, navigate to Settings > [your name] > iCloud. Tap the graph depicting your iCloud usage and then select Manage Storage.
- For iOS 11 or later, go to Settings > [your name] > iCloud > Manage Storage > Backups.
Alternatively, you can employ MobiKin Doctor for iOS to preview photo files before deciding to delete them.
Q3: Can I recover permanently deleted photos from iCloud?
Restoring deleted iCloud photos is achievable if there are backups created before their permanent deletion. The process involves resetting your iPhone and erasing all data and settings. After restarting, the setup enables you to choose an iCloud backup for restoring photos and other content. If this method proves ineffective, consider using a backup extractor tool such as MobiKin Doctor for iOS to selectively restore photos from iCloud or iTunes.
Summary
After reading the above-mentioned solutions on how to recover photos from iCloud, you not only understand a variety of troubleshooting, but also know a powerful and easy-to-use iCloud recovery software - MobiKin Doctor for iOS. It can recover photos, contacts, messages, call history, etc. from iPhone, iPad, iPod touch, and iCloud/iTunes backup. It has a high success rate and no data loss. It really is a tool worth having.
You can leave your comment below. If you like this article, please share it with your friends. In addition, if you need further help, we are also happy to help you solve your problem.
Related Articles:
How to Extract iPhone Photos from Backup Files
How to Solve iPhone Notes Icon Missing or Hidden Issue?
How to Undelete Notes on iPhone 15/14/13/12/11/X/XR/8/7/6
How to Restore Notes on iPhone from iCloud [3 Ways Included]
[Solved] How to Recover Deleted SMS from iPhone/iPad
3 Simple Steps to Transfer WhatsApp Backup from Google Drive to iCloud
