USB Debugging Tips: How to Enable USB Debugging on Motorola Phones?
Wish to manage or restore the data on Motorola with some third-party tools? One important thing you need to do is to enable USB debugging on your Motorola devices to ensure the success of the connection and recognition.
As we all know, the methods to open USB debugging on the same Android OS version are similar, so you can easily enable the mode by following the comprehensive guide: How to Enable USB Debugging on Android Phones.
You are not using a Motorola phone? Then you can get the ways to turn on the mode from the pages:
- How to Enable USB Debugging on Samsung Phone?
- How to Enable USB Debugging on Xiaomi Mi/Redmi/POCO?
- How to Activate USB debugging on TECNO/Infinix/itel?
- How to Enable USB Debugging on OPPO/realme?
- How to Enable USB Debugging on OnePlus Device
- How to Enable USB Debugging on vivo/iQOO?
- How to Enable USB Debugging on Huawei/Honor?
- How Do I Enable USB Debugging on Google Pixel?
- How to Enable USB debugging on TCL?
- How to Enable USB Debugging on HTC Device?
- How to Enable USB Debugging on LG Device?
You can also follow the specific tutorial below to open USB debugging on Motorola devices.
Part 1: How to Enable USB Debugging on Motorola Phones?
For Android 9 and Newer
Applies to: Moto G 5G/Edge series, Razr 2022+, Android 9/10/11/12/13+
Step 1: Turn On Developer Mode
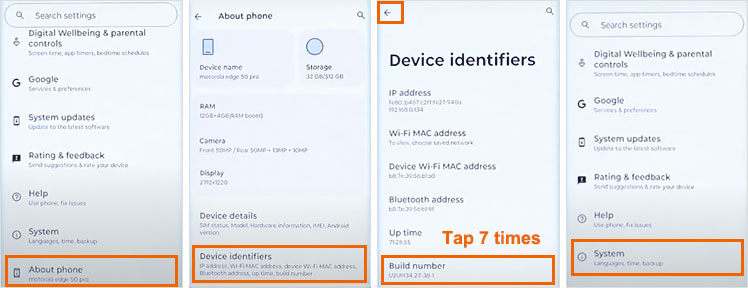
- Open "Settings" and go to "About phone".
- Tap on "Device identifiers".
- Tap the Build number 7 times in a row. You'll see a message saying "You are now a developer!"
Step 2: Enable USB Debugging
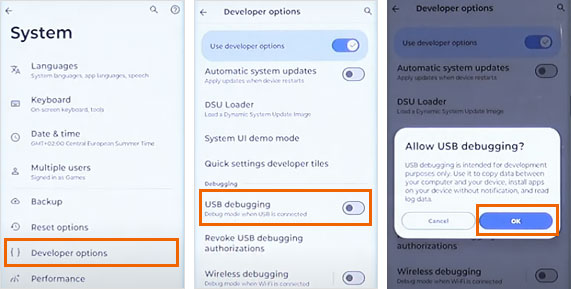
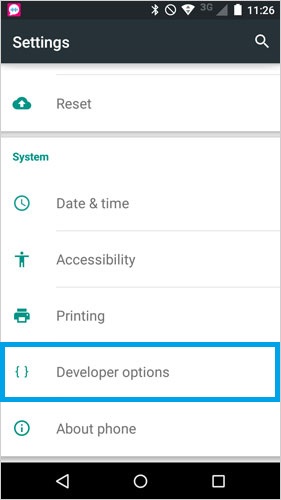
- Go back to "Settings", then tap "System" > "Developer options".
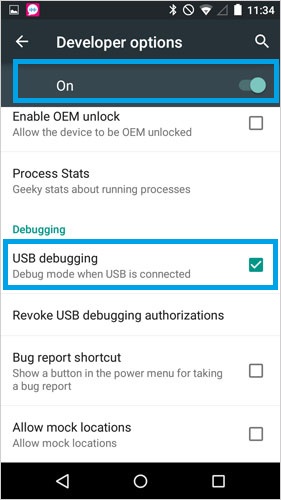
- Find and switch "USB debugging" to "ON".
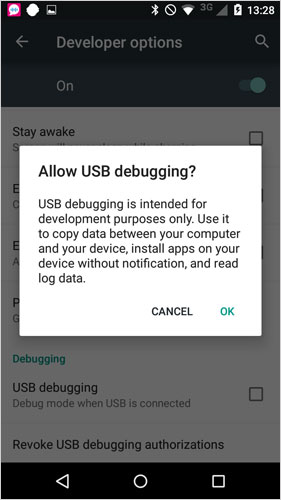
- Tap "OK" to confirm the security message.
Step 3: Connect to Your PC
- Plug your phone into the PC using a USB cable.
- When asked, choose "File transfer" mode.
- On your phone, confirm the pop-up asking to allow USB debugging.
Now your Motorola device is all set for ADB commands, flashing, or connecting with PC tools.
Using Android 11 or newer? You can also turn on "Wireless debugging" (just below USB debugging) for cable-free access.
For Android 8.1 and Earlier
(Moto G6/Z3, E5 series, Android 5–8.1)
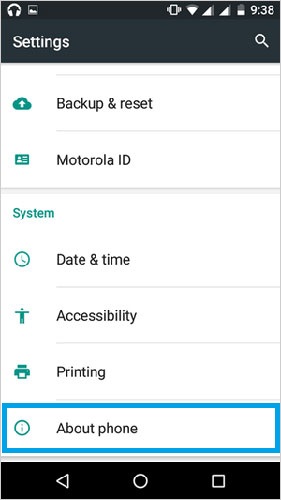
Step 1: Open the "Settings" app on your Motorola phone.
- If you already see "Developer options" in the Settings menu, you can move on to the next step.
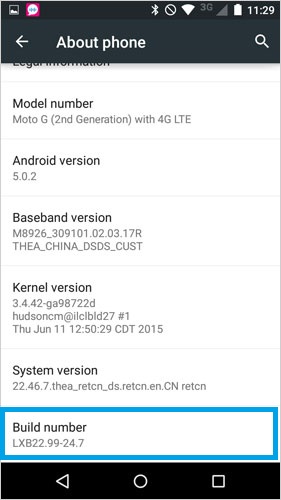
- If you don't see it, go to "About phone", then tap "Build number" seven times quickly. You should see a message saying developer mode has been enabled. Go back to the main Settings screen, and now you'll see "Developer options" listed.
Step 2: Enable USB Debugging
- Tap on "Developer options".
- Turn on the Developer options switch if it's off.
- Scroll down and find "USB debugging", then turn it on.
- When the popup appears asking "Allow USB debugging?", tap OK to confirm.
Connection Safety Tips for Linking Your Phone to a PC
To keep your phone secure when connecting it to a computer, follow these simple steps:
- Revoke USB access when you're done: Go to Developer Options and tap on Revoke USB debugging authorizations to clear any trusted connections.
- Avoid enabling "OEM unlocking" unless you specifically need to unlock the bootloader — it's not needed for regular use and can weaken your device's security.
- Turn off USB debugging when you're not using it — this prevents unauthorized access and keeps your phone safer.
Part 2: Ask Our Support Team for Help
If you fail to open the USB debugging mode on your Motorola device by using the methods above, you can contact us via the email: support@mobikin.com with the following information:
- What brand, model, and Android version is your device running?
- Describe the issue you're facing in more detail.
- Send us any screenshots that highlight the problem.
If you have met other problems while using our products, please go to the Product FAQ page to search for solutions.