5 Easy Solutions to IQOO Backup and Restore [Safe & Efficient]
TL;DR:
iQOO users have several reliable options for safeguarding their data, ranging from desktop tools like MobiKin Backup Manager for Android to cloud-based solutions. While cloud methods offer automatic syncing of essential data, desktop and manual PC transfers provide fuller control over media files and offline storage.
Ultimately, choosing the right approach depends on whether you prioritize convenience, complete data coverage, or direct device-to-device migration without internet dependency.
Before resetting or giving away the old iQOO phone, people look for ways to save data safely so nothing gets lost. Photos, contacts, app settings, and personal files accumulate over time, and losing them during a wipe or transfer can be frustrating.
The following page presents 5 optimal ways for iQOO backup restore. No technical background is required. Just follow the steps in order, pick the approach that matches your needs, and keep your information intact throughout the reset or handover process.
- Part 1: Back Up & Restore IQOO via MobiKin Android Backup & Restore [Trouble-free]
- Part 2: Conduct IQOO Backup & Restore via Google Sync
- Part 3: Make IQOO Backup & Restore Using vivo Cloud
- Part 4: Back Up & Restore an IQOO Phone via a PC Only
- Part 5: Back Up & Restore IQOO via Another IQOO Phone
- FAQs about IQOO Backup & Restore
Part 1: Back Up & Restore IQOO via MobiKin Android Backup & Restore [Trouble-free]
A desktop utility like MobiKin Backup Manager for Android (Windows/Mac) handles iQOO backup and restore in a more structured way than basic transfer methods.
Termed MobiKin Android Backup & Restore, this tool connects a phone to a computer and allows selective or full data backup in one session. Restoring is straightforward, letting users push saved data back onto a device when needed. This approach works well for iQOO users who want more control over what gets saved and recovered.
Core Features of MobiKin Backup & Restore:
+ One-click full backup of iQOO data to PC.
+ Selective backup and restore of specific data types.
+ Supports contacts, messages, call logs, photos, videos, apps, and more.
+ USB/WiFi-based stable connection for transfer.
+ Offline local storage without cloud dependency.
+ Fast transfer of large files like media and app packages.
+ Safe restore without overwriting all existing phone data.
+ Easy backup history management on computer.
+ Works as a structured iQOO migration tool, working for 8,000+ Android phones, covering 15/13/12/11/10/9/Neo/Legend, etc.


Back Up
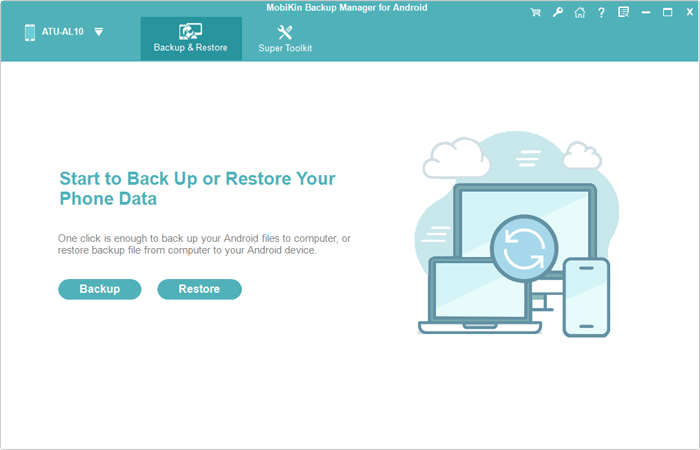
- Launch the software after downloading and installing it on your computer.
- Next, connect your IQOO phone to the computer using a USB cable.
- You may need to activate USB debugging mode on your IQOO device to ensure it is recognized.
- Once this is done, the screen will show options for "Backup" and "Restore". Simply select the former.
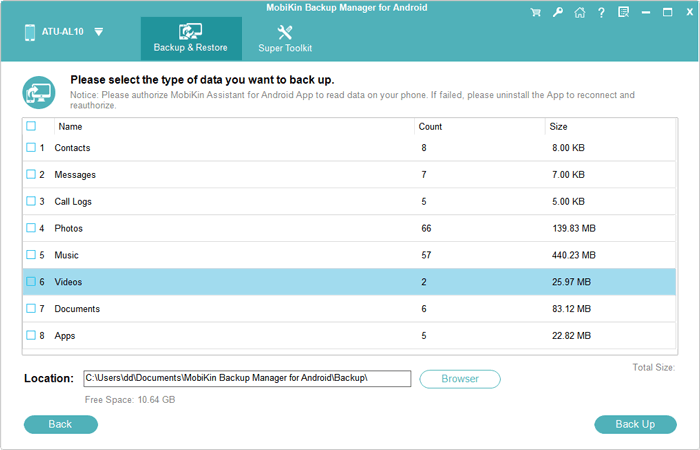
- Choose the types of data you wish to back up.
- Then, designate a location on your computer for storage.
- Finally, click on "Back Up" to transfer the IQOO data to your computer.
Restore
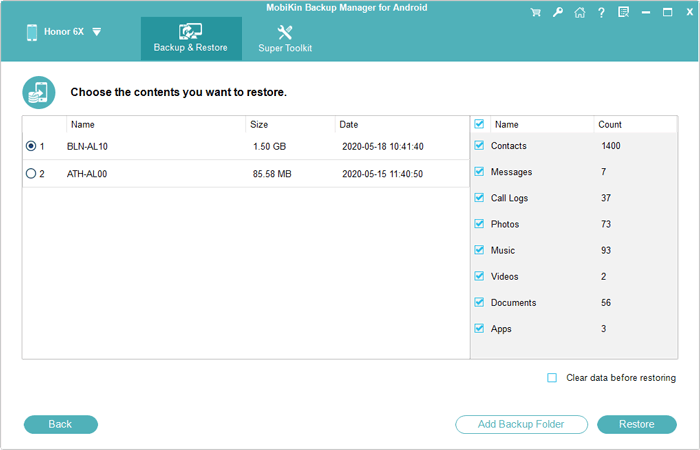
- Once the software detects your IQOO phone, select "Restore" from the main interface and review the backup content you previously created.
- Choose the file type(s) you wish to restore.
- Finally, click on "Restore" again to transfer the items to the connected device.
Video Instructions:
My Testing Experience: When I tested MobiKin Backup Manager for Android, the setup felt stable once the phone connected to the computer. The software quickly detected the iQOO device and loaded all available data categories. I was able to select specific items instead of doing a full backup, which made testing more flexible.
You Might Need: How to Transfer Music from IQOO to IQOO? [Way 1 Is Ideal]
Part 2: Conduct IQOO Backup & Restore via Google Sync
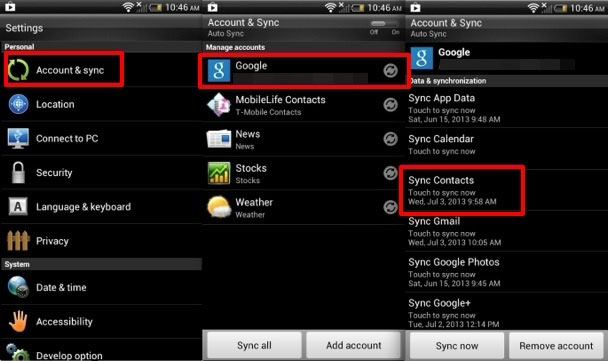
Cloud-based syncing through Google Sync focuses on essential data tied to a Google account. Contacts, calendar entries, and some app-related settings are automatically stored once syncing is enabled. During setup or login on a new iQOO phone, the same account brings that data back without extra steps. However, it does not fully cover media files or complete app data, so it feels more like a partial restore system.
Back Up
- Open Settings > System management > Backup & Reset.
- Tap Backup data and choose Google server.
- Turn on Back up my data.
- Select or add your Google account.
- Go to Accounts & Sync > tap your Google account.
- Enable all sync options (Contacts, Calendar, etc.).
- Tap Sync now to upload the latest data.
Restore
- Turn on your iQOO phone (new or after reset).
- During setup, sign in with the same **Google account.
- When prompted, choose Restore from backup.
- Select the desired backup from the list.
- Follow on-screen steps to restore apps, settings, and data.
- After setup, go to Accounts & Sync if needed and tap Sync now to retrieve remaining data (e.g., contacts).
My Testing Experience: During my test of Google Sync, the first step was simply signing in and enabling backup, which was very quick. After syncing, I checked another iQOO device using the same account and noticed contacts and basic settings returned smoothly. However, I found that media files and some app data were missing, which made the result feel partial.
Learn More: 4 Easy & Safe Ways to Retrieve Deleted Text Messages on IQOO
Part 3: Make IQOO Backup & Restore Using vivo Cloud
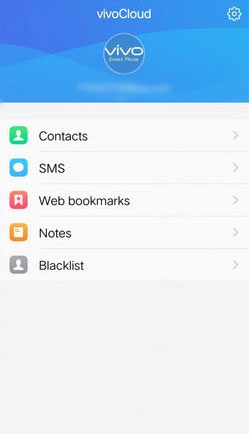
A built-in option such as vivo Cloud integrates directly with iQOO devices through the system account. It can store messages, contacts, photos, and selected system settings in the background when enabled. Recovery happens by signing in with the same account and choosing a saved backup point. This method suits users who prefer automatic protection without connecting to external devices.
Back Up
- Open Settings on your iQOO phone.
- Go to Accounts & Sync or System management.
- Tap vivo Cloud.
- Sign in with your Vivo account.
- Select Cloud Backup.
- Choose data types (contacts, messages, notes, etc.).
- Tap Back Up Now and wait for the upload to finish.
Restore
- Turn on or reset your iQOO phone.
- Sign in with the same Vivo account.
- Open vivo Cloud in Settings.
- Go to Backup & Restore.
- Select your latest backup file.
- Tap Restore.
- Wait for data sync to complete, then open Accounts & Sync and tap Sync Now if needed.
My Testing Experience: With vivo Cloud, I noticed the backup process started automatically once enabled in settings. It uploaded contacts, messages, and photos in the background without interrupting phone use. Restoring data on another iQOO device was straightforward after logging in with the same account. Still, I observed that some apps required manual sign-in even after restoration.
Part 4: Back Up & Restore an IQOO Phone via a PC Only
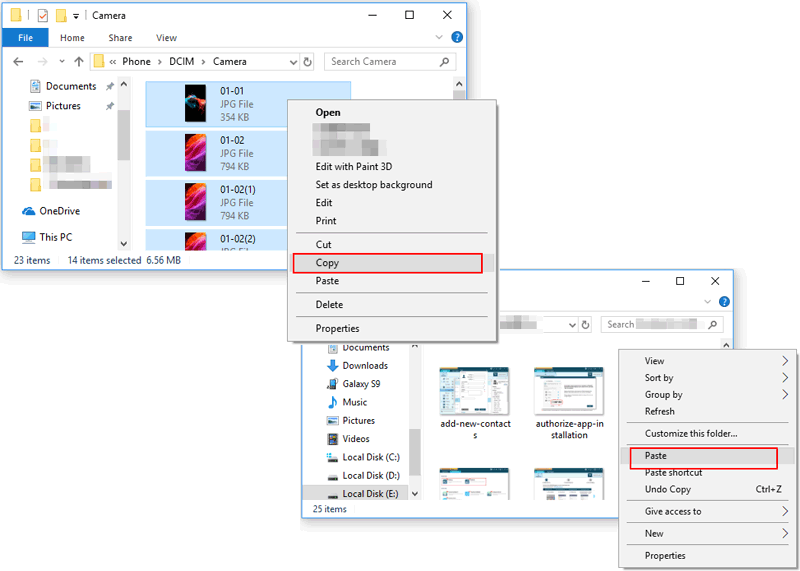
Offline handling via PC Only backup relies on manual file transfer through a USB connection. Users copy folders like DCIM, Downloads, and Documents from an iQOO phone to a computer for safekeeping. Restoring simply reverses the process by dragging the files back to the device. It is dependable for media storage but does not cover apps or system-level data.
Back Up
- Connect your iQOO phone to a PC using a USB cable.
- On your phone, select File Transfer (MTP mode).
- Open This PC > iQOO/Vivo device storage.
- Copy important folders such as: DCIM (photos/videos); Pictures; Download; Documents, or Music.
- Paste them into a folder on your PC hard drive.
- (Optional but recommended) Create a backup folder like: iQOO_Backup_2026.
Restore
- Connect your iQOO phone to the PC again via USB.
- Select File Transfer (MTP mode) on the phone.
- Open your backup folder on the PC.
- Copy the saved folders/files.
- Paste them back into the same locations on your phone (e.g., DCIM, Downloads).
- Wait for the transfer to complete.
- Restart your phone to refresh media files if needed.
My Testing Experience: In my test of PC-only backup, I connected the iQOO phone via USB and manually copied folders to a computer. The transfer speed for photos and videos was stable and depended mostly on the cable quality. Restoring was just as simple by dragging files back into the phone storage. The main limitation I noticed was the absence of app data or system settings backup.
Part 5: Back Up & Restore IQOO via Another IQOO Phone
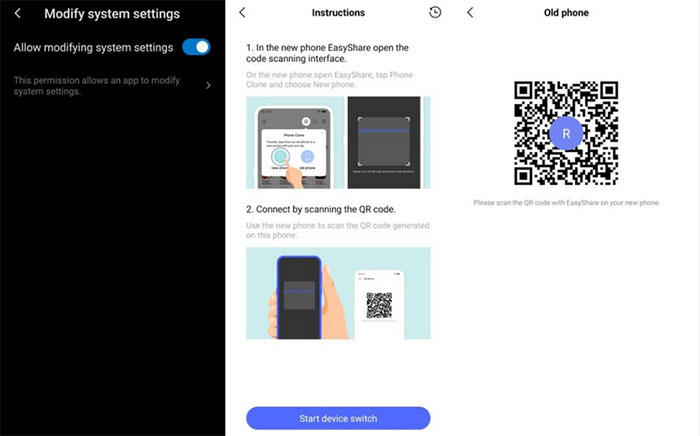
Device-to-device migration using another iQOO phone offers a fast local transfer experience. Data is sent directly between phones through tools like EasyShare without needing internet access. Contacts, apps, and media can be moved in one session, making it useful when upgrading devices. Still, some app data may require a separate login or cloud recovery after the transfer.
Back Up
- Install and open EasyShare on both iQOO phones.
- On the old iQOO phone, tap Phone Clone/Send.
- On the new iQOO phone, tap Phone Clone/Receive.
- The old phone will generate a QR code or hotspot connection.
- Use the new phone to scan the QR code or connect via Wi-Fi Direct.
- Wait until both phones are paired successfully.
- On the old phone, select the data you want to back up, such as: Contacts, Messages, Photos & videos, Apps (APK files), or Documents.
- Tap Start Transfer/Start Clone.
- Wait until the transfer is completed, then tap Finish on both devices. (Try an EasyShare substitute if this tool doesn't work)
* To restore the backup from new IQOO phone, repeat the above steps, but remember to swap the sender and receiever mentioned in the above steps.
My Testing Experience: When I tested transferring data between another iQOO phone, the connection via EasyShare was fast and required minimal setup. The QR pairing made linking both devices easy, and file transfer started almost immediately. Most photos, contacts, and apps appeared on the new phone after completion. However, I still had to manually log into several apps because not all app data was included.
FAQs about IQOO Backup & Restore
Q1. Does Google backup save everything on iQOO?
A: No. Google backup saves contacts, app list, and some settings, but not all app data or media files unless synced separately.
Q2. What does vivo Cloud back up?
A: vivo Cloud can back up contacts, messages, photos, system settings, and some app data depending on the model.
Q3. Can I restore data after a factory reset?
A: Yes, if you previously enabled Google backup or vivo Cloud and sign in with the same account during setup.
Q4. Does EasyShare create a backup file?
A: No. EasyShare does not directly create stored backup files; it transfers data directly between two devices (as a backup).
Q5. Will apps and game data be fully restored?
A: Not always. Apps may transfer, but game progress and login data often need separate cloud sync from the app itself.
Q6. What is the easiest way to back up an iQOO phone?
A: vivo Cloud is better for automatic backup, while MobiKin Backup Manager for Android is the easiest and safest for quick IQOO backup & restore, as mentioned above.
Related Articles:
IQOO Contacts Eraser: 5 Tools to Erase Contacts on IQOO Easily
How to Recover Deleted Photos from IQOO Internal Storage? 5 Tactics
5 Tried-and-true Methods to Unlock IQOO Phone without Effort
4 Clever Strategies to Transfer Contacts from Computer to IQOO