[Guide in 2023] How to Transfer Data from Old iPad to New iPad
If you bought a new iPad, or if multiple family members use different iPads, you may need to share data such as photos, videos, music, and other files. Apple has made it easy to transfer data from iPad to iPad Pro/Air/4/mini/3/2. Plus, using a professional iPad/iPhone transfer tool can help make this process easier and more efficient.
Transferring data from one iPad to another helps ensure all data is up to date and accessible on all devices. In the guide below, we'll explain what your options are for transferring your stuff from an old iPad to a new iPad, and how to do it.
- Way 1: How to Transfer Data from iPad to iPad via Quick Start
- Way 2: How to Transfer from iPad to iPad via iCloud Backup
- Way 3: How to Transfer Data from old iPad to New iPad via iTunes Backup
- Way 4: How to Transfer Data from one iPad to Another via AirDrop
- Way 5: How to Transfer Data from iPad to iPad with Third-Party Apps
Way 1: How to Transfer Data from iPad to iPad via Quick Start
Transferring data from one iPad to another using Quick Start is a simple and easy process. Here are the steps:
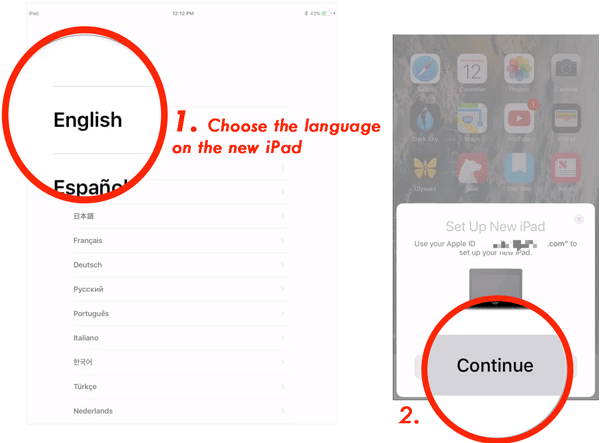
- Place both iPads near each other and turn on the new iPad.
- A pop-up message should appear on the old iPad asking if you want to use your Apple ID to set up the new iPad. Tap "Continue" on the old iPad.
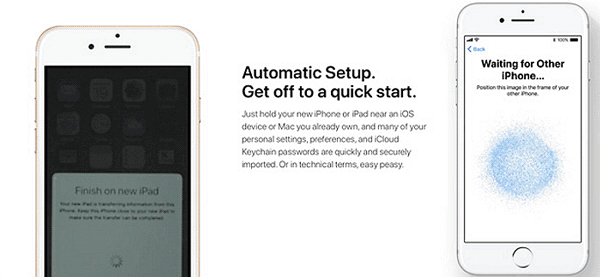
- Hold the new iPad over the old iPad, and the Quick Start screen should appear on the new iPad.
- Follow the on-screen instructions to set up your new iPad, including selecting a language, setting up Face ID or Touch ID, and entering your Apple ID and password.
- On the "Transfer Your Data" screen, select "Transfer from iPad" as the method to transfer data.
- A six-digit code should appear on the old iPad. Enter this code on the new iPad to confirm the transfer.
- Select the data you want to transfer, including apps, photos, contacts, and more. Tap "Continue" to start the transfer.
- Wait for the transfer to complete. Depending on the amount of data you are transferring, this may take some time.
- Once the iPad to iPad transfer is complete, you can use your new iPad with all of your old data and settings.
Check If You Need:
- How to Transfer Music from iPad to Computer with Ease?
- How to Transfer Videos/Movies from iPad to Computer? [5 Easiest Ways]
Way 2: How to Transfer from iPad to iPad via iCloud Backup
Complete iPad to iPad data transfer using iCloud Backup is a convenient way to transfer data wirelessly. Here are the steps on how to transfer to new iPad:
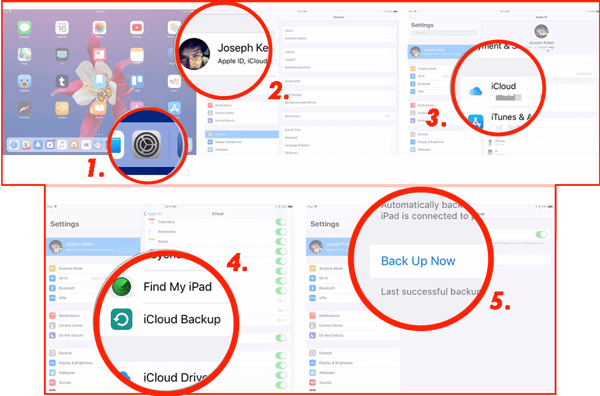
- Connect your old iPad to a Wi-Fi network and go to Settings > [your name] > iCloud > iCloud Backup.
- Turn on "iCloud Backup" and tap "Back Up Now" to create a backup of your data on iCloud. (iPad not backing up to iCloud?)
- Wait for the backup to complete. Depending on the amount of data you have, this may take some time.
- Turn on your new iPad and follow the on-screen instructions until you reach the "Apps & Data" screen.
- On the "Apps & Data" screen, select "Restore from iCloud Backup".
- Sign in with your Apple ID and select the backup you just created.
- Wait for the restore process to complete. This may take some time depending on the amount of data you have.
- Once the restore process is complete, your new iPad should have all of the data and settings from your old iPad.
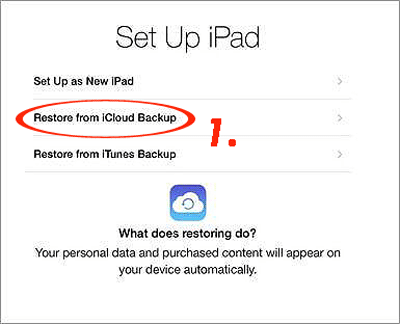
It's important to note that some data, such as music and videos, may not be included in the backup if they were not purchased from the iTunes Store or synced from a computer. You may need to manually transfer this data using other methods such as iTunes or third-party transfer tools.
Way 3: How to Transfer Data from old iPad to New iPad via iTunes Backup
How to transfer data from one iPad to another without iCloud? It is reliable for switching iPads using iTunes. Just follow the steps in the below:
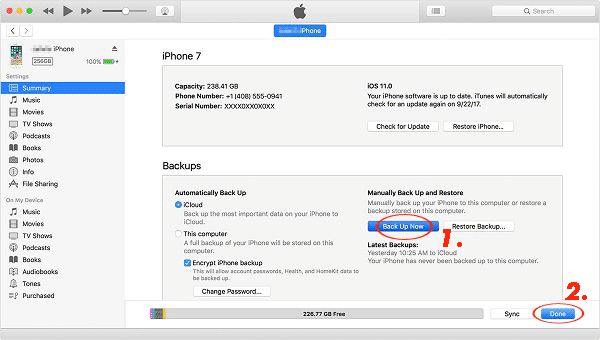
- Connect your old iPad to your computer and open iTunes.
- Click on the iPad icon in the top left corner of iTunes.
- Select "Back Up Now" to create a backup of your old iPad data on your computer. Wait for the backup process to complete.
- Disconnect your old iPad from your computer and connect your new iPad to your computer.
- Follow the on-screen instructions to set up your new iPad, including selecting a language, setting up Face ID or Touch ID, and entering your Apple ID and password.
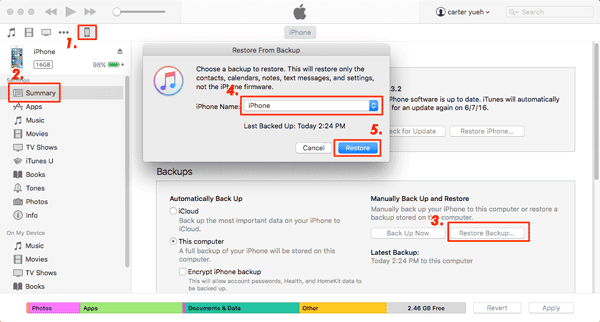
- On the "Apps & Data" screen, select "Restore from iTunes Backup".
- Select the backup you just created and click "Continue" to start the restore process.
- Wait for the iPad restore from iTunes backup process to complete. Depending on the amount of data you have, this may take some time.
- Once the restore process is complete, your new iPad should have all of the data and settings from your old iPad.
Check If You Need:
- How to Delete Google History on iPad Pro, Air, mini, 4
- How to Print Calendar from iPad Pro/Air/mini/4/3/2 in 6 Ways?
Way 4: How to Transfer Data from one iPad to Another via AirDrop
Want a fast and convenient way to transfer data from one iPad to another? You can use AirDrop. Then, how do I transfer everything from one iPad to another using AirDrop?
- Make sure that both iPads are connected to Wi-Fi and have Bluetooth turned on.
- On the iPad that you want to share from, open the app that contains the data you want to transfer (e.g. Photos, Contacts, Files, etc.).
- Select the files or data you want to share by tapping on them.
- Tap the "Share" button (which is usually an arrow pointing up out of a box) to bring up the Share Sheet.
- Tap on the AirDrop icon at the top of the Share Sheet.
- Wait for your other iPad to appear in the AirDrop section of the Share Sheet. Make sure that the person who owns the other iPad has also turned on AirDrop and set it to receive from "Everyone" or "Contacts Only" (depending on your preference).
- Tap on the other iPad's icon in the AirDrop section of the Share Sheet.
- Wait for the transfer to complete. Depending on the size of the files or data, this may take some time.
- Once the transfer is complete, the data should appear on the other iPad in the appropriate app or folder.
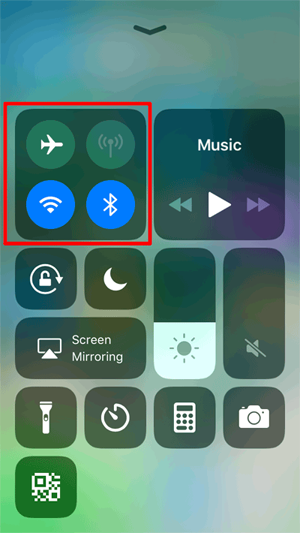
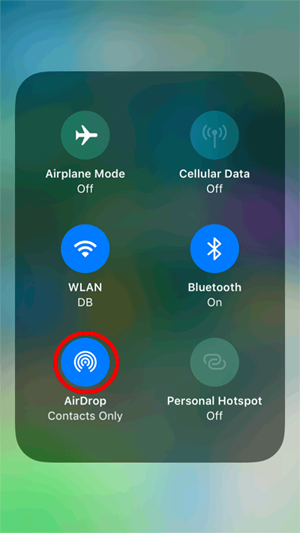
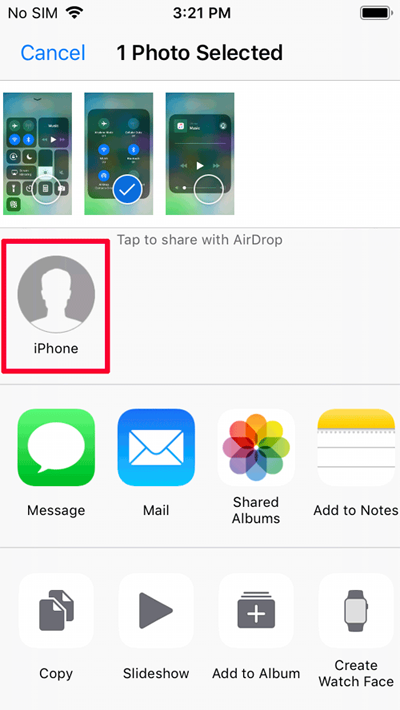
It's important to note that AirDrop works best for smaller files and data. For larger amounts of data, it may be better to use other methods such as iTunes backup or iCloud backup.
Way 5: How to Transfer Data from iPad to iPad with Third-Party Apps
MobiKin Transfer for Mobile is a software program designed to help users transfer data between different mobile devices, such as Android phones and tablets, iPhones, iPads, and iPods. With MobiKin Transfer for Mobile, users can transfer a wide range of data types, including contacts, notes, calendars, bookmarks, books, and more from one iPad to another.
Core Features of Transfer for Mobile
- Transfer data from iPad to iPad with one click.
- Allows users to transfer data between different mobile devices and operating systems, including Android and iOS devices.
- Supports the transfer of various data types, including contacts, text messages, photos, videos, music, call logs, and more.
- Users can select specific types of data to transfer, allowing them to transfer only the data they need.
- Uses advanced technology to ensure fast and efficient data transfer between devices.
- The data transfer process is secure and reliable, ensuring that no data is lost during the transfer process.
How to transfer information from one iPad to another using Transfer for Mobile? Follow these steps:
Step 1: Install the program and connect your devices to the computer.
Download and install the Transfer for Mobile software on your computer. Connect both of your iPads to your computer using USB cables and launch the software. It will then scan both of your iPads and display them on the screen.
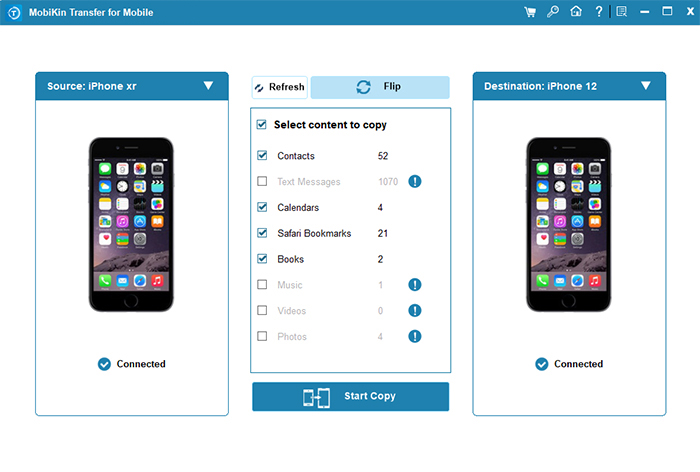
Step 2: Confirm the source and destination devices
Ensure that the source iPad is listed on the left side and the destination iPad is on the right side. If they are not listed correctly, you can use the "Flip" button to switch their positions.
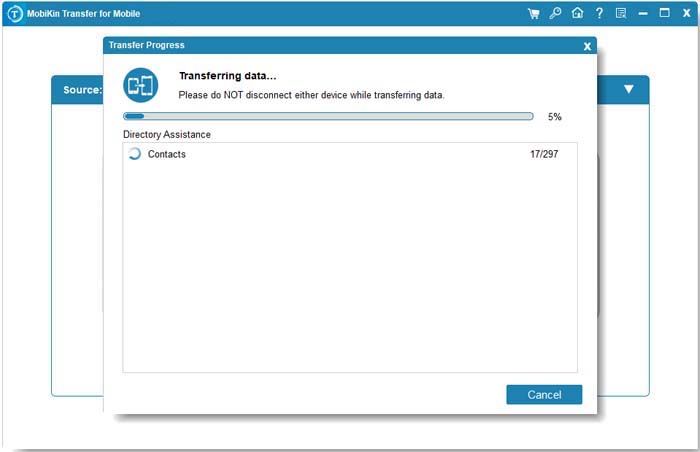
Step 3: Transfer data from old iPad to new iPad
Choose the data types you want to transfer from the source iPad to the destination iPad. After that, click the "Start Copy" button to begin transferring data from the source iPad to the destination iPad. The transfer progress will be displayed on the screen, and you can check the transferred data on the destination iPad once the transfer is complete.
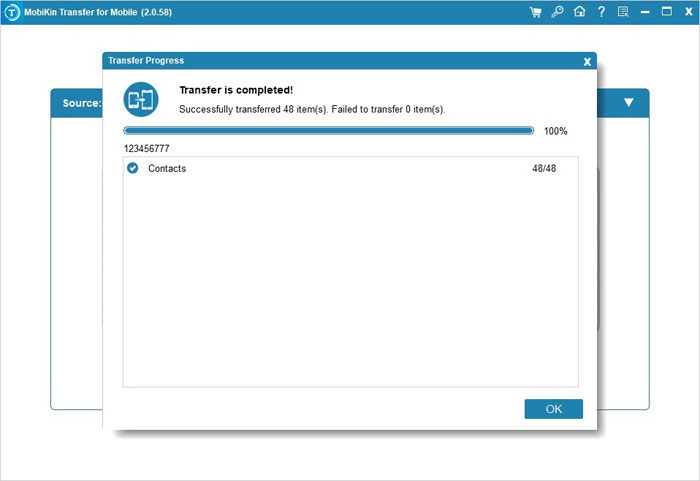
Please note that during the iPad data transfer process, make sure both iPads are connected to the computer and do not disconnect them until the transfer is complete.
Sum Up
Above, we have many options to finish the new iPad transfer from old iPad. You can choose wired or wireless methods according to your needs. However, if you want the fastest method, a wired connection to your computer will be your best option. MobiKin Transfer for Mobile makes the process super easy and fast, so you can start using your brand new device in no time, whether it's an iPad mini 6, M2 iPad Pro, or iPad Air 5.
Related Article:
How to Switch Android Phones without Trouble? 6 Ways & Some Helpful Tips
Locked out of iPad? 6 Easy Ways Help You Unlock iPad without Password
How to Retrieve Deleted Music from iPad on PC or Mac
5 Ultimate Ways to Transfer Music from iPad to iPhone 14/13/12/11/Xs Max?
How to Restore iPad from iPhone Backup? 3 Worry-free Options Here


