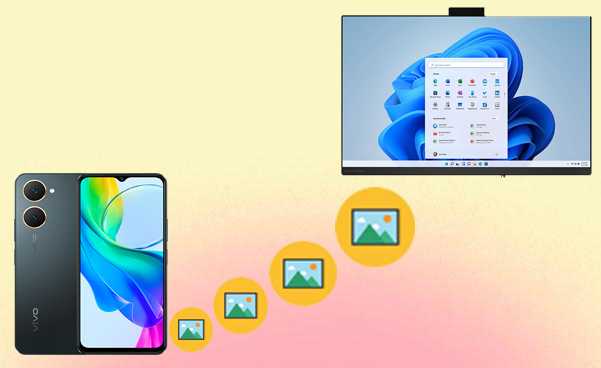
5 Options to Transfer Photos from vivo to PC via USB/WiFi
"Why is my vivo phone not connecting to a PC for file transfer?" -- from Quora
Over time, images on vivo phones can quickly take up a lot of storage space, and it's important to find ways to back them up on a more secure or larger device like a PC. Additionally, organizing images for higher resolution or printing them from a PC can also be the reason why you may need to make the transfer swiftly.
If you're unsure how to transfer photos from vivo to PC, don't worry! In this post, we shall compile 5 easy solutions for transferring your photos, including both wired and wireless options and covering the advantages and disadvantages of each avenue.
- Option 1: How to Transfer Photos from vivo to PC via USB Cable Only
- Option 2: How to Transfer Photos from vivo to PC via USB or Wirelessly [Flexible]
- Option 3: How to Transfer Photos from vivo to PC Windows 11/10/8/7 via EasyShare
- Option 4: How to Transfer Pictures from vivo Phone to PC via Google Photos
- Option 5: How to Copy Photos from vivo to PC via Windows Photos App
Option 1: How to Transfer Photos from vivo to PC via USB Cable Only
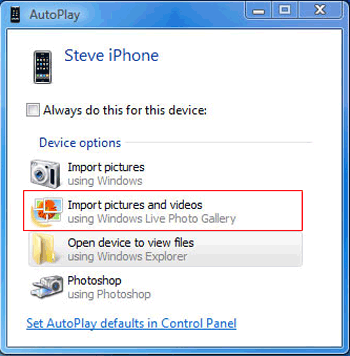
AutoPlay is a Windows feature that automatically prompts options when you connect your vivo phone via USB. To transfer photos, select "Import photos and videos" from the AutoPlay menu, and the transfer will begin automatically to your chosen folder. This makes photo transfer quick and easy with just a USB cable. Below is the specific drill:
- Connect your vivo phone to a computer via USB.
- The computer will automatically install the necessary mobile driver and recognize the device.
- If AutoPlay does not activate, enable it by navigating to "Start > Control Panel > Hardware and Sound AutoPlay" and check "Use AutoPlay for all media and devices."
- Next, swipe down from the top of the Google Pixel screen and select either "Media device (MTP)" or "Camera (PTP)" in the "Connect as" section.
- Ensure the Pixel drivers are installed on your computer. A window will appear automatically.
- Select "Import pictures and videos" and follow the on-screen instructions to transfer vivo images to the PC.
It's also a good idea to transfer photos from vivo to a PC via File Explorer using a USB cable only. To do it: Connect your vivo phone to the PC with a USB cable. On your phone, select File Transfer mode. Open File Explorer on your PC and find your vivo device under This PC. Navigate to the DCIM folder and select the photos. Drag and drop them into a folder on your PC.
The Good:
- Works natively with Windows, so no additional apps are needed.
- Easy transfer using just a USB cable.
The Bad:
- Offers basic file transfer without advanced features like selective syncing or backup.
- The feature may not automatically detect your device and prompt you to transfer photos.
Option 2: How to Transfer Photos from vivo to PC via USB or Wirelessly [Flexible]
Are you looking to establish a flexible connection between your vivo phone and computer for quick and stable photo transfers? Consider utilizing the reliable software - MobiKin Assistant for Android (available for both Windows and Mac). This exceptional tool enables the seamless copying of various file types.
Its user-friendly interface and robust security measures position this software as an excellent choice for transferring data between your mobile device and PC. Additionally, it provides advanced functionalities that enhance data management directly on your computer.
Main Features:
- Transfer photos from vivo to PC/Mac without error.
- Migrate data between Android and computer selectively.
- Offer 1-click options to back up and restore your device data easily.
- Work for a broad range of data types, including contacts, call logs, messages, media content, apps, etc.
- Let you manage your phone pictures and other stuff on a computer.
- You can choose from Wi-Fi or USB for swift transfers.
- Work well with 8,000+ Android devices, covering V31/V29/V27/V25/V23/V21/V9/V9 Youth/Pro/V8/V7/V6, X100/X90/X80/X70, etc.
- Highly secure and delivers a free trial.


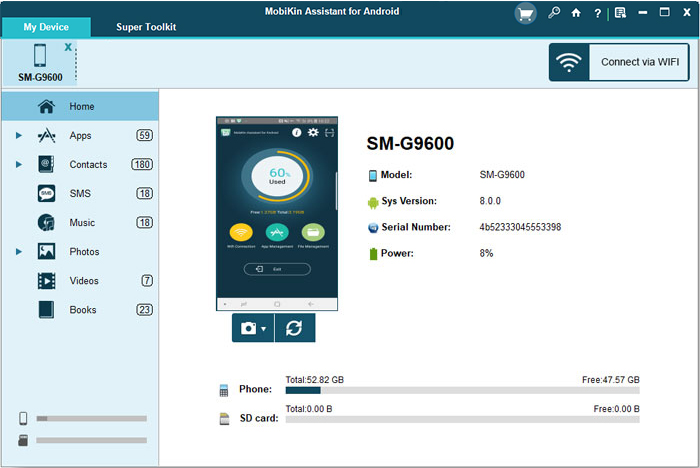
How can I use MobiKin Assistant for Android for photo transfers from vivo to PC?
Step 1. Initiate the software - Begin by launching the tool on your PC and link your vivo to the system using a USB cable. If USB debugging is not activated on your device, please enable it. Subsequently, follow the instructions to install the USB driver on your PC to establish a virtual connection with your phone.
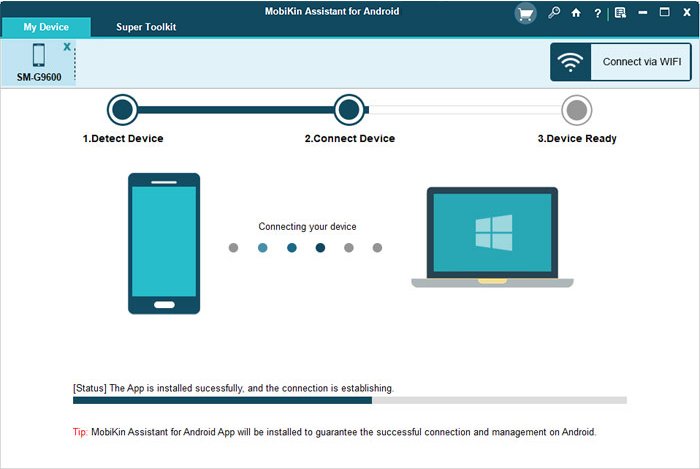
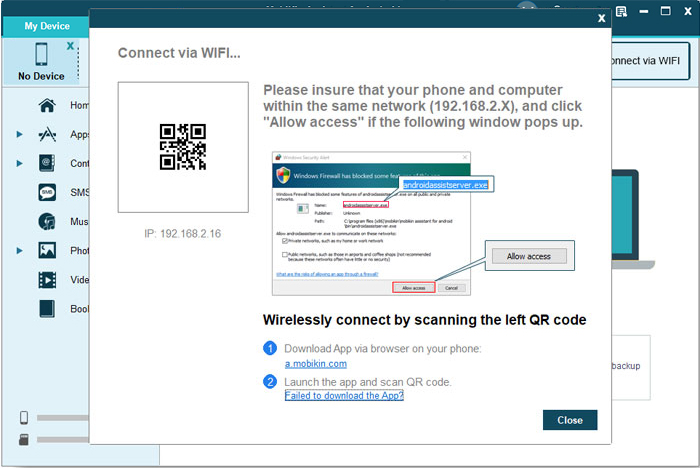
If your vivo phone isn't connecting via USB, try Wi-Fi. Open the program on your PC, select "Connect via WiFi," then download and install MobiKin Assistant for Android (Android version) on your vivo. Scan the QR code on your PC using the app, ensuring both devices are on the same network. For more reference, please click here>>.
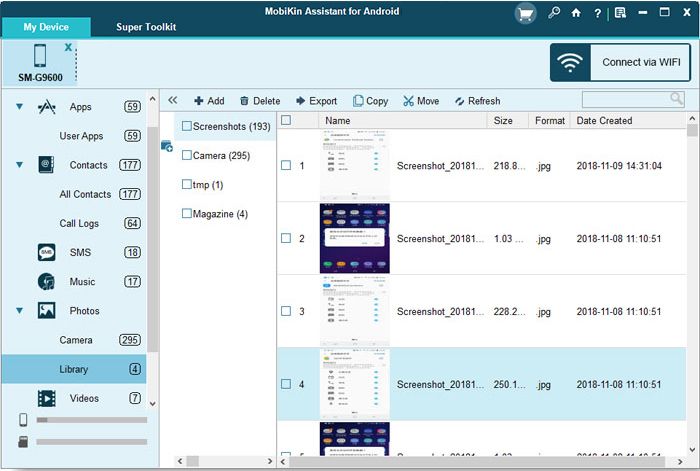
Step 2. Access and choose - After your device is recognized, a window will appear showcasing its data and details. Locate the "Photos" folder in the left panel to examine its content.
Step 3. Transfer images - Choose the images you intend to transfer to your computer. Finally, click the "Export" button located in the upper window to commence the transfer process from your vivo phone to your PC.
Video Instructions:
The Good:
- Allows for easy management of all phone data, including photos, contacts, and apps.
- Can connect both via USB or Wi-Fi for more flexibility.
- Supports full device backup and restores, ideal for managing multiple types of data.
The Bad:
- Full features require a paid version.
Option 3: How to Transfer Photos from vivo to PC Windows 11/10/8/7 via EasyShare
EasyShare is a file transfer application developed by vivo, enabling users to swiftly transfer photos, videos, contacts, and various other files between devices without requiring cables or an internet connection. The application facilitates cross-platform transfers among vivo smartphones, Android devices, iPhones, and computers. Here's how it works:
- Ensure the EasyShare app is installed on your vivo phone from the Google Play Store.
- You may also need to install the EasyShare desktop version on your PC, or you can use the web version depending on the app's features.
- Open EasyShare on both your vivo phone and PC.
- Ensure both devices are connected to the same Wi-Fi network or pair them via Bluetooth or a direct connection.
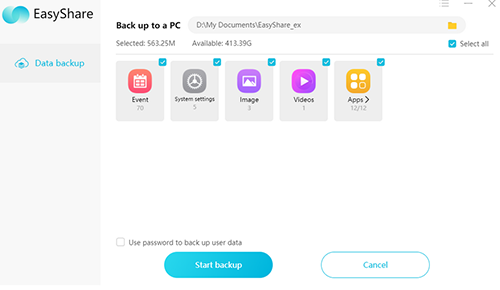
- On your vivo phone, open EasyShare and navigate to the Photos section.
- Select the photos you want to transfer.
- Once the pictures are selected, choose your PC as the destination device in EasyShare.
The Good:
- Works across vivo, Android, iOS, and PC, making it versatile.
- Uses Wi-Fi Direct, not reliant on internet connections.
The Bad:
- Transfer speeds may be slower or prone to error compared to USB-based methods.
- Both your phone and PC need the EasyShare app, limiting its use to supported devices.
Option 4: How to Transfer Pictures from vivo Phone to PC via Google Photos
Google Photos is a cloud service that automatically backs up your photos. To transfer photos from your vivo to your PC, upload them to Google Photos on your smartphone, then access and download them from the web on your PC. It's an easy way to share photos between devices without needing a USB cable. To see how it operates:
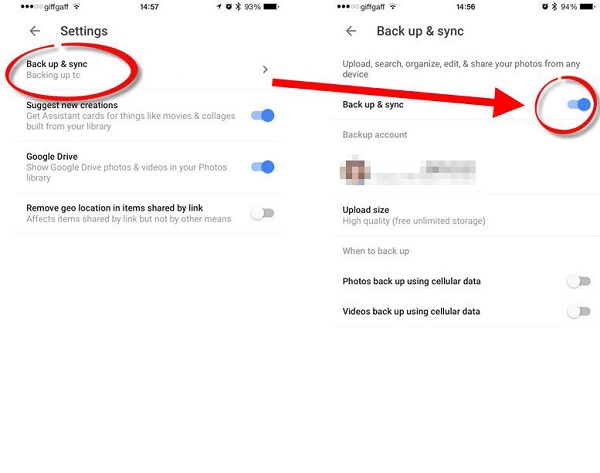
- Upon completing the installation, open Google Photos on your vivo device.
- Subsequently, tap on the three dots icon located at the top of your phone.
- Select and enable "Backup & sync". Allow some time for all your pics to be successfully backed up. (Google Photos failed to back up?)
- Next, access photos.google.com using your computer's web browser to view all your stored photos.
- Lastly, choose the files you wish to download and click on the "Download" icon to transfer them to your computer.
The Good:
- Automatically backs up photos to the cloud.
- Easy to download photos on your PC from any browser without cables.
- Works across Android, iOS, and PC platforms.
The Bad:
- Free storage is limited, and high-quality backups count against your Google storage.
- Photos may be compressed if backup quality settings are not set to original quality.
- Syncing may take time, especially for high-resolution images or videos.
Option 5: How to Copy Photos from vivo to PC via Windows Photos App
The Windows Photos app offers a simple, built-in way to import photos directly from a vivo phone to a PC when connected via USB. You can rely on its straightforward import feature to copy selected pictures without needing extra drivers or cloud uploads. Once transferred, the app also allows basic editing and organization, making it a handy tool for managing vivo photos on a Windows computer. Learn how it operates:
- Connect your vivo phone to PC using a USB cable.
- On your phone, select File Transfer (MTP) mode.
- Open Microsoft Photos on your computer.
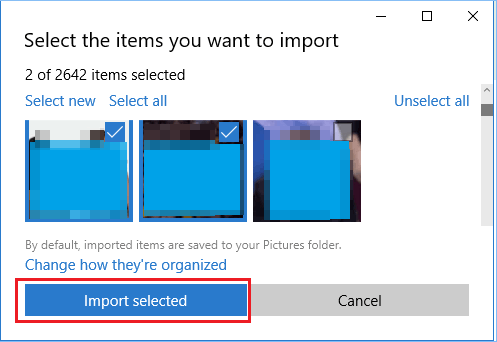
- Click the Import button in the top-right corner.
- Choose From a USB device.
- Wait while the app scans your phone for photos.
- Select the photos you want to transfer.
- Click Import Selected to start transferring.
- Find the files in Pictures > Imported Pictures on your PC.
The Good:
- Simple and beginner-friendly import process.
- No need to manually search folders like DCIM or Pictures.
- Allows selecting specific photos before importing.
- Built-in Windows tool, no extra installation required.
- Organizes imported photos automatically into folders.
The Bad:
- Can be slow when importing large numbers of photos.
- Requires a stable USB connection and proper MTP mode.
- Limited file management control compared to File Explorer.
- Sometimes fails to detect the device properly.
- Not ideal for advanced users who want full folder-level control.
The End
After considering all the methods, you're recommended to try MobiKin Assistant for Android for a flexible connection and smooth photo transfer experience. This tool provides the convenience of both USB and Wi-Fi transfers, making it easy to move your images to your PC without limitations.
Always back up your photos regularly to avoid the risk of losing precious memories, especially when switching devices or before performing a factory reset on your vivo phone.
Hot Articles:
vivo to vivo Data Transfer: 5 Ways to Copy Data from vivo to vivo
4 Clever Strategies on How to Recover Deleted Photos from File Safe in vivo
Top 4 Methods to Root Vivo Phone Like a Pro [Easy & Quick]
4 Useful Methods to Unlock vivo Phone If Forgot Password/Pattern