
2 Ways to Recover Deleted Data from Phone Memory for Android
TL;DR:
Recovering data from Android internal memory can be challenging, so stop using your phone and act quickly to reduce the risk of deleted files being overwritten. MobiKin Doctor for Android offers a straightforward way to scan and recover supported files from internal storage or an SD card, while the advanced manual method requires more technical knowledge.
To improve your chances of recovering lost data, choose a suitable recovery method and back up your Android phone regularly.
Older Android phones often relied on SD cards to expand limited storage, but modern devices typically offer more internal space. Still, storing everything in internal memory raises concerns about how to recover data if files are accidentally lost. In fact, this is what we will show you in this article. We will tell you how to recover data from Android phone memory with ease.

Watch the video below for a quick introduction to this topic.
Part 1. Is It Possible to Recover Data from Phone Memory for Android
Under normal circumstances, people would think that recovering data from the internal memory of an Android device is much more difficult than recovering from an SD card (Differences among internal, phone, & external storage?). But you don't have to think like this, because as long as you select the appropriate phone memory recovery software for your Android device, everything will become easy.
You might be concerned that when you accidentally delete some data from your Android device's internal storage, it's gone for good and can't be found anywhere. But don't worry - these deleted files haven't truly vanished. In fact, they still exist on your Android device, and there's a strong chance they can be recovered.
However, we need to take some precautions to increase the probability of successful data recovery and avoid permanent data deletion.
- You must not restart your Android device multiple times to prevent losing the chance of recovering lost data from the internal memory.
- When you accidentally delete important data, stop using your Android phone immediately. If you continue to use the phone after deleting the data, the newly generated data may overwrite the deleted data, so you will never be able to restore them.
- Solve the problem as quickly as possible, the earlier you act, the easier it is to retrieve the lost data. Procrastination will only make the situation worse.
- Use safe and reliable phone memory recovery software to help you recover lost data.
- The best way to prevent data loss on Android phones is to back up data on your device regularly.

Can't Miss:
Part 2. How to Recover Data from Android Phone Memory [Easiest Way]
You may have lost important Android phone data due to improper operation, accidental deletion or formatting of the device. But no matter what the reason is, finding the right internal memory software to recover the lost data is the most important thing.
Here, you can try MobiKin Doctor for Android (with its Mac version) for free, it is an all-round Android data recovery software that can recover almost all files from the phone memory and even on the external memory card.
Core Features of this phone memory recovery software for Android:
- Scan internal memory of Android phone and recover lost data with one click.
- Supports various file types, including photos, videos, music, call logs, contacts, SMS and many more.
- Be able to recover deleted data from both internal memory and external SD card on Android.
- Supports 6,000+ Android device models, various Android OS, including Samsung, Sony, Motorola, Huawei, Xiaomi, etc.
- No data will be collected or leaked from the customer service.
- Stable and 790,000+ users have downloaded it.
Download with Confidence: No ads, bundled apps, or background uploads.


How to Use It?
Step 1. Run the program and connect your Android phone
Connect your Android device to computer using a digital cable. Launch the program after you downloaded and installed it. Then, you may need to enabled USB debugging on your smartphone so that the computer can detect the internal memory successfully.
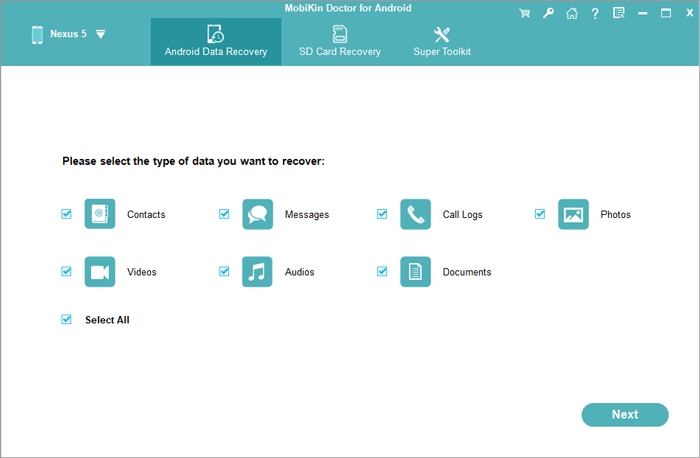
Step 2. Preview and select files from recovery
All recoverable data types are displayed on the interface. Just tick off the data types you want to recover and click "Next". Then, the program will start scanning for files and then you can see an interface that will display Android files in details.
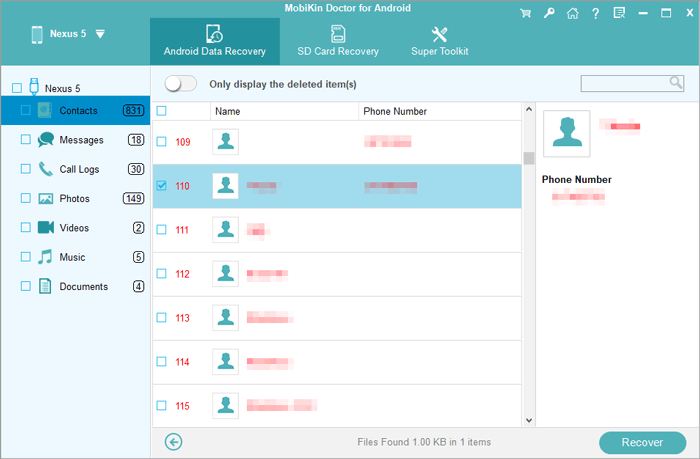
Can't find the data you need? You can try to root your Android device to make the program get access to your Android internal memory deeply.
Step 3. Start the data recovery from phone memory
Preview and mark the deleted files you want to get back and then give a click on the "Recover" button to save the selected files to your computer completely.
Vide guide on phone internal memory data recovery:
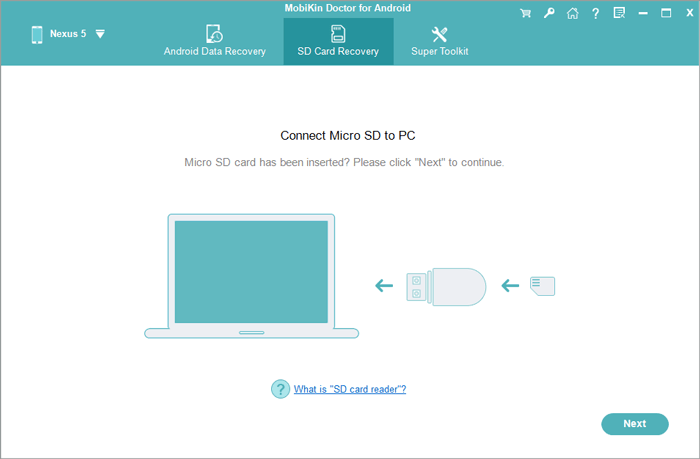
By they way, if you need to recover lost data from Android SD card directly, you can go to "SD Card Recovery" tab from the top menu, mount the SD card to the computer and then Doctor for Android will start to scan and SD card and restore the lost data for you. Here is a detailed guide teaching you how to recover lost data from Android SD card.
Can't Miss:
Part 3. How to Recover Data from Android Phone Internal Memory [Advanced Way]
The following is a more complicated method to implement phone memory recovery for Android method to recover data from Android phone internal memory. And maybe the first few attempts will not succeed immediately. And first you have to make sure your Android device has been rooted. So, if you are already a computer expert and have a wealth of computer knowledge, you can continue reading.
The general procedure is that we need to copy the internal storage of the phone to a RAW file, and then convert it to VHD format. After that, we install a virtual hard disk into Windows Disk Management, and then use a reliable data recovery tool to scan the virtual hard disk. Feel a bit embarrassed? Below, we will explain the specific operation steps clearly in detail:
Step 1: Make an image for your Android internal memory
- First, we need to create an image of the internal memory of your Android phone. To do that, you need to resort to a tool called FileZilla. Just install and run it on your computer.
- When running FileZilla on your computer, go to its general settings. Select Listen to these ports tab and list the value of 40. Then select the timeout tab and enter 0 for the connection timeout.
- Next, click Users settings> Add New User, you can choose to add a password here.
- Then, you can enable read and write operations to save the changes to C:\cygwin64\000. Here, C: is the drive where Windows is installed.
- After completing the above operations, now, you need to install the Android SDK on your computer. Then copy adb.exe, ADB-windows.exe, AdbWinApi.dll, and then fastboot.exe files, and paste it at C:\cygwin64\bin.
- Now, you can connect your Android device to the computer and make sure that USB debugging is turned on. Then, launch the Command Prompt and enter the command:
adb shell
su
find /dev/block/platform/ -name 'mmc*' -exec fdisk -l {} \; > /sdcard/list_of_partitions.txt - In the above command, the "list_of_partitions" refers to the distinction data of your Android device. Continue to type the following commands here and copy them to a safe folder:
ADB pull /sdcard/list_of_partitons.txt C: /cygwin64/00 - After that, start the file and manually find the file or data information you want to recover.
- Now, you need to open up another tab and enter the following details:
adb shell
su
mkfifo /cache/myfifo
ftpput -v -u qwer -p pass -P 40 192.168.42.79 mmcblk0p27.raw /cache/myfifo - Here "qwer" and "pass" are the users and passwords respectively, followed by the port number and server address.
- Run another console and type the following command:
adb shell
su
dd if=/dev/block/mmcblk0p27 of=/cache/myfifo - Among them, "mmcblk0p27" is the location of data loss on our mobile phone. Different phones may have different locations.
- Then, FileZilla will take a copy of your data on this Android device and save it in a folder named "000". Now, all you need to do is to wait patiently for the completion of this process.

Step 2: Convert your RAW file to VHD format
- After successfully copying the data, now you need to convert this RAW file to VHD format, which is virtual hard disk format. In this case, it can be mounted on the system.
- Download the VHD tool, and then copy the VHDTool.exe file in the working folder. This is the "000" folder mentioned above. Launch console again, go to the folder, and type the following:
cd C:/cygwin64/000/ VhdTool.exe /convert mmcblk0p27.raw - After the conversion is completed, the file name will have the RAW extension, but it can be used as a virtual hard disk.
Step 3: Use this file as a virtual disk on Windows computer
- Go ahead and use the converted file as a virtual hard disk on Windows. To do this, first you need to enter the "Disk Management"> "Settings"> "Action"> "Attach VHD" option on the Windows computer.
- Then, enter the location of the file "C:\cygwin\nexus\mmcblk0p12.raw". Right-click it so that the disk can be initialized and then go to GPT. Of course, you can also right-click the blank space and select "New Simple Volume".
- Continue to follow the wizard to complete the operation, and then enter the new letter to assign the drive.
- Then, right click on your RAW file and format it as FAT32.

Step 4: Start the phone memory recovery for Android
Once all the above steps are successfully completed, you can now use any free data recovery tool to scan the virtual disk you just installed on the system. Generally, you also need to provide the drive letter of the virtual disk you allocated in the previous step so that the recovery tool knows where you are performing data recovery.
In Conclusion
The two methods offer different ways to recover Android internal memory data, but the second is more complicated and may have a lower success rate.
If you don't want to go through any trouble and want to complete the recovery process simply and smoothly, then you only need to use MobiKin Doctor for Android directly. It is easy to operate, and the recovery success rate is as high as 98%. It is a rare professional Android recovery software.
It is recommended that you add this page to the bookmark. Next time you encounter a problem about phone storage recovery, you can click into this article. We will also continue to update the page content in order to provide you with better and more complete information.
Related Articles
3 Practical Ways to Recover Data from Water Damaged Android Phone/Tablet
How to Back Up Android Phone to PC without Google Drive? [With FAQs]
iPhone Memory Recovery: How to Recover Data from iPhone Internal Memory?
SOLVED: Why Is My Android Phone Storage Full after Deleting Everything? [9 Ways]