
How to Back Up iPhone Before Switching to New iPhone? Technical Tips
TL;DR:
- Backing up your old iPhone before switching to a new one helps protect important files and prevents unexpected data loss during migration.
- Whether you choose iCloud, Finder, iTunes, Quick Start, or MobiKin Assistant for iOS, make sure your backup or exported files are complete before proceeding.
- Finally, restore your data, check essential apps and accounts, and erase your old iPhone only after confirming that everything important is safely transferred.
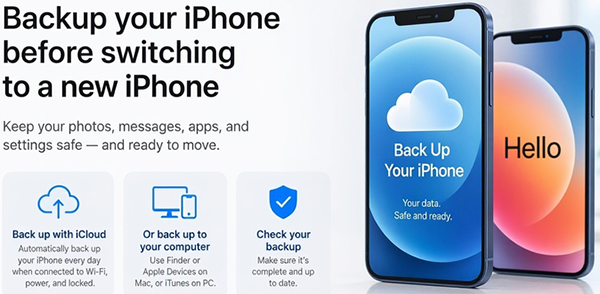
A new iPhone brings exciting features, but transferring data from an old device can be stressful if you worry about losing important files. Many users want to make sure their old iPhone's data is safely backed up before setting up their new device to avoid unexpected interruptions or transfer failures.
This passage explains how to back up iPhone before switching to new iPhone using practical methods such as iCloud, iTunes, Finder, and third-party tools.
- Part 1. What to Do Before Backing Up Your iPhone?
- Part 2. How to Back Up iPhone Before Switching to a New iPhone? (5 Ways)
- Part 3. What Data Should You Back Up Separately Before Switching iPhones?
- Part 4. How to Restore Your Backup to a New iPhone?
- Part 5. How to Make Sure Everything Has Been Transferred Successfully?
- Part 6. FAQs About Backing Up iPhone Before Switching to a New iPhone
Part 1. What to Do Before Backing Up Your iPhone?
Before proceeding with an iPhone backup, several preparations can help prevent interruptions, storage issues, and data loss. Consider the following essential checks to ensure your device and important app data are ready for a smooth backup process.
- Check Your iPhone Storage: Review available storage and identify large files that may affect the backup process.
- Check Your iCloud Storage: Make sure your iCloud account has sufficient space if you plan to use iCloud Backup.
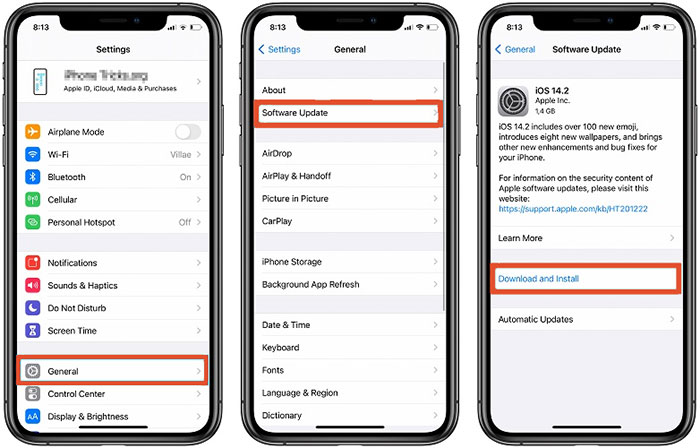
- Update iOS: Install a compatible iOS version to reduce potential problems during backup and restoration.
- Check Your Apple Account Credentials: Make sure you know your Apple Account password and can complete two-factor authentication.
- Charge Your iPhone and Connect to Wi-Fi: Keep the device sufficiently charged and use a stable network for wireless backups.
- Review Important App Data: Check whether banking apps, authenticator apps, WhatsApp, and other applications require separate backup or transfer procedures.
Part 2. How to Back Up iPhone Before Switching to a New iPhone? (5 Ways)
The following table compares five popular options to help you choose the most suitable method based on your storage, device, and backup needs:
|
Method
|
The Good
|
The Bad
|
|
MobiKin Assistant for iOS
|
Selectively or bulk exports supported files to Windows/Mac |
Not a complete iOS system backup |
|
iCloud
|
Wireless and convenient cloud backup |
Requires sufficient iCloud storage |
|
Finder
|
Creates local Mac backups with encryption options |
Requires a Mac and enough disk space |
|
iTunes/Apple Devices
|
Supports local Windows backup and restoration |
Requires a computer |
|
Quick Start
|
Transfers data directly between two iPhones |
Both iPhones must remain available during migration |
Way 1. Back Up iPhone to Computer Using MobiKin Assistant for iOS
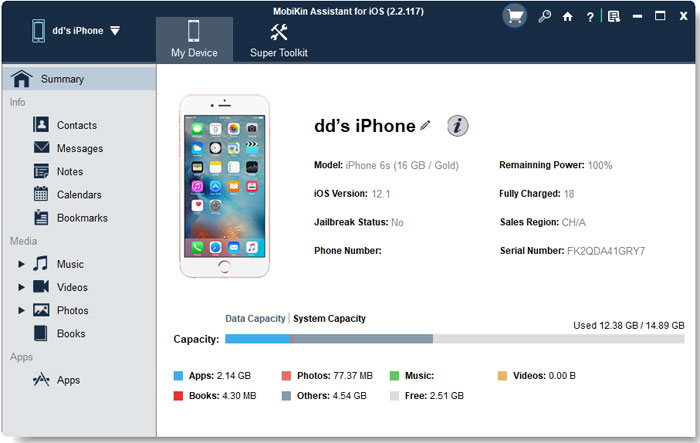
If you prefer to manage individual files rather than merely create a complete device backup, MobiKin Assistant for iOS (Windows/Mac) offers a more selective approach. This product allows you to export contacts, messages, photos, videos, and other supported data from your old iPhone to a computer before switching devices.
You can then import compatible files to your new iPhone, although this process is different from a full-device backup and restoration. Further, it also facilitates you to bulk back up and restore your iPhone 18/17/16/15/14/13/12/11/X/8/7 locally without iTunes/Apple Devices.
Secure Download: Free from ads, unwanted bundles, and background uploads.


How to Use?
- Download and install MobiKin Assistant for iOS on your computer.
- Connect your iPhone to the computer using a USB cable and tap Trust if prompted.
- Launch the program and wait for it to recognize your iPhone.
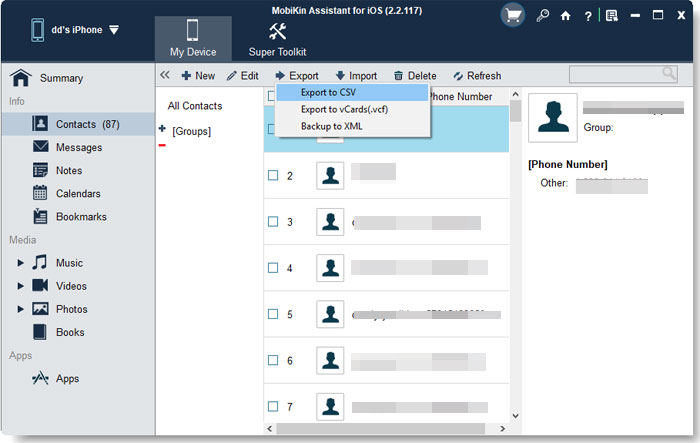
- Select the data categories you want to back up, such as contacts, messages, photos, and videos.
- Click Export to save the selected files to your computer.
Video Guide:
Further Exploration: iCloud vs. Local iPhone Backup: Which Is Better? [Comprehensive Comparison]
Way 2. Back Up iPhone to iCloud
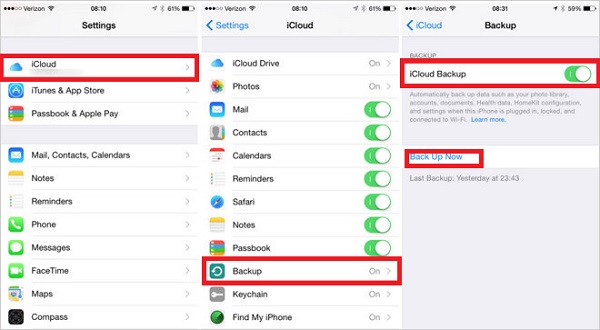
iCloud Backup lets you save your iPhone data wirelessly without connecting it to a computer. Before switching to a new iPhone, make sure you have enough iCloud storage and a stable Wi-Fi connection. Then follow these steps:
- Open Settings on your old iPhone.
- Tap your Apple Account name at the top and select iCloud.
- Tap iCloud Backup.
- Turn on Back Up This iPhone if it is not already enabled.
- Tap Back Up Now to start a manual backup.
- Keep your iPhone connected to Wi-Fi until the backup finishes.
- Check the latest backup date and time under Last Successful Backup.
Way 3. Back Up iPhone to Mac Using Finder
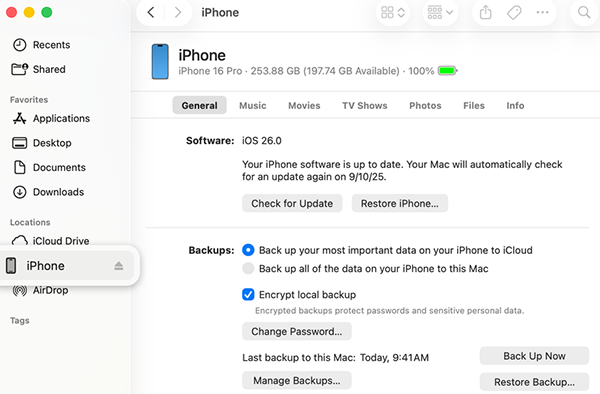
For Mac users preparing to switch to a new iPhone, Finder provides a built-in way to create a local backup of the old device. It saves most device data and settings to the Mac, allowing you to restore them when setting up your replacement iPhone. An encrypted backup can also preserve sensitive information, including saved passwords, Wi-Fi settings, and Health data. Learn how to do it:
- Connect your iPhone to your Mac using a USB cable.
- Open Finder and select your iPhone under Locations.
- Click General and select Back up all of the data on your iPhone to this Mac.
- To protect sensitive information, select Encrypt local backup and create a password.
- Click Back Up Now and wait for the process to finish.
Way 4. Back Up iPhone to Windows PC Using iTunes or Apple Devices
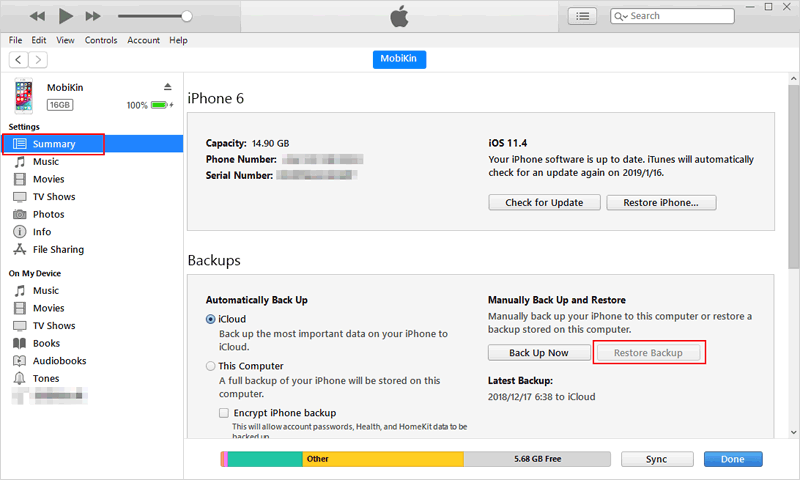
Windows users can rely on iTunes (Apple Devices) to back up their existing iPhone before moving to a new one. The backup is stored on the computer and can later be restored to the new iPhone through the same application. You can also encrypt the backup to include additional information that a standard local backup may leave out. Learn how to do this:
- Connect your iPhone to your Windows PC using a USB cable.
- Open Apple Devices or iTunes, depending on the app installed on your computer.
- Select your iPhone and open the General or Summary section.
- Choose Back up all of the data on your iPhone to this computer.
- Enable Encrypt local backup if needed, then click Back Up Now.
Way 5. Back Up iPhone Directly to Your New iPhone Using Quick Start
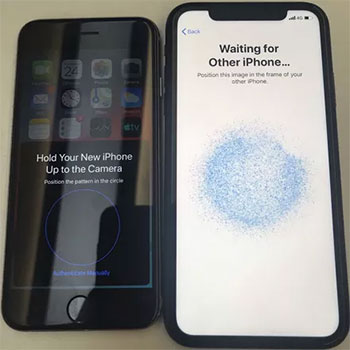
For those who want to move their data without using a computer, Quick Start supports direct iPhone-to-iPhone data transfer during the initial setup of a new device. Place the two iPhones close together, follow the on-screen instructions, and choose to transfer data from the old iPhone. This method saves you the trouble of creating a separate computer backup, as the transfer takes place directly between the two devices. Learn how to do it:
- Turn on your new iPhone and place it near your old iPhone.
- Make sure Bluetooth is enabled on your old iPhone and both devices are connected to Wi-Fi.
- Follow the on-screen Quick Start instructions and use your old iPhone to scan the animation on the new device.
- Enter your old iPhone's passcode on the new device and set up Face ID or Touch ID.
- Select Transfer from iPhone and keep both devices close to each other and connected to power until the transfer finishes. (Does Quick Start copy everything?)
Part 3. What Data Should You Back Up Separately Before Switching iPhones?
Before switching to a new iPhone, remember that some app data may not be included in standard backups and may require separate transfers. Pay special attention to the following:
- WhatsApp and Messaging Apps: Back up chat history, photos, videos, and attachments using each app's transfer or backup feature.
- Authenticator Apps: Transfer 2FA accounts and save recovery codes to avoid losing access to your accounts.
- Banking and Payment Apps: Check reactivation requirements, identity verification, and device registration procedures.
- eSIM and Cellular Plans: Confirm your carrier's eSIM transfer process before removing the old cellular plan.
- Photos and Videos: Verify cloud synchronization or export important media to a computer.
- Notes, Voice Memos, and Files: Sync or manually export locally stored documents and recordings.
- Health and Fitness Data: Check iCloud synchronization or use an encrypted computer backup.
- Passwords and Safari Data: Ensure saved passwords, bookmarks, and other browsing information are synchronized.
My Point of View: Keep your old iPhone intact until you have checked your important apps, restored essential files, and confirmed that your new device can access your accounts. Some services require the old device to approve a new login, so erasing it too early can make the transition more difficult.
Part 4. How to Restore Your Backup to a New iPhone?
If you previously exported selected iPhone data using the methods above, you can import those files to your new device without restoring a complete backup. Follow these steps to transfer your saved contacts, messages, photos, and other supported files.
Option 1. Restore from a Mac or Windows PC Backup
- Turn on your new iPhone and follow the initial setup instructions.
- On the Transfer Your Apps & Data screen, select From Mac or PC.
- Connect your iPhone to the computer containing your backup.
- Open Finder, iTunes, or Apple Devices and select your new iPhone.
- Click Restore Backup, choose the desired backup, and enter its encryption password if required.
- Keep your iPhone connected until the restoration process finishes.
Option 2. Import Files Exported Using MobiKin Assistant for iOS
- Install and launch MobiKin Assistant for iOS on your computer.
- Connect your new iPhone using a USB cable and tap Trust if prompted.
- Wait for the software to recognize your device.
- Open the corresponding data category, such as Contacts, Messages, or Photos.
- Select the Import option and browse for the files previously exported from your old iPhone.
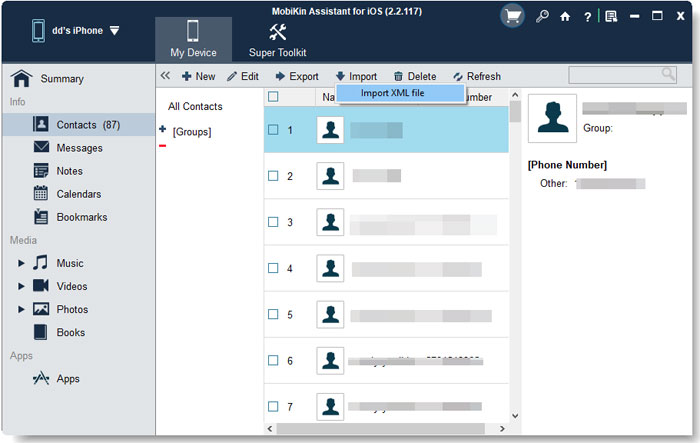
- Choose the files you want to transfer and complete the import process.
Part 5. How to Make Sure Everything Has Been Transferred Successfully?
After transferring data to your new iPhone, take a few minutes to check that important files, settings, and accounts are available. Use the following checklist to avoid missing anything:
- Check Contacts and Messages: Open the Contacts and Messages apps to confirm your conversations and contact details are intact.
- Verify Photos and Videos: Browse your Photos library and check whether recent pictures and videos are present.
- Test Important Apps: Open banking, messaging, email, and authenticator apps to ensure they work properly.
- Review Notes and Files: Check iCloud Drive, Notes, Voice Memos, and other document folders.
- Check Account Access: Confirm that your Apple Account, email accounts, and password manager work as expected.
- Test Cellular and Network Connections: Make sure calls, SMS, mobile data, Wi-Fi, and Bluetooth function normally.
- Review Health and App Data: Check fitness records, WhatsApp chats, and other app-specific information.
Part 6. FAQs About Backing Up iPhone Before Switching to a New iPhone
Q1. How long does it take to back up an iPhone before switching?
The time depends on how much data your iPhone contains, your internet speed, and the backup method. A small backup may take a few minutes, while a large one can take several hours.
Q2. Can I transfer everything from my old iPhone to a new one?
Most settings, photos, messages, contacts, and app data can be transferred using Quick Start, iCloud, or a computer backup. However, some banking apps, authenticator accounts, and messaging data may require separate transfers or reactivation.
Q3. Will backing up my iPhone delete any data?
No. Creating an iCloud or computer backup does not remove existing data from your iPhone. Your original files remain on the device unless you manually delete them or erase the iPhone.
Q4. Do I need a SIM card in my new iPhone before transferring data?
No. You can generally transfer data over Wi-Fi without inserting a physical SIM card. However, you may need to activate your SIM or eSIM separately to use cellular services.
Q5. Can I use my new iPhone while restoring a backup?
Some basic setup activities may be available during restoration, but apps, photos, and other content may continue downloading in the background. For the best results, keep your new iPhone connected to Wi-Fi and power until everything finishes.
Q6. When can I erase my old iPhone after switching?
Erase your old iPhone only after confirming that your important data, accounts, photos, messages, and apps are available on the new device. Also, make sure you've transferred your eSIM and authenticator accounts before resetting the old phone.
Related Articles:
[Solved] How to Recover Data from Wiped iPhone with/without Backup?
Compare iPhones: Comprehensive Comparison of iPhone 17 Series [Hot]
5 Popular Ways to Mirror iPhone/iPad to Windows 11/10 [2026 Updated]