ZTE FRP Bypass: 5 Easy Options to Bypass FRP on ZTE Securely
Some people reset their phones and later realize they cannot remember the Google account used before the ZTE reset. Others purchase a second-hand device where the previous owner didn't remove their Google account. In situations like these, many users begin searching for practical solutions related to ZTE FRP bypass so they can access the device again.
This article covers 5 practical methods to make the bypass process a lot easier for ZTE users.
Part 1: Perform ZTE FRP Bypass via TalkBack Accessibility
Access to certain system menus during the setup stage can sometimes make it possible to bypass FRP on ZTE Blade, Axon, Nubia, and RedMagic series through TalkBack accessibility bypass. This approach uses accessibility gestures to open TalkBack settings and reach help resources that may contain links to other apps.
From there, users may navigate to a browser or system settings page. Once additional options become available, the Google account restriction can sometimes be removed or bypassed.
How-to Guide:
- Turn on the ZTE phone and connect it to Wi-Fi on the setup screen.
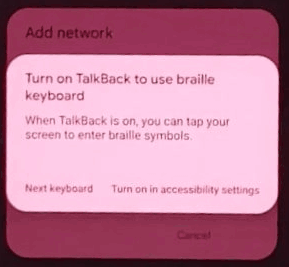
- Press Volume Up + Volume Down together to enable TalkBack.
- Draw an L-shaped gesture on the screen to open the TalkBack menu.
- Tap TalkBack Settings and disable TalkBack if needed.
- Enter Help & Feedback in the settings page.
- Open a help article that contains a YouTube video link.
- Tap the video and open YouTube, then access a browser link from there.
Part 2: Bypass FRP on ZTE with YouTube & FRP APK
A route to external webpages during device setup may allow FRP removal on some ZTE phones through the YouTube & FRP APK tool method. The process typically begins by opening a YouTube link from the help section and then switching to a browser such as Chrome.
After reaching a website, certain APK files like QuickShortcutManager related to Google account management can be downloaded and installed. These apps may create an opportunity to add a new Google account or access hidden system activities.
How-to Guide:
- Access YouTube through the Help & Feedback page.
- Tap the profile icon or video share option.
- Choose Open in Chrome or another browser.
- Visit a website that provides FRP bypass files.
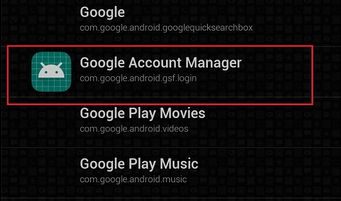
- Download Google Account Manager and QuickShortcutManager APK.
- Install the apps and open QuickShortcutManager.
- Launch the Google Account login activity and sign in with a new account.
Part 3: Bypass ZTE FRP via SIM Card PIN Trick
Notifications triggered during SIM authentication can sometimes create an opening for navigation beyond the setup screen with the SIM card PIN trick. In this method, a SIM card with a PIN lock is inserted so that the device prompts for verification.
The notification panel or related settings may then become accessible. From those areas, users might reach device settings or a browser to work around the FRP restriction on ZTE phones.
How-to Guide:
- Insert a SIM card with a PIN lock enabled.
- Restart the device while on the setup screen.
- When the SIM PIN request appears, enter the PIN to unlock it.
- Pull down the notification panel.
- Tap SIM or network notifications that lead to settings.
- From settings, access a browser or other apps.
- Add a new Google account or reset the device again.

You Might Also Like: SIM Unlock: 4 Hot Tips to Unlock SIM Card on Android Mobile Phones
Part 4: Remove ZTE FRP Lock via Offline Setup Bypass
Some firmware versions allow device configuration to proceed without full account verification through the Offline setup bypass technique. The idea relies on completing the initial steps without maintaining an active internet connection.
When the setup process continues offline, the Google sign-in step may be skipped on certain models. After reaching the home screen, a new account can be added normally in system settings.
How-to Guide:
- Power on the ZTE device and start the normal setup process.
- Select your preferred language and follow the on-screen instructions until you reach the connection stage.
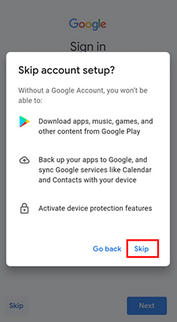
- At the screen that asks you to connect to WiFi, choose the Skip option if it is available.
- If the phone automatically connects, turn off WiFi or remove the network to keep the device offline.
- Follow the remaining setup prompts without reconnecting to the internet.
- Some ZTE firmware versions allow the process to continue even without a network connection.
- When the Google account login page shows up, look for Skip or Not now. Selecting this option may allow you to move past the verification step.
- Complete the rest of the setup, including basic preferences such as date, time, and security settings.
- Continue until the phone finishes loading the system interface.
- Open Settings > Accounts > Add account > Google. Sign in with a new Google account so the device can be used normally afterward.
Part 5: Bypass FRP on ZTE via PC FRP Unlock Tool [The Highest Success Rate]
Situations where manual methods fail often lead users to try software utilities such as Android Lock Wiper for FRP removal on ZTE devices. The program works from a computer and guides users through a connection and unlocking procedure.
Once the process begins, the tool attempts to remove the Google account lock automatically. After completion, the device can usually be set up again without requiring the previously synced account.
|
Android Lock Wiper - Core Feature
|
Description
|
|
FRP Bypass |
Removes Google Factory Reset Protection (FRP) so the ZTE phone can be accessed without the previous Google account or password. |
|
Remove Android Screen Locks |
Unlocks various lock types such as PIN, password, pattern, fingerprint, and face lock. |
|
Wide Device Compatibility |
Supports thousands of Android phones and tablets from brands like ZTE, Samsung, Xiaomi, Huawei, Motorola, OPPO, and more. |
|
No Google Account Required |
Allows users to remove FRP without knowing the original Google account credentials. |
|
Simple PC-Based Operation |
Works through a computer program where the phone is connected via USB and guided steps complete the unlocking process. |
|
Firmware Package Installation |
Downloads and installs firmware packages needed to complete the FRP removal procedure. |
|
Screen Unlock Without Data Loss (Limited Devices) |
Some supported models can remove screen locks without deleting existing data. |
How-to Guide:
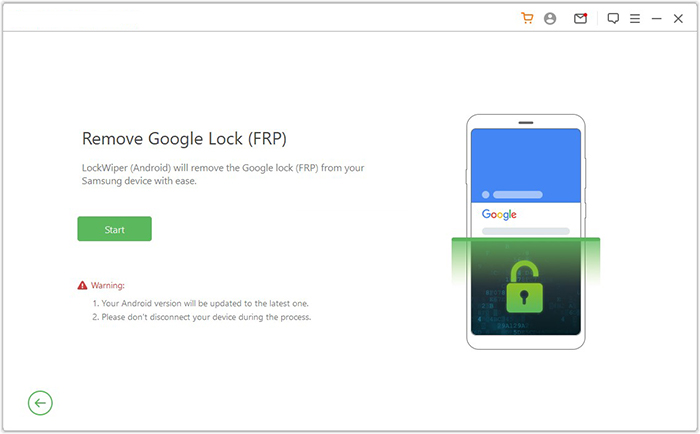
- Start by downloading and installing the software on your computer. Once this is done, select "Remove Google Lock (FRP)" and opt for "Advanced Mode."
- Connect your ZTE device to the computer using a USB cable, then click "Start." It is recommended to back up your ZTE to avoid any possible data loss during the FRP bypass procedure.
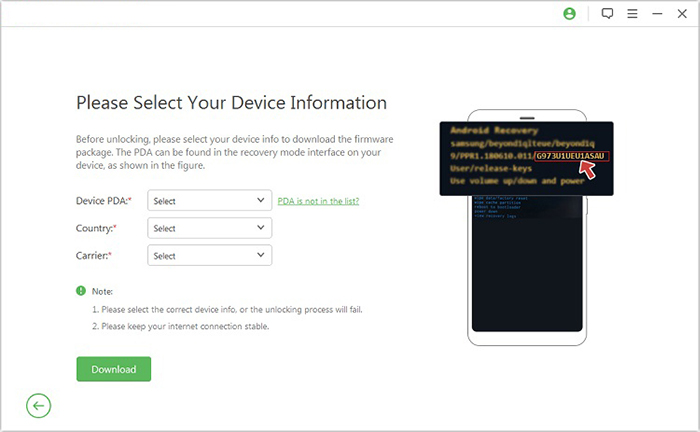
- Follow the instructions to input the required details about your Android device and click "Next." Adhere to the on-screen guidance to enter recovery mode on ZTE.
- On the next screen, choose the correct PDA, country, and carrier, then click "Download" to retrieve the necessary data package.
- Subsequently, click "Start to Extract," and follow the on-screen prompts to put your device into Download Mode, enable USB debugging, turn on OEM unlock, and extract the firmware along with other essential tasks.
- Ultimately, the software will initiate the unlocking process for your smartphone. After a short notification, you will be able to access your device without needing to verify any Google account.

The End
FRP protection helps prevent unauthorized access, but it may also block legitimate users who cannot verify the original Google account. After reviewing several possible solutions, choosing a reliable and efficient approach becomes important.
For those who prefer a quicker and more straightforward way, Android Lock Wiper offers a convenient option to remove FRP locks without complicated procedures. With a simple process and broad device compatibility, it can help regain access to a ZTE phone and continue using the device normally.
Related Articles:
How to Transfer Photos from ZTE Phone to Computer [Fixed!]
Forgot Password on ZTE Phone? 5 Tips to Unlock ZTE Phone Pattern without Losing Data
How to Backup and Restore ZTE Phone? 4 Reliable Ways Here!
5 Methods to Transfer Data from ZTE to Samsung Galaxy S26/S25/S24/S23/S22
