5 Smart Ways for Google Pixel FRP Bypass [Based on Our Tests]
"My friend recently bought Pixel 10 based on my approval; the seller found the phone after a concert in a different country. The Pixel he got is stuck at Pin/Email Verification after a factory reset. Any tips on Google Pixel FRP bypass?" -- from Reddit
Many individuals find themselves in a difficult situation when they get stuck at the Google verification screen after a hard reset and can't continue setting up the phone. This protection feature - known as Factory Reset Protection (FRP) - is meant to secure your data, but it can also lock you out if you no longer remember the account credentials.
This passage walks you through 5 feasible ways that you commonly explore when dealing with FRP on a Google Pixel, helping you understand the choices available and the precautions to keep in mind.
![]()
Part 1: Perform Google Pixel FRP Bypass with a Professional Program
Description:
Some users seek a practical solution to regain access when their devices are locked, and Android Lock Wiper is often mentioned as a reliable option for bypassing FRP on Pixel phones. It is designed to remove Google verification without needing the original account details.
People value its user-friendly interface, which simplifies what is normally a complicated process. This tool helps restore device usability, especially when the owner has forgotten their login credentials.
Main Features:
- Removes various Android screen locks, including PIN, pattern, password, fingerprint, and face ID.
- Supports FRP & Google account verification removal for brands such as Pixel, Samsung, Xiaomi, Redmi, and OnePlus.
- Can unlock Samsung screen locks without data loss in supported scenarios.
- Allows users to factory reset Android phones and tablets in about 5 minutes.
- Compatible with 6,000+ Android devices, including models running Android 15.0.
- Designed for lawful use only with the informed consent of the device owner.
- Offers a step-by-step on-screen guide to make the process easier, even for beginners.
- Provides regular updates to support new Android versions and device models.

How to Bypass?
- Download and install the phone unlocker software on your computer.
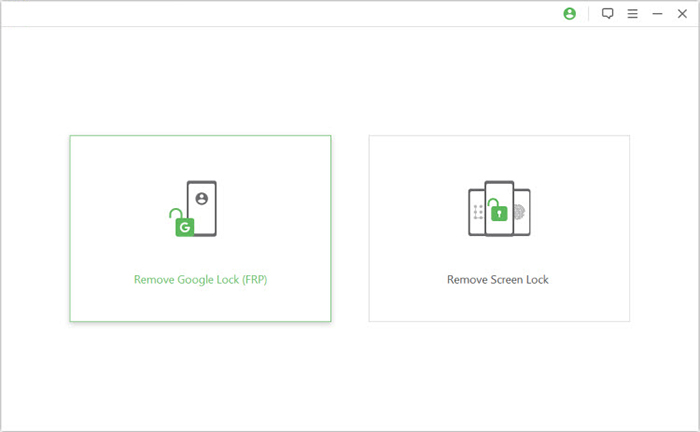
- Then, choose the "Remove Google Lock (FRP)" option and select "Advanced Mode.
- Connect your Google Pixel device to the computer via a USB cable.
- Cick "Start" to begin the Google lock removal process.
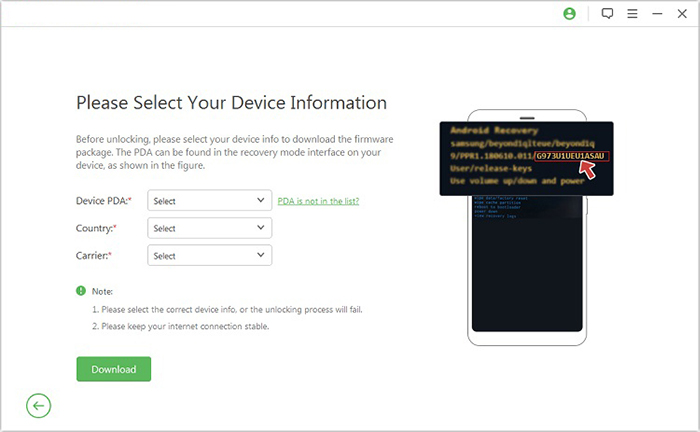
- Follow the prompts to select your Pixel information, then click "Next."
- Complete the on-screen instructions to put your device into Recovery Mode.
- On the next screen, select the correct PDA, country, and carrier.
- Click "Download" to fetch the required data package.
Part 2: Bypass Google Pixel FRP Using TalkBack Settings
Description:
There is also a built-in accessibility feature known as TalkBack Settings, which can sometimes be leveraged in FRP-related workflows on Pixel devices. By navigating through special accessibility menus, users may gain access to certain system settings.
This feature appeals to those looking for alternative routes when standard verification becomes an obstacle. It highlights how built-in tools can occasionally support FRP bypass-related scenarios in specific conditions.
How to Bypass?
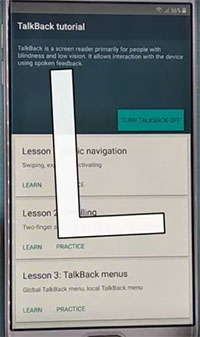
- Power on Pixel > Assistive Options > Vision > TalkBack > Activate TalkBack > Draw "L" shape.
- From TalkBack prompt > TalkBack Settings > Hold Volume Up + Down to deactivate TalkBack temporarily.
- Scroll to Braille Keyboard > Set up Braille keyboard > Settings > Enable TalkBack Braille keyboard.
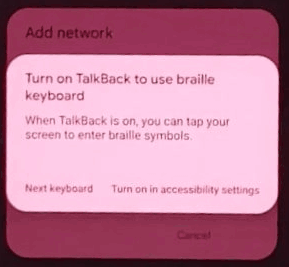
- Go to WiFi > Add new network > Tap keyboard icon > Select TalkBack Braille keyboard.
- Accessibility Menu > Interaction controls > Accessibility > Assistant > Keyboard icon > Next keyboard > Type "Google" > Enter.
- On the Google page > Microphone > Say "Open settings." Apps > Show system > Android Setup > Force stop.
- Google Play Services > Disable > Return to welcome screen > Accessibility > Assistant > Finish setup > Re-enable Google Play Services.
Part 3: Bypass Google Pixel FRP via FRP Bypass APK
Description:
Another method people discuss online involves installing an application known as FRP Bypass APK to help remove Google verification on Pixel phones. This app is typically used when the account credentials are not available. Many consider it a lightweight workaround because it avoids more complex flashing procedures. It is often referenced in conversations about regaining control of locked Android devices.
How to Bypass?
- Prepare the APK: Get the latest FRP Bypass APK file on your computer and copy it to a USB drive.
- Connect & Install: Connect the USB drive to your locked Pixel using an OTG cable. Open the File Manager when prompted and install the APK file.
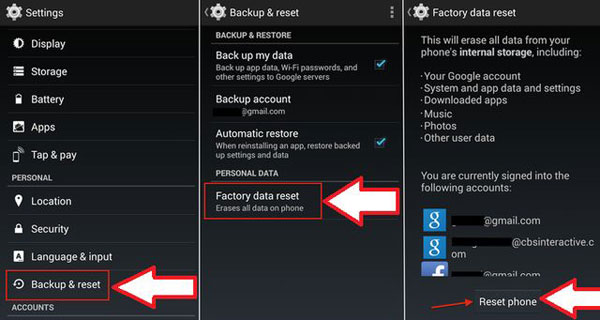
- Factory Reset: Launch the phone's Settings, go to Backup and Reset, and select Factory data reset.
- Confirm to reset the phone. (Steps differ across Android models - shown here on a Pixel 7.)
- Finish: The phone will reboot. After the reset, the FRP lock should be cleared, allowing you to set up the device without the previous Google account.

Part 4: Bypass FRP Lock on Google Pixel via SIM Pin Code
Description:
Security features built into mobile networks also come into play, and the SIM Pin Code method is sometimes linked with FRP bypass attempts on Pixel phones. Certain SIM-based prompts can potentially trigger alternative setup screens. This approach is valued by users who prefer not to rely on third-party software tools. It shows how device and network interactions can influence access-control situations.
How to Bypass?
- Eject SIM & Connect WiFi: Remove the SIM card and connect the phone to a WiFi network.
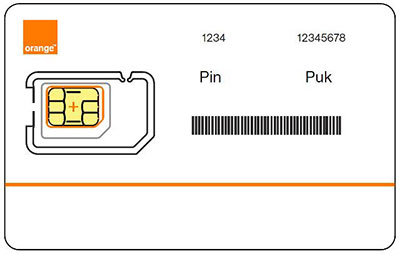
- Bar the SIM Card: Re-insert the SIM card. When prompted, enter the wrong SIM PIN repeatedly until the device asks for a PUK code. Enter the wrong PUK code repeatedly until the SIM card is blocked or becomes useless.
- Trigger the Menu: Click the Padlock icon on the lock screen. When a warning appears, select All Options or a similar choice to access a menu.
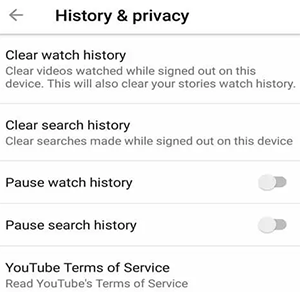
- Access YouTube and Chrome: From that menu, search for and open YouTube. Go to YouTube's Settings, then History & privacy to view its terms of service. This should open the Chrome browser.
- Search & Reset: In Chrome, search for "settings" or use voice search to open the device's Settings app. From there, perform a Factory Reset.
- Setup: After the reset completes, the FRP should be cleared. You can proceed with the new device setup.
Are there risks involved in attempting SIM-based FRP workarounds? Yes. Possible risks include device instability, setup failure, or triggering additional security locks if the process is interrupted or misused. Any attempt to remove FRP should only be done with the explicit consent of the lawful device owner. Laws and policies vary by region. What if your Pixel phone is SIM-locked?
Part 5: Bypass Pixel FRP Lock with Pangu FRP Bypass
Description:
Finally, users sometimes refer to Pangu FRP Bypass as another solution created specifically for removing Google account locks from Pixel devices. It is designed to help users overcome FRP restrictions when login details are forgotten. The program is particularly appreciated by those seeking a straightforward utility. Its reputation comes from offering an additional path toward regaining device access.
How to Bypass?
- Download & Extract: Obtain the Pangu FRP Bypass software on a Windows computer and extract the files.
- Prepare the Phone: On the locked Pixel, navigate to the setup screen. Connect to a Wi-Fi network.
- Access Accessibility Menu: Use the voice assistant or a series of gestures (like the "L" shape for TalkBack mentioned in your first query) to open the Accessibility Menu.
- Open a Browser: From the Accessibility Menu, find and open the Chrome browser.
- Download Mode: On the computer, run the Pangu executable. It would instruct you to put the phone into Download Mode (usually by holding specific buttons like Volume Down + Power while connecting the USB cable to the computer).
- Run the Bypass: With the phone in Download Mode and connected, you would run the "Bypass" or "Start" command in the Pangu software. The tool would attempt to flash or modify system partitions to disable the FRP check.
- Reset & Setup: After the process, the phone would reboot. You would then perform a Factory Reset (via recovery mode: often Volume Up + Power). After the reset, you could ideally set up the phone as new.

Overall, recovering access to a Google Pixel affected by FRP requires care, patience, and lawful ownership of the device. By understanding your options available, you can choose the safest and most appropriate path forward.
Additional Tips:
If you're locked out of your phone, here are safe and legitimate options that do work:
- Recover your Google account via Google's official recovery page.
- Wait 24-72 hours if the password was recently changed (Google may block sign-in temporarily).
- Contact the device manufacturer or authorized service center with proof of purchase.
- If it's a second-hand phone, ask the previous owner to remove the device from their Google account remotely.
- Check your backups so nothing important is lost while resolving access.
Related Articles:
8 Quick Fixes to Google Pixel File Transfer Not Working [2026]
How to Recover Deleted Contacts on Google Pixel? 4 Reliable Options
[Tutorial 2026] How to Bypass Android Lock Screen Using Camera
How to Recover Data after Factory Reset Android? 5 Ingenious Ways
