ASUS Backup & Restore: 5 Ways to Back Up & Restore ZenFone 12/11/10/9
ASUS is highly praised for its high-grade ZenBook, and ZenFone, developed in recent years, is also catching on by its endurance and high-quality after-sales service.
Well, you know, most of us spend a bulk of time on our mobiles in daily lives. And there are lots of photos, videos and contacts, etc., closely related to us. Nowadays, many people have been aware of the importance of backing up files before a hard reset or something nasty happens to their gadgets.
Now, if you don't know how to do ASUS Backup and Restore better, just check this article with 5 smart ways for you.
- Method 1: How to Conduct ASUS Backup and Restore with Android Backup and Restore
- Method 2: How to Back Up and Restore ASUS with Google Account
- Method 3: How to Back Up ASUS ZenFone 5/6/7 and Restore It Using ASUS Backup App
- Method 4: How to Carry out ASUS ZenFone Backup and Restore with a USB Cable Only (Media Files)
- Method 5: How to Back Up and Restore ASUS ZenFone Using SD Card (Contacts Only)
Method 1: How to Conduct ASUS Backup and Restore with Android Backup and Restore
It's a prudent precaution in case something unexpected occurs to your ASUS mobile. So choosing a professional utility is a sage option. Here, MobiKin Backup Manager for Android can fully satisfy your needs. It is well capable of taking a complete and stable backup to ensure a painless experience. To keep this handy tool, you'll thus use the ASUS ZenFone to its fullest with confidence that you won't lose anything for good.
Currently, it only works for various Windows-based desktops or laptops. And it'll come with its Mac version shortly afterwards.
Core highlights of this Android Backup and Restore software:
- Back up Android contacts, call history, text messages, videos, music, documents, apps, etc. to a computer intactly.
- Restore backup files to your phone safely and conveniently.
- Can be used to add another backup folder to the list for restoring.
- Easy to connect your phone via a USB cable or WiFi, and intuitive to preview the data types.
- User-friendly, off-line running, and ad-free.
- Deliver smooth performance on various Android devices, including the latest ZenFone 12, etc., as well as Samsung, Sony, Huawei, Xiaomi, OPPO, and many more.
Wow, so magic! Just download its trial version to give it a shot now.


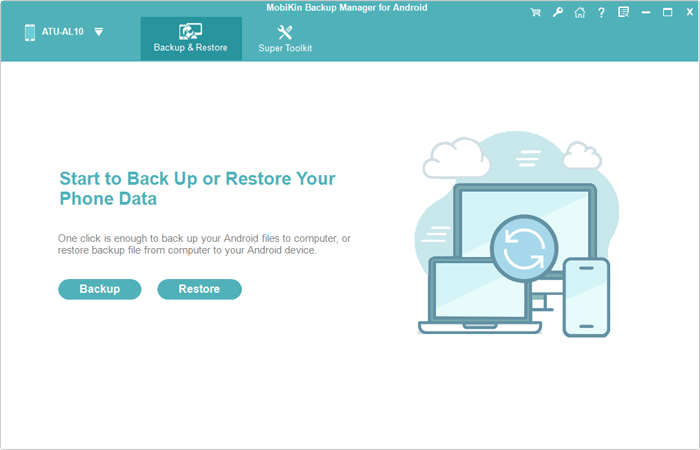
How do I back up and restore my ASUS ZenFone 12/11/10/9/8/7/6/5/4/3/2?
Step 1: Have your ASUS recognized by the tool
Install the downloaded Backup and Restore software on computer before you open it. Plug the USB cable that came with ZenFone into the device and the PC. You now need to enable USB debugging on ASUS, and soon you'll get the main interface.
Step 2: Choose data for backup
Tap the "Backup" option from the window to commence. Then the next page will list various file types for you. Just tick on any of them you are in need of for backup.
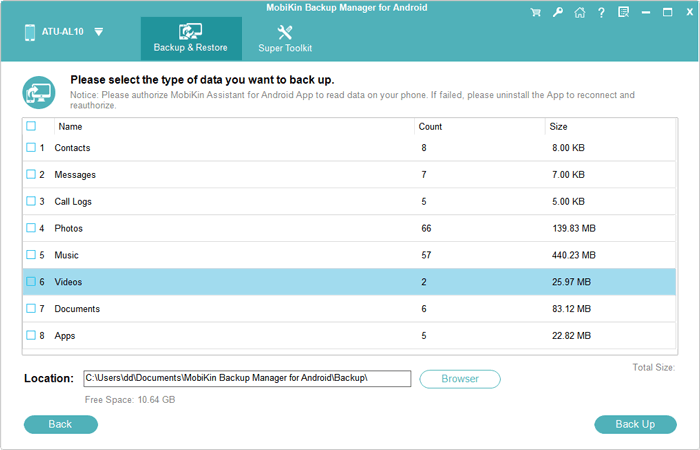
Step 3. Back up ASUS device to computer
Ensure that you've chosen what you need. Next, locate an output directory to put them in by tapping the "Browser" option. After that, press the "Back Up" button at the lower right to get the backup task started.
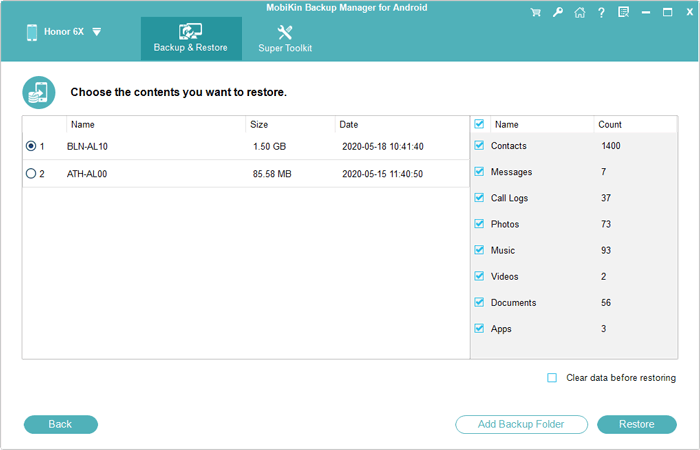
Step 4. Restore backup files as you like
It's also easy to get the backup back whenever you want. Just click "Restore" from the main interface, and choose what you want to fetch from the backup records. Then tap "Restore" again to move them from computer to ASUS ZenFone.
To fulfill the backup, please don't unplug the USB cable until you are prompted that the procedure is done.
Method 2: How to Back Up and Restore ASUS with Google Account
To back up and restore ASUS contacts, calendar, app data, etc. with Google account, you should find and turn on the related button for automatic backup on Google. And after the phone backup to Google Drive completes, you can also enable the automatic restore option to regain the latest backup content. Again, it is easy to choose different Google accounts before you sync ASUS.
How can I back up ASUS and restore it with Google account?
Step 1. Unlock your ASUS mobile and ensure the WiFi feature is enabled. Then go to "Settings" > "Backup & reset" > "Backup my data". Now, ensure that the "Backup my data" button is turned on to sync the data via Google account.
Note: Now, make sure the desired Google account is displayed in the Backup account section. Here, you can also choose the preferable account to log in for an instant backup.
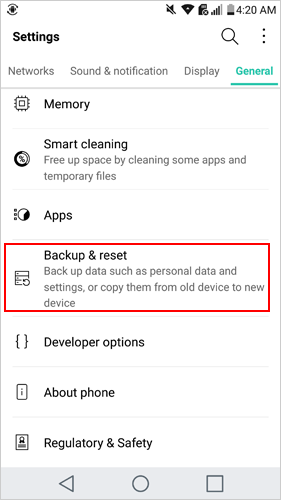
Step 2. To restore ASUS from your Google account, just go to "Settings" > "Backup & reset" to find the "Automatic restore" switch. Now turn it on, and your previous backup will be restored to your ASUS phone later on.
More Related:
- Photos Recovery for ASUS ZenFone Mobile Phones
- How to Transfer Files from Mac to Android Phone in 6 Trouble-free Ways
Method 3: How to Back Up ASUS ZenFone and Restore It Using ASUS Backup App
Currently, ASUS Backup app is only available for ASUS ZenFone series. And a password must be set for the backup files of some models. After backing up call logs, calendar, browser data, etc. with it. You can access the default path of backup files: sdcard/ASUS/ASUSBackup, if you haven't inserted the microSD card yet. Otherwise, the path is: /storage/MicroSD/ASUSBackup.
Let's see how to back up ASUS ZenFone and restore it with the ASUS Backup app:
Step 1. Open ASUS Backup. If you are using it for the first time, please read the license agreement and click "Confirm". Then click "Backup" from its main screen to preview your ASUS data on the list.
Step 2. Scroll down the list to select backup items by ticking the box(es) on the left of the related file type(s). After that, tap "Start backup" to proceed.
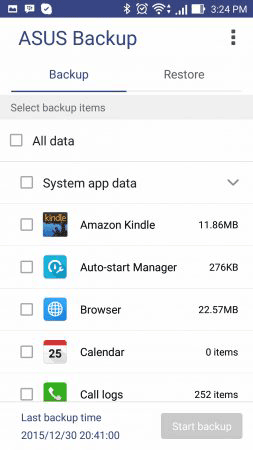
Step 3. Open the ASUS Backup app on your ZenFone. Click on the "Restore" section from the top menu. Then check and select the backup files, and press "Start restore" from the bottom right to regain the last backup.

Method 4: How to Carry out ASUS ZenFone Backup and Restore with a USB Cable Only (Media Files)
With an impressive low-light camera, ASUS ZenFone may store a number of media files inside it. It is a straightforward way to back up the data to the PC via a USB cable. Prior to the task, you have to set the connection mode before processing the files by copying and pasting.
Make ASUS ZenFone backup and restore with USB cable only:
Step 1. Ensure that you have connected ASUS ZenFone to computer using a USB cable. Then slide down the notification tray to choose "Use USB for"/"Connect USB as" media (MTP).
Step 2. Now your computer will identify ASUS ZenFone. Then go to "This PC"/"My Computer" to double-click the icon of your phone, and open the DCIM folder on computer. Subsequently, copy your desired files and paste them on any location of computer.
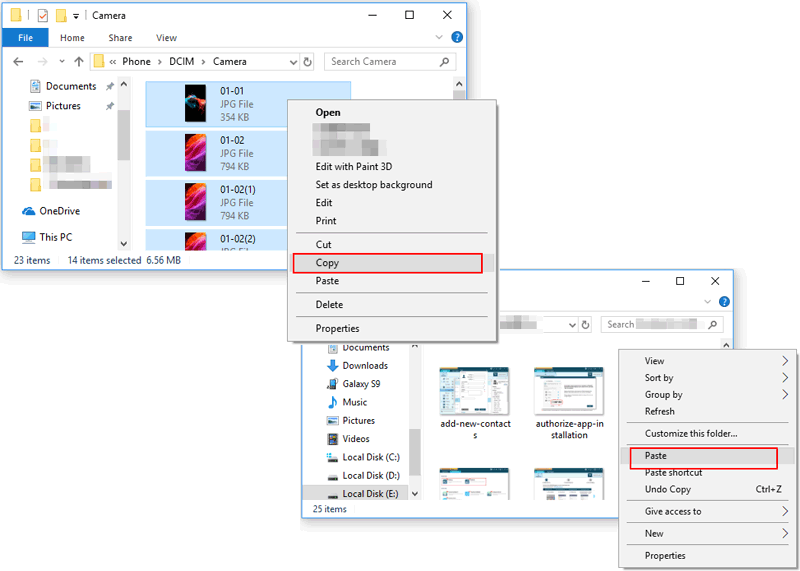
Step 3. After the completion of the transfer, you can open the folder to check your ASUS media files on computer, and drag and drop your wanted files to the related location of your ZenFone whenever needed.
See If You Need:
Method 5: How to Back Up and Restore ASUS ZenFone Using SD Card (Contacts Only)
The contacts app of ASUS ZenFone gets you the ability to back up contacts to the SD card. And it's also convenient for you to get them back from the memory card backup. The filename of exported file shows you where the exported data is.
How do I perform ASUS backup and restore using SD card:
Step 1. Open the "Contacts" app on your ASUS ZenFone, and choose "Manage contacts" from the menu. Then go for "Import/Export" > "Export to SD card" to copy your contacts to the memory card as a vCard file.
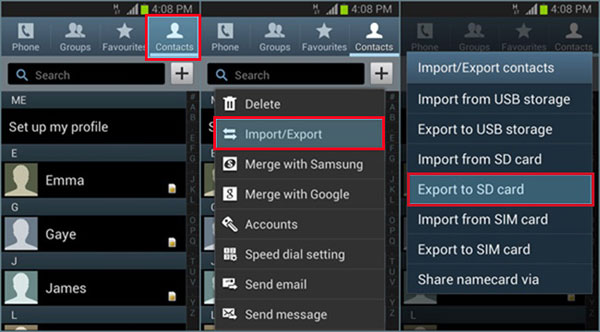
Step 2. Simply go to "Contacts" > "Import/Export" > "Import from SD card", and find the vCard file you've migrated to the memory card. Then choose the contacts you need, and confirm the actions to restore contacts to ASUS ZenFone.
The Bottom Line
That's all there is to make ASUS backup and restore. Having a cheap and cheerful ZenFone with excellent performance at hand, you possibly have vital phone data, especially from the ASUS camera with saving the best moment in daily activity.
Plus, although ASUS phone delivers first-class post-sales service, it is mainly reflected in mobile hardware maintenance. At this point, it is also necessary to pick a backup and restore program to secure all your ASUS data. Well, as you can see, MobiKin Backup Manager for Android is a clever method to go for.
At last, if you have any queries, please leave them in the comment area. And we'll help in the best possible manner.
Related Articles:
WiFi File Transfer for PC to PC, PC to Mobile, & Android to PC [5 Means]
How to Back up and Restore iPhone without iTunes: 2 Efficient Methods
6 Clever Tactics to Transfer Data from One Phone to Another
[Top 11 Lists] Want the Best Android Data Recovery Software? See Here!