4 Tested Methods to Sync Microsoft Outlook Calendar with Android
"I'm on Android 15, and it seems I can't add an O365 account in Android settings. How can I sync the O365 calendar with Android?" -- from Reddit
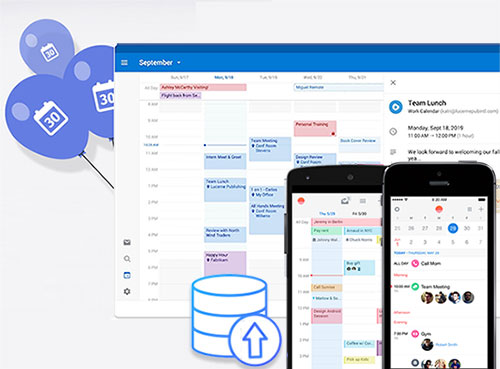
Microsoft Outlook Calendar is one of the most popular digital calendars, helping you plan events, track deadlines, get reminders, and avoid conflicts. It offers features like event scheduling, meeting management, calendar sharing, group schedules, and SharePoint integration, making it a great choice for Android users.
If you're wondering how to sync Outlook Calendar with your Android phone, this guide will walk you through the methods. (iPhone users can check this post - how to sync Outlook calendars with iPhone?)
- Part 1: How to Sync Outlook Calendar with Android via Outlook Android App
- Part 2: How to Sync Outlook Calendar with Android Phone via Settings
- Part 3: How to Sync Outlook Calendars with Android via Gmail
- Part 4: How to Sync Outlook Calendar to Android via Outlock-Android Sync
- Bonus: How to Sync Outlook Contacts with Android via Assistant for Android
Part 1: How to Sync Outlook Calendar with Android via Outlook Android App
One of the best and easiest ways to sync Outlook calendars with Android is by using the Outlook Android app. Microsoft Outlook Android app is equipped with a wide array of features, including Outlook calendars that you can sync with your Android phone. Below is a step-by-step process on how to sync the Outlook calendar with Android via the Outlook Android app:
- Open the Google Play Store on your Android phone and search for the Outlook app.
- Install the app on your Android phone.
- Open the app and log in to the account using your Microsoft account details.
- The app will automatically sync your email.
- Click the home icon located in the top left corner.
- Tap the "Settings" icon located in the bottom left corner.
- Under your mail account, choose "Outlook".
- Turn on the toggle to sync calendars.
When you go back to the home page, you will be able to use the Outlook calendar to schedule appointments, track deadlines, and more.
You May Need:
Part 2: How to Sync Outlook Calendar with Android Phone via Settings
Another easy way to sync the Outlook calendar with Android is through your phone settings. Below is a step-by-step process on how to go about it:
- Open "Settings" on your Android phone.
- Choose the "General" tab located in the top right corner.
- In the general tab, select "Accounts".
- Tap on the "Auto-sync accounts" button.
- When prompted to allow the auto sync feature, click "TURN ON".
- Open the Outlook app. If you have not downloaded the app, go to the Google Play Store, download, and install the app.
- Tap the office icon in the app.
- Click the Settings - "Gear" icon.
- Choose the account that you want to sync.
- Tap the sync calendar button before toggling "sync calendars" to complete the process.
Part 3: How to Sync Outlook Calendars with Android via Gmail
Gmail is an email service that usually comes pre-installed on all Android phones. If you usually use Gmail to manage your emails, then you can sync it with your Outlook calendar to make it easy to schedule and track your appointments.
Although it is not possible to set up automatic syncing between Gmail and Outlook, it is possible to export your calendar from Outlook and then import it to your Gmail. Below is a step-by-step process on how to go about it.
- Open Outlook on your computer.
- Click "File", tap Open and export and go to "Import/Export".
- Select export to a file, then tap "next".
- Choose "Comma separated values" (CSV).
- On the "Export to a file" window, choose the calendar folder under the account you wish to export the calendar from, then click "Next".
- Name the export file and hit "ok". Choose a location on your computer where you would like to store your calendar file and click "next".
- Tap finish to export.
Once you save your Outlook calendar on your computer as a CSV file, you can easily import it into an email manager like Gmail. Below is a step-by-step process on how to import your Outlook calendar to your Gmail account.
- Visit https://calendar.google.com/. Sign in if you have not signed in to your Google account.
- Click my calendar> other calendars> import.
- Choose "select file" from your computer, select your exported Outlook calendar CSV file, and click "open".
- Click "Import" to start importing your Outlook calendar to your Google account.
Once you have synced your Google account with your Outlook calendar, you can then save the calendar to your Android phone. Below is a step-by-step process on how to go about it.
- Open "Settings" from your Android phone and choose "Accounts".
- Click "Google account" that you have just imported your Outlook calendar to.
- Tap "Sync Calendar" for this account to complete the process.
Read Also: Sync iCloud Calendar with Outlook: A Step-by-Step Guide in 2025
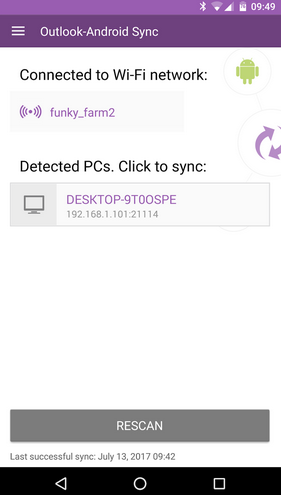
Part 4: How to Sync Outlook Calendar to Android via Outlock-Android Sync
Requirements:
- Microsoft Outlook installed on PC (2000–2021, Office 365 desktop version supported).
- Windows PC with administrative rights to install software.
- Outlook-Android Sync app installed on both PC and Android device.
- Sufficient storage on both PC and Android to handle calendar data.
- Permissions enabled on Android (calendar access, contacts if needed).
Here's how to sync Outlook Calenders to Android devices using Outlook-Android Sync:
- Download & Install Outlook-Android Sync on both your PC (with Outlook) and your Android device.
- Connect Devices via USB, Wi-Fi, or Bluetooth (depending on the sync option you prefer).
- Launch the Program on both PC and Android to establish a connection.
- Select Sync Direction - choose whether to sync Outlook to Android, Android to Outlook, or two-way sync.
- Configure Calendar Settings - pick specific Outlook calendar folders you want to sync.
- Start Sync Process - click the sync button and wait for the data transfer.
- Verify on Android - open your Calendar app to confirm the events appear correctly.
Bonus: How to Sync Outlook Contacts with Android via Assistant for Android
An easy and quick way to sync the Outlook contacts with your Android phone is by using a reputable third-party tool like MobiKin Assistant for Android. As its name suggests, this tool is an Android data manager that allows you to manage your Android data with ease.
This software can do a wide variety of tasks, including backing up your videos, photos, music, call logs, apps, and more from your computer to Android and vice versa. It is also the best software to use if you want to transfer contacts from your Microsoft Outlook to your Android phone.
Key Features of MobiKin Assistant for Android:
- Sync Outlook contacts to Android with one click.
- Back up and restore data between PC and Android.
- Export contacts to Outlook, CSV, HTML, XML, VCF, and BAK; import from Outlook, backups, and VCF.
- Manage Android data on PC (calls, photos, videos, messages, contacts, audio, apps).
- Ensure no data loss during management and transfer.
- Supports nearly all models of Android devices, including those with the latest Android 16.


Step-by-step process on how to sync Outlook contacts with Android via MobiKin Assistant for Android:
Step 1. Download and install MobiKin Assistant for Android on your computer. Connect your Android phone to your computer using a USB cable and ensure that it is allowed to access data.
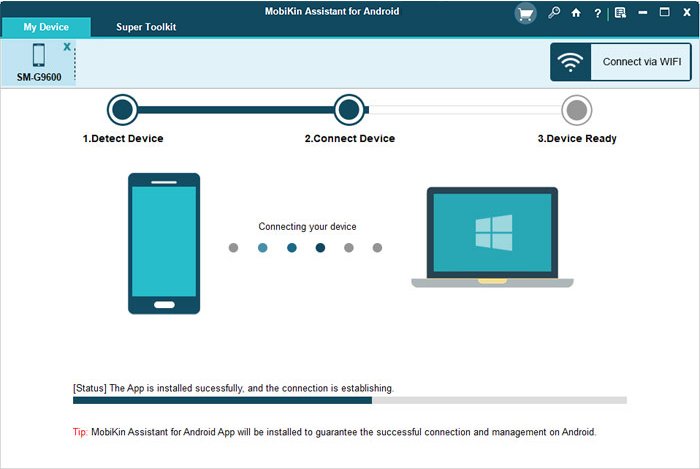
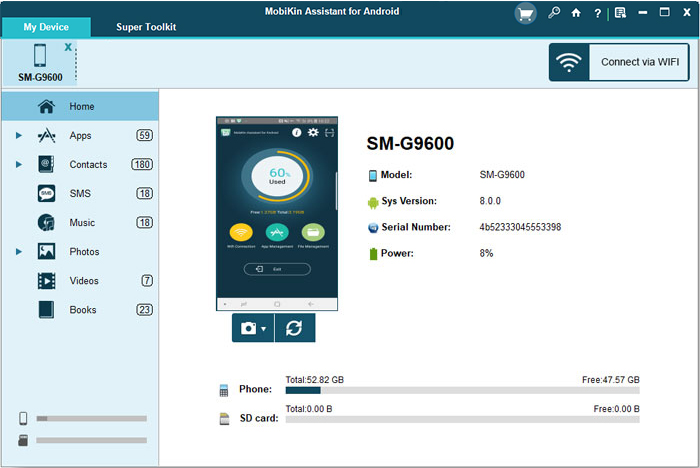
Step 2. The program interface will pop up if the connection is successful. All files that this software can manage are displayed on the left sidebar. Choose "Contacts", and this software will then automatically start to scan for all your contacts and display them.
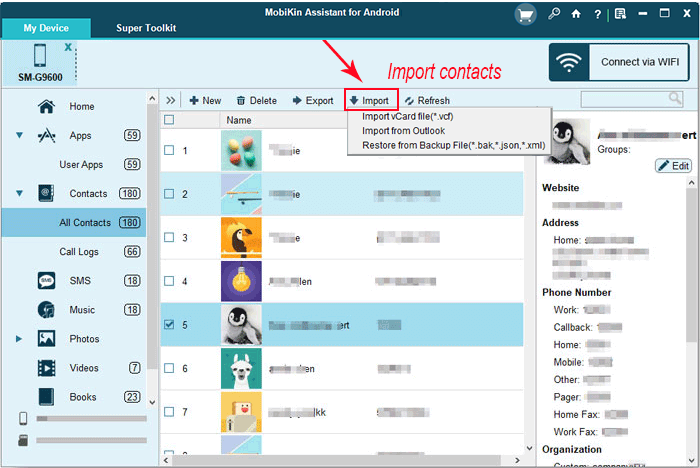
Step 3. The final process is to import the Outlook contacts to your Android device. All you need to do is select the "Import" button and then choose "Import from Outlook". Log in to your Outlook account to import Outlook contacts to your Android device.
Final Thoughts
We hope that the information given above has been informative. As described above, syncing the Outlook calendar with your Android device is an easy process. You only need to follow the simple tips given above. We particularly recommend the use of MobiKin Assistant for Android for syncing Outlook contacts with Android because it is simple and straightforward.
Related Articles:
How to Back Up Calendar on Android Phone? Most People Don't Know
[5 Methods] How to Restore Calendar Events on Android Phone
How to Transfer Calendar from iPhone to Mac in 3 Simple Ways?
3 Flexible Ways to Transfer Calendar from Android to iPhone 16/15/14/13/12/11/X